
Get the lowdown on three further techniques: ✅ Set up a Dual Boot Windows 10 System and Ubuntu
How To Dual Boot Windows 10 and Ubuntu
I’ll go through how to install the latest “Ubuntu 20.04 LTS the desktop edition” and dual boot it alongside Windows 10. I am using my Windows 10 computer, where I want to install Ubuntu Desktop alongside it. This article teaches step-by-step instructions to install “dual boot Windows 10 and Ubuntu”.
Step 1: Shrink Partition For Second Operating System (For Ubuntu)
1. You need to go to the search bar. just typing in “disk [space] management”.
2. You can see a “Create and format hard disk partitions” option. Select this option and launch the application. Using this application, we will make room for the Ubuntu desktop here on our current disk with Windows installed.
Primarily, we just need to focus on the C drive here. Don’t touch anything else; otherwise, you can cause system issues.
NOTE: Also, I need to mention that before continuing, I highly recommend making backups of all your data. If you haven’t already, there’s always a potential to mess up while installing an operating system, and you wouldn’t want to lose all your data.

3. I have the C drive here. It has about 64 gigabytes (See the picture). This is the portion of the storage disk that I need to shrink to be able to install the Ubuntu desktop. so you need to right-click on it and select the “Shrink Volume” option

4. I’m given the maximum amount of space that I can go ahead and shrink the current storage. So, I’ll go ahead and specify a little less here. I’m going to give about 32 gigabytes for the Ubuntu system, so I’m given 32000 values, and that represents 32 gigabytes in megabytes.
5. Next, click on the “Shrink” option. This will give us some unallocated space here at the end. We got about 32 gigs of that unallocated space here now.
Step 2: Download the Ubuntu Operating System
- Go to the ubuntu.com website. This is where I’m going to download the Ubuntu OS desktop. So go ahead and click on the Download dropdown option. Here, we can see that it’s currently the 20.04 long-term support edition.

NOTE: I am going to the 64-bit computer. So make sure that the processor on your computer where you’re installing it is 64 bits.
2. Go and Click on the green button. Please wait until it finishes downloading.
Step 3: Make Your USB Drive Bootable (Flash Our Ubuntu Install ISO)
1. I need to go and open the belenaEtcher app. Please go to the official website, download it, and then install it. Using this app, we will flash the OS images onto a USB, CD, or DVD.
2. Go to the search box and just search for belenaEtcher. Click and Open it. BelenaEtcher is an easy-to-use application available for Windows, Mac, and Linux.
You can also use any other application to create a bootable drive, such as unetbootin or Rufus.
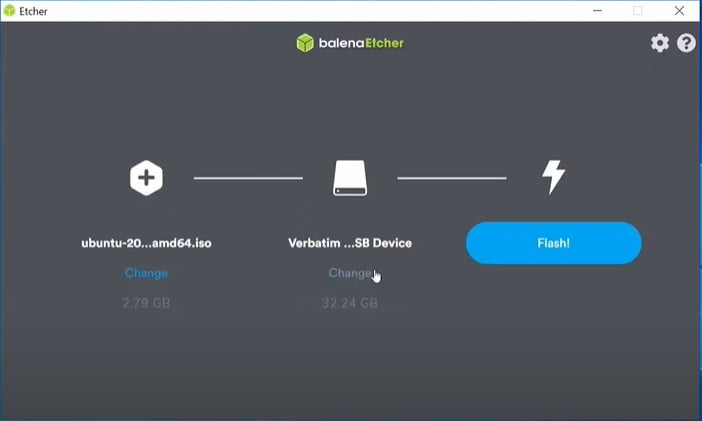
3. Now, we need to select the ISO image file that I just downloaded. So, Click on the “Select Image” blue button and browse to the “ubuntu 20.04.1-desktop-amd64bit” file. Then click on the Open option.
4. Next, You need to select the drive. Click on the blue “Select Drive” option to select a drive where I want to flash the image.
Here, I already have a USB selected. But you might have more than one USB CD or DVD, so choose the proper one because all the data will be erased, too. Ok, Go and flash the iso onto it.
5. Finally, click on the Flash button. And you’ll be asked for administrative privileges. Just click on Yes. And the flash will now start.
This will take a few moments. Then, we’ll be ready to finish the installation process. Alright, and once things are done flashing, you can exit now.
Step 4: Boot Into Bios And Set Boot Priority Order
There are two ways to do that.
Method 1,
Since I’m on the computer, I must install dual boot Windows 10 and Ubuntu.
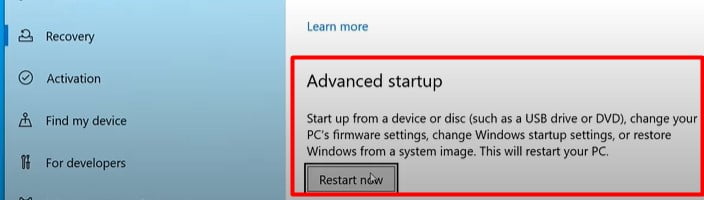
- Go to the Start menu > Search Box. Search for something called a boot menu. Click on the result called “Change advanced startup options.”
- If you click on this, it’ll open a window where you can select the “Restart now” option before startup. Here, you can select the USB, CD, or DVD you just finished creating, which has the Ubuntu desktop installer. The system will then restart into the installer.
Method 2,
- Make sure to insert the USB, CD, or DVD into the computer where you resize the storage.
- You must restart that computer and boot into bios to set your boot order device.
2. While I’m first booting up on my computer, there’s a screen that tells me to either press F2 or Delete to get to my bios. Keep pressing the bios key until you get into bios.
(See the picture) I successfully got into my bios. You can see the screenshot here, where it shows me that I have UEFI bios.
NOTE: The key to getting into your bios might be something different. but we’re looking for a screen similar to this. Now, mine’s a newer-based Uefi bio. So I can use my mouse here.

2. I must go to the Advanced mode in my bios by pressing the F7 key.
3. Now. You need to find the option called Boot or Boot order. This will allow us to change the order around what devices get booted and in what order.
We’re looking for boot option number one to make sure that this is selected as the same USB, CD, or DVD that I had just finished flashing.
4. In my case, it’s the 32-gigabyte verbatim store. And I need to select this. Now You can see that my boot order option number 1 is the UEFI USB that I just flashed my Ubuntu Linux image onto.
IMPORTANT: One thing: You need to make sure that secure boot and fast boot are turned off on my computer. So, for my case, I select an os type which automatically turns off secure boot. But you’ll want to turn this off because otherwise, your computer may start Windows instead of other operating systems.
5. Once you are done. You need to exit, save all changes, and restart the computer.
Step 5: Install Ubuntu Linux
Congratulations! If you have this Interface. You’re officially in the installer for Ubuntu-desktop to set it up alongside a Windows 10 platform.
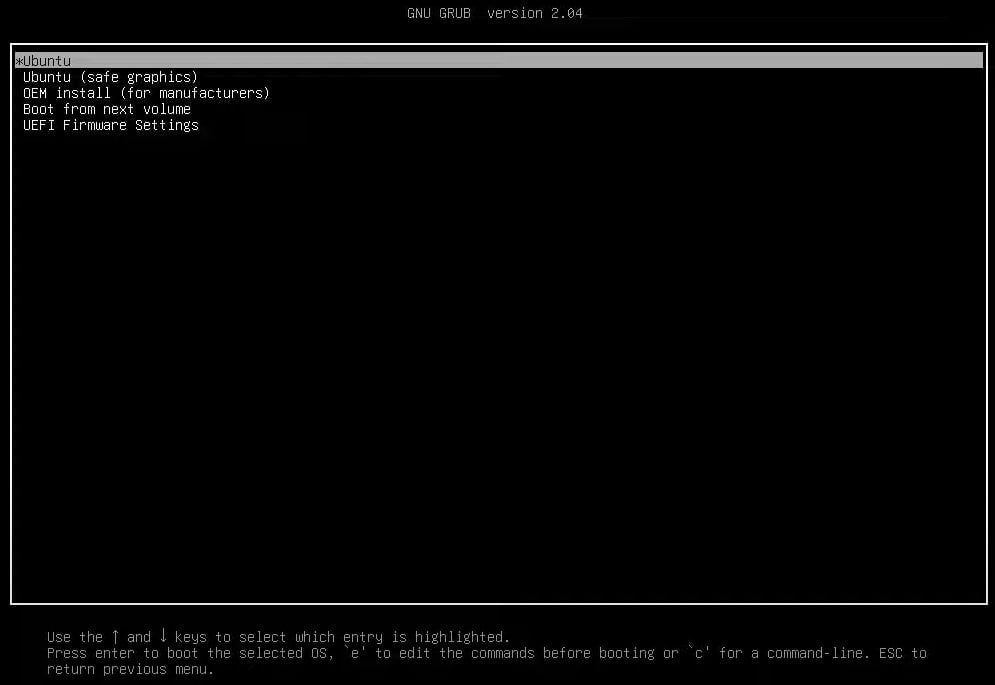
1. The option you need to select is the Ubuntu option. Suppose you have any problems with getting your graphics to load. You can select the Ubuntu (safe graphics) option as well. But I’m going to choose the first option, “Ubuntu.”
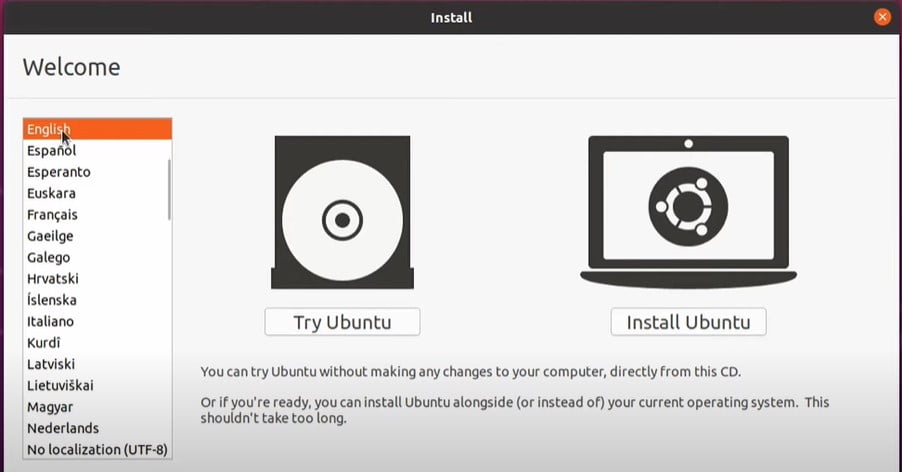
2. Once all things are loaded up. You can see a Welcome screen by the Ubuntu installer where you can select the Language you want to use. I will choose English Default and click the Install Ubuntu button.
3. In the next window, you can select your keyboard layout. The default English (US) is fine for me. You can test your keyboard in the input box by typing something. Otherwise, you can detect the keyboard layout automatically once you’re finished here. You need to click on Continue.
4. In the next window, you can see a few options on what type of install you want. You can go with the Normal installation as it only comes with a web browser and basic utilities.
Also, you get a few extra things with a normal installation. Office software, games, and media players. I will select “Normal installation.”
Other options help you install proprietary software for graphics and/or for Wi-Fi hardware. So, if you need something requiring additional drivers, select the checkbox and press Continue.
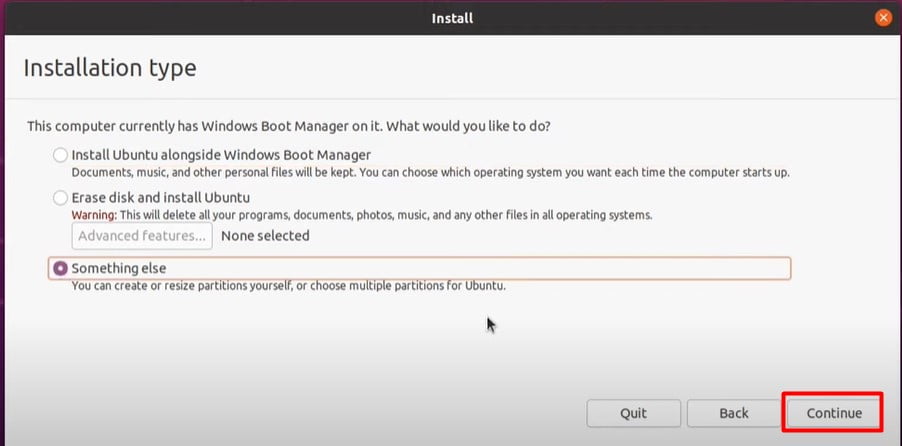
5. Next, You are being asked what type of installation type. Do you want to go through :
- Erase the disk and install Ubuntu only.
- Install Ubuntu alongside Windows Boot Manager. ( it detected that the Windows boot manager is on the same storage disk. Therefore, it’s asking us if you want to install Ubuntu alongside Windows)
- You can select the 2nd option. But we want to install Ubuntu in a separate storage space. So, I must choose the “Something else” option and press “Continue.”
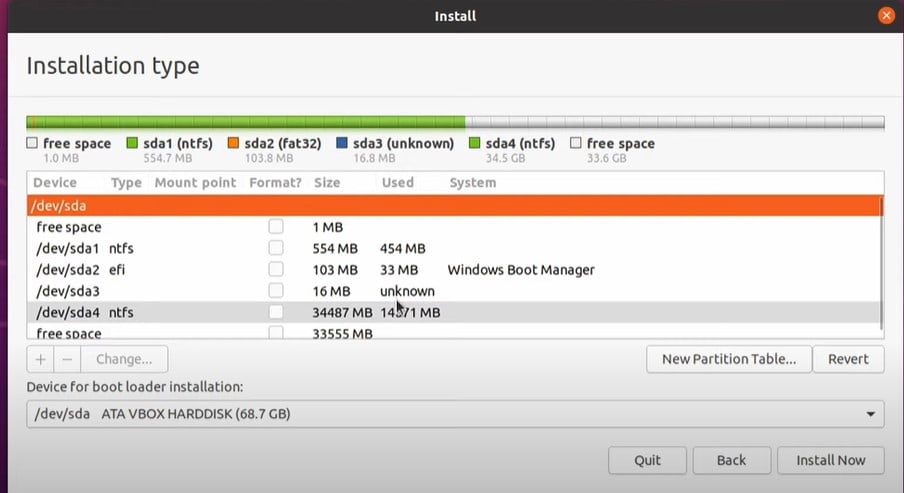
6. In the next window, you can see your partitions as well as the disk. dev/sda is the main disk.
See the above picture. It shows me that I have a few partitions there. sda1, sda2, sda3, and sda4 and then last free space. Well, You need to install Ubuntu on the free space partition. (This space I created above in the Shrink Partition Section.)
7. Double-click on the free space partition. It will open a pop-up window. You need to configure a few important settings to install dual boot Windows 10 and Ubuntu.
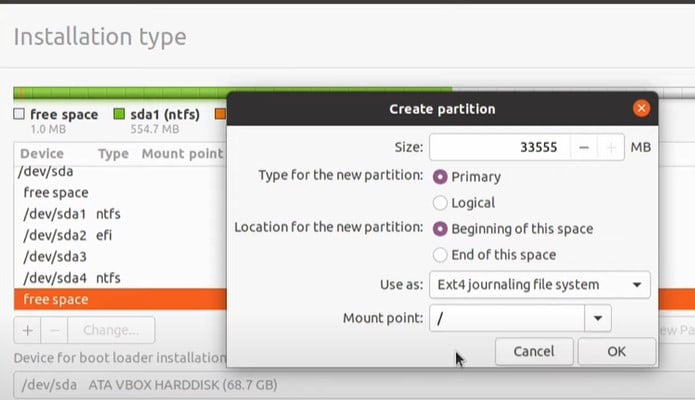
- a. Size: Leave it as it is. You can change it if you want.
- b. Type for the new partition: Select “Primary.”
- c. Location for the new partition: Select “Beginning of the space.”
- d. Use as Select “Ext4 journaling file system.”
- e. Mount Point: Select “forward slash [/]” (Since this is my root file partition)
- f. Click on “OK.” Wait for a moment and then see at the top. You’ll see a new, updated scheme for the disk. For my case, it’s sda5 (ext4) formatted.

- g. Next important thing you need to change is make sure that you select the proper partition for the “Device for boot loader installation.” In my case, it’s sda2.

It says, here is the Windows boot manager, and that’s where the boot manager for Windows is and where I’d like to install the Ubuntu boot manager.
NOTE: Please double-check if your Windows boot manager location is correct.
7. Check again and confirm that everything seems correct to you. Now you can click the Install Now option.
8. Next, it will ask you about writing all the changes to the disk. I want to notify you that it’s just going to overwrite anything located in those partitions that we specified. Well, I know I set the correct partitions. So, I’m going to click on Continue.
9. Next, It will be for our time zone. So please select your time zone. I’m in Los Angeles. And Click on Continue.

10. On the next screen, you need to put in your name. Your computer’s name. Then, it asks you for a username. Make sure you put a username and remember it.
Then, you need to type the password for that username and confirm that password.
After that, you can select the log in automatically option or require my password to log in.
I suggest doing the second one. If you select to log in automatically, Someone can get into your system without having to put in a password.
Next, Click on Continue.
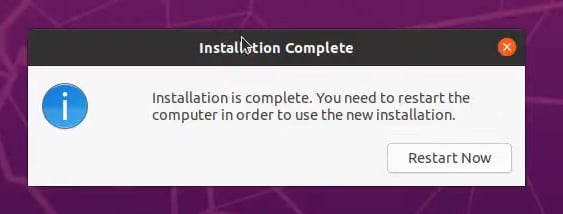
11. At this point, Ubuntu has started to install. This might take a few moments to install completely. You’ll get the installation complete dialog box where it says you can restart your computer. Click on Restart.
12. Now, It says, You can remove the installation media from your computer, the USB, CD, or DVD, that you flashed; after you’ve done this, you can press enter and reboot into your newly installed dual boot Windows 10 and Ubuntu system.
13. Once you are back after restarting. The Grub bootloader welcomes you with a few entries. Now, it can timeout by itself and automatically select Ubuntu.

Suppose you didn’t catch it. Don’t worry; you can restart your computer to get back to this. Just make sure you hit a key in order to stop the timeout. And now I have two options here: ubuntu and the Windows boot manager option.
First, I will suggest going to the windows boot manager option to check and make sure that my windows side is still working properly.
Now, Restart your system again in order to check the Ubuntu side of things all right. Now you successfully installed dual boot windows 10 and ubuntu. Enjoy it.
Install Dual Boot Windows 10 Pro And Windows 10 Home
Step-by-step instructions to dual boot Windows 10 system home and pro. The part is separated into five stages. Please follow my steps to install two operating systems on one laptop or computer.
Step 1: Download Rufus

You have to download Rufus from their official website (Click Here).’
Step 2: Download Windows 10 ISO File
After that, you have to download the Windows ISO file. You can download it from microsoft.com.
Trending: How To Clean Install Windows 11 Official | Windows 11 ISO Download
Step 3: Format your USB drive.
Go to the window 10 search box and type cmd. It will show the command prompt. Click to open it.
Type the following commands to format:
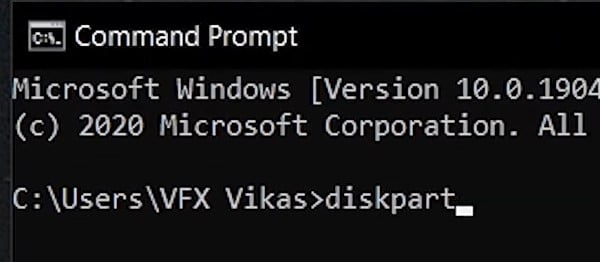
1st, Type the command “diskpart” and hit Enter. It will show a new command prompt window, which is called Diskpart.exe (See the picture).
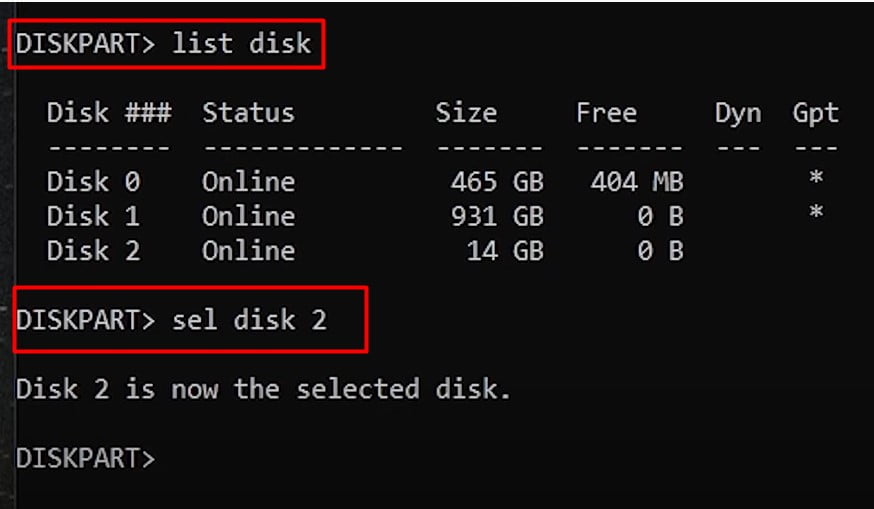
2nd, On the diskpart.exe command window, type the command “list disk” and hit Enter. This command will show you a list of your system disk.
3rd, Next, you have to select the disk that you want to format. Just type “sel” and your disk number. Then hit Enter. (For Example: sel disk 2) [This is the External Drive] This command will show you that your disk is selected.
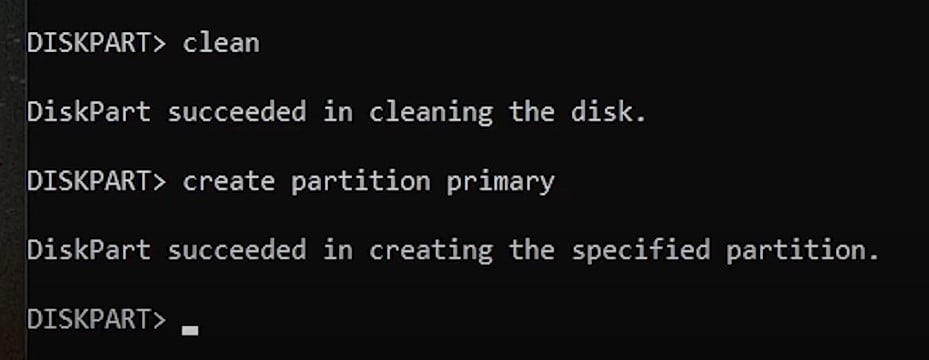
4th, Just type the command “clean” and hit enter. It will show you the success message.
5th, After that, type the command “create partition primary” and hit Enter.
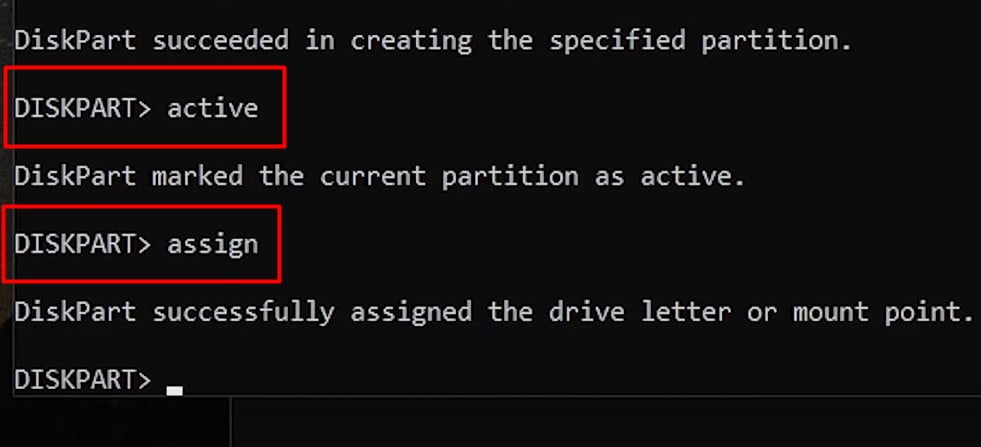
6th, Next, type the command “active” and Press Enter.
8th, Now Type the command “assign.” And Press Enter.
This command will show the message “Disk part successfully assigned the drive letter or mount point.”
Read More: How To Upgrade Windows 10 To Windows 11 Without Losing Data
Format USB
Now, you have to format your external USB drive.
First, connect your external USB drive to your computer.
2nd, Open This PC. Right-click on the USB drive, and then a contextual menu will open. Select the Format option from the menu.
3rd, Then a format pop-up window will open. Click on Start. Wait until it is completed. and then click on OK.
Step 4: Make Your USB Bootable
1st, Double-click to open the Rufus program. Press Enter to permit User control.

2nd, click on the Select box. Browse your Windows.iso file.
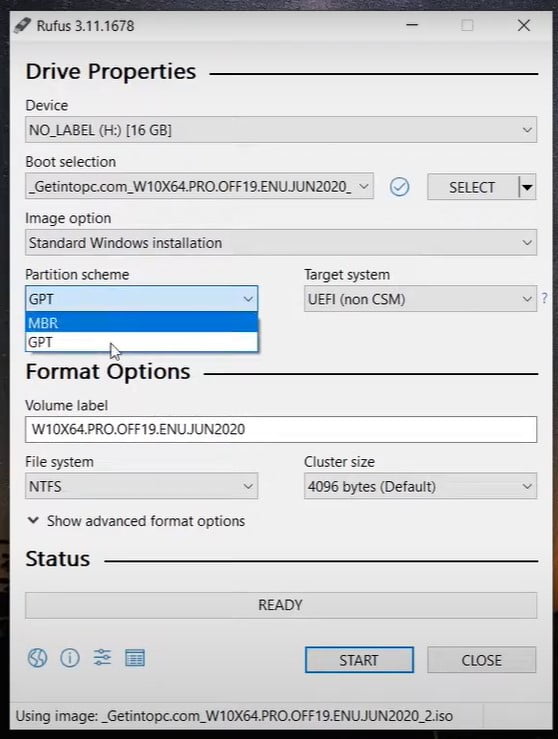
3rd, Click on the Partition Scheme select box. Select the MBR option from the dropdown if you have an MBR partition. Select GPT if you have the GPT partition.
How To check which type of partition you have?
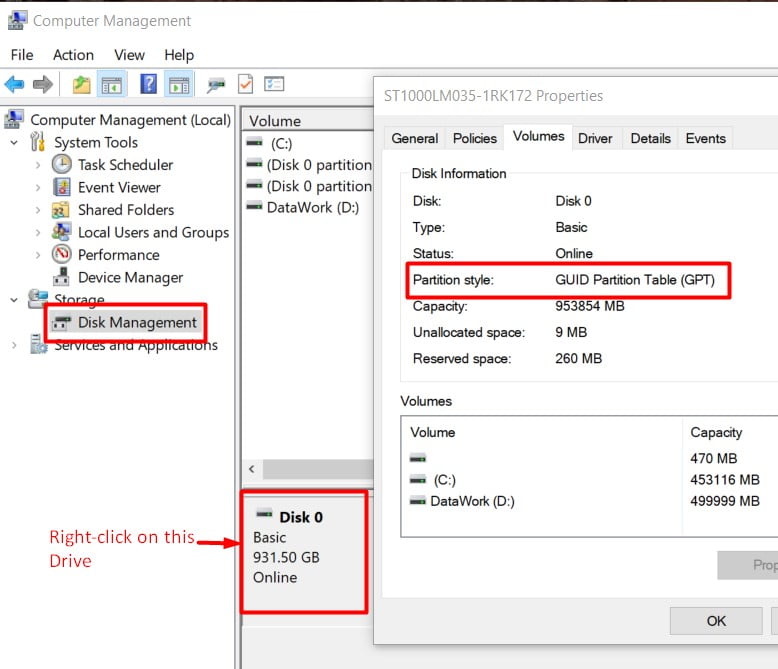
- Right-click on the “This PC” icon. Select the Manage option.
- Open Disk Management and right-click on your drive. And select Properties. Click on Volumes.
- So now I have a GPT partition. So, I need to select GPT.
4th, Click on the Start button and click on OK.
Wait for the ISO file to be copied utterly. Then, close the window and go to the next step.
Step 5: Create Partition for Second System (Space For Dual Boot Windows 10 or Ubuntu)
This is the last step to set up the Dual Boot Windows 10 System successfully.
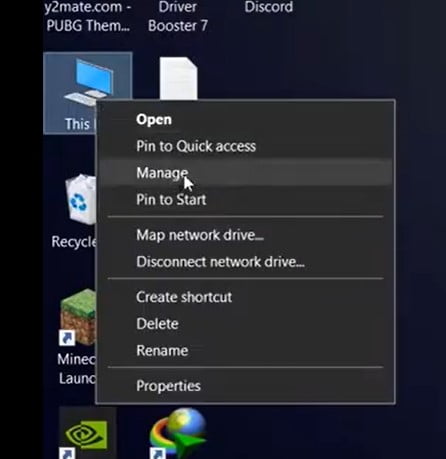
1st, Right-click on the “This PC” option and select the Manage option. It will open the Computer Management window. Select Disk Management.
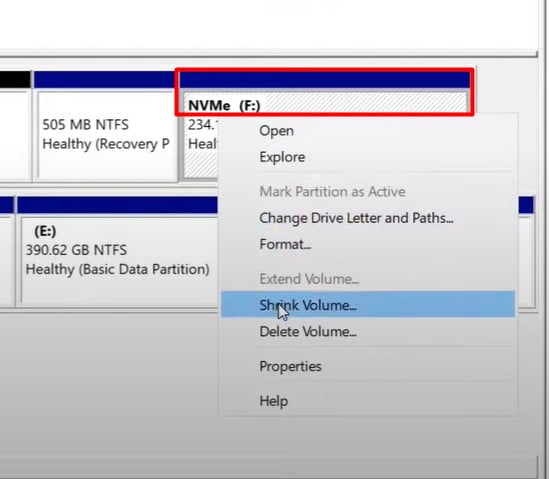
2nd, Next, Right-click on your Drive. Choose Shrink Volume.
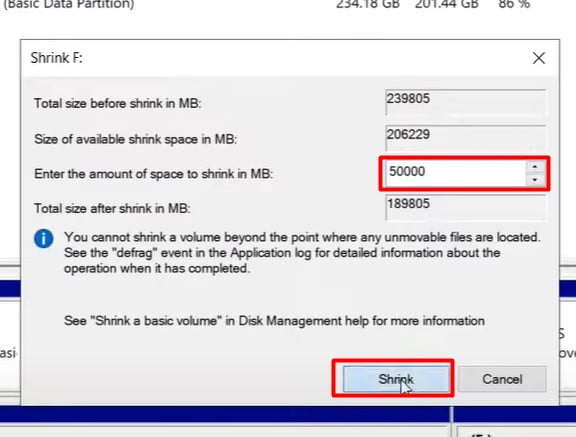
3rd, Next, Shrink the volume according to your space. I am making a 50 GB partition. Click on the Shrink button.
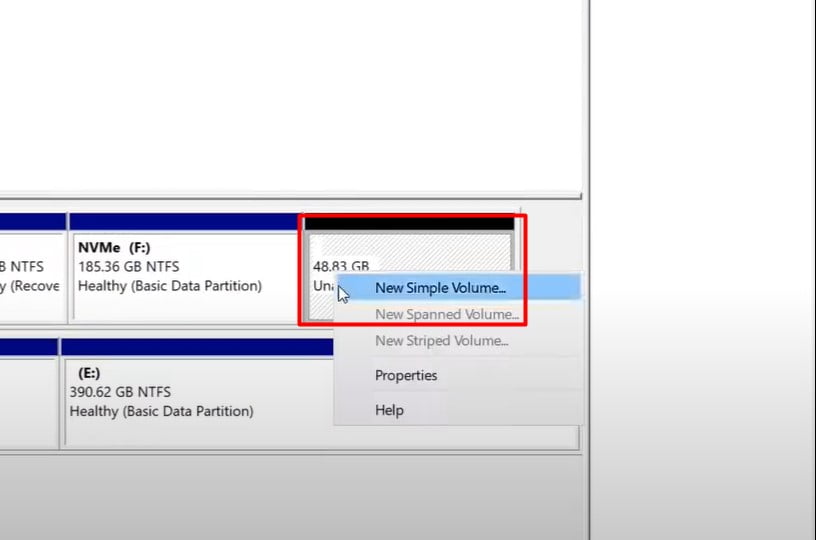
4th, Right-click on an allocated space (The volume you just made). Choose “New Simple Volume.” label it (choose any alphabet), click on Next, and name it “Windows 10 pro or Ubuntu if you want” (Whatever name you want).
5th, After That, click on Next and click on Finish.
NOTE: Before installing Windows, backup all your data in the “C” drive. I have already backed up my C drive data in another Drive.
Read More:
How To Install Windows 11 Official Step By Step
Windows 11 BIOS Settings [Enable UEFI, TPM]
Step 6: Set Down Your Computer and Install Windows 10
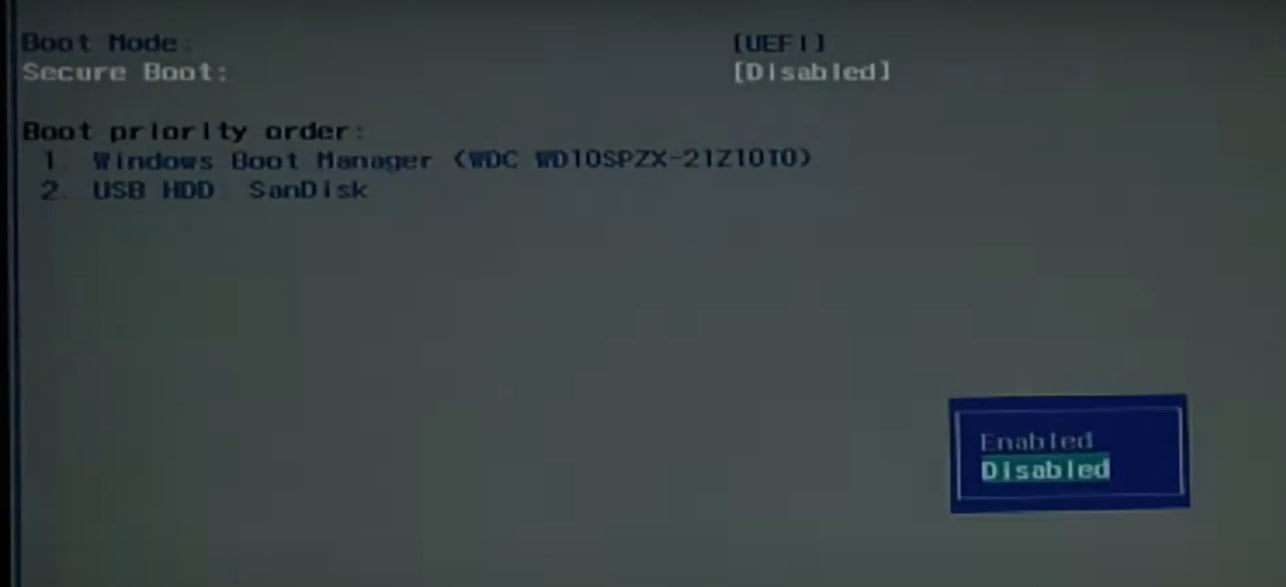
1st, Restart your system. Then press your Bios key, go to the boot menu, and Disable secure boot.
2nd, Next, Press F10. Press the Setup key, and select your USB drive.
NOTE: Your setup key might be different. It will depend on your PC manufacturer company. You can search on Google for it.
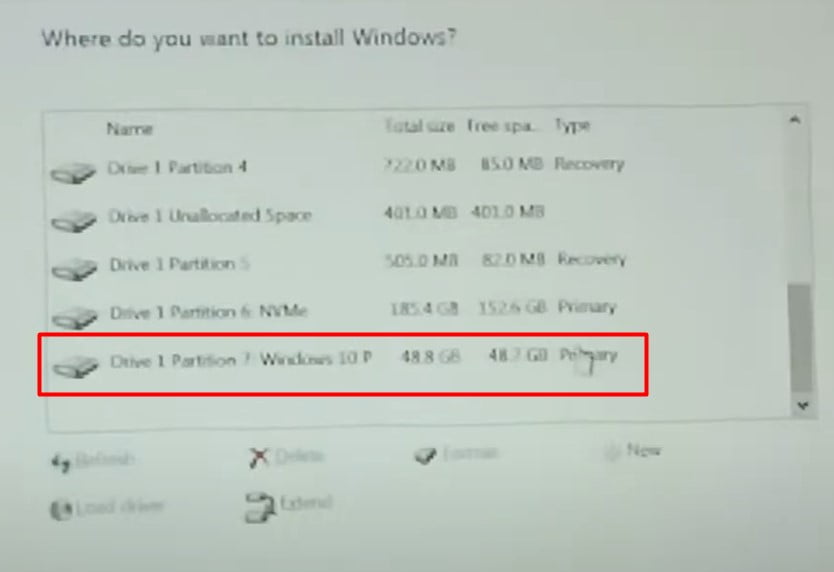
3rd, Click on Install. Now click on “I accept the license terms” and click on Next. Click on Custom Install. And here, find and select your drive. Select Windows 10 Pro Drive. (We named the drive before.)
4th, Click on Next. Now, you can see Windows 10 is installed on your computer in dual boot.
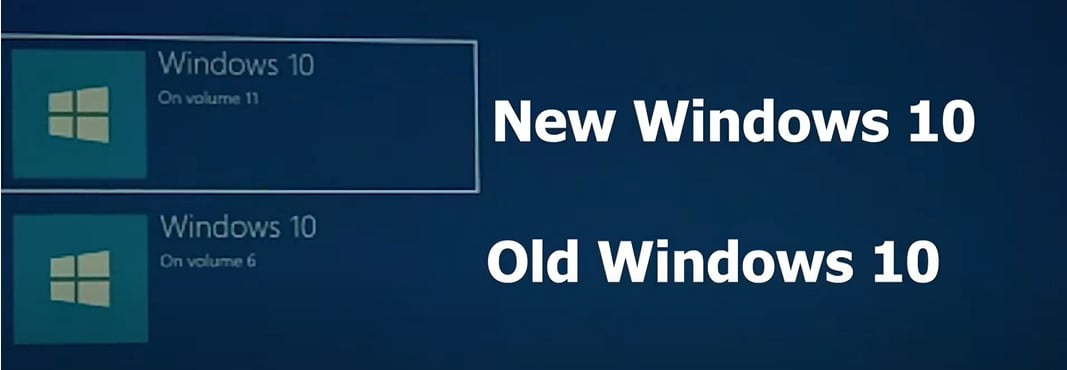
5th, After Installation, you can see a dual Windows 10 screen. Volume 11 is a new window. And Volume 6 is your old window. So select your New Windows 10.
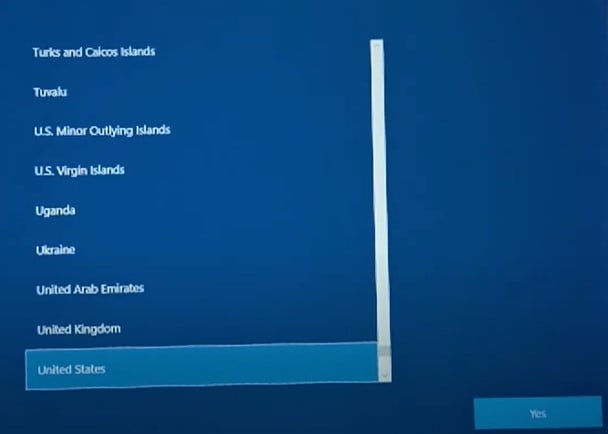
6th, Next, again, choose the operating system that you want to boot. Select your Region > to select the keyboard layout > click on the Skip button.
7th, You can see nothing will be deleted after installing two operating systems on your PC or laptop. We have successfully installed Windows 10 Pro on our PC.
Also, you can “Setup Dual Boot Windows 10 and Ubuntu” when you start your computer. It will ask you which windows you want to boot.
Make Dual Boot Windows 10 System and Ubuntu UsingThird-Party

1. PARTITION HARD DRIVE
You’ll need to partition your drive to free up space on which to store your copy of Windows. The best tool for the job is the AOMEI Partition Assistant (www.aomeitech.com/aomei-partition-assistant. Html).it will solve all bootable issues such as Rebuild MBR.
First, Choose Check Partisan to check and fix bad sectors on the system. (Please check this point before you set up Dual Boot Windows 10 System).
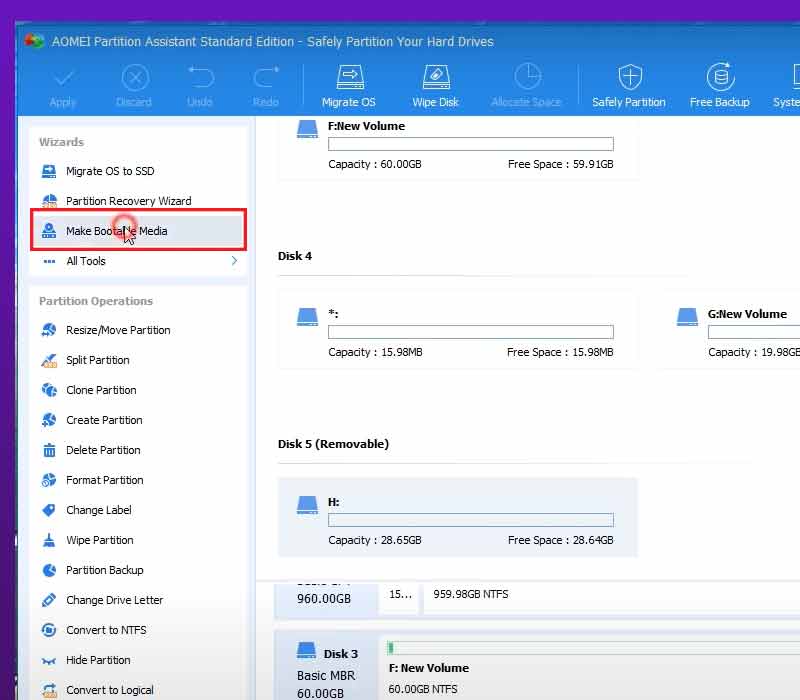
First, Connect your Pendrive to your PC and open AOMEI Partition Assistant. At that point, select the option called Make Bootable Media on the left sidebar.
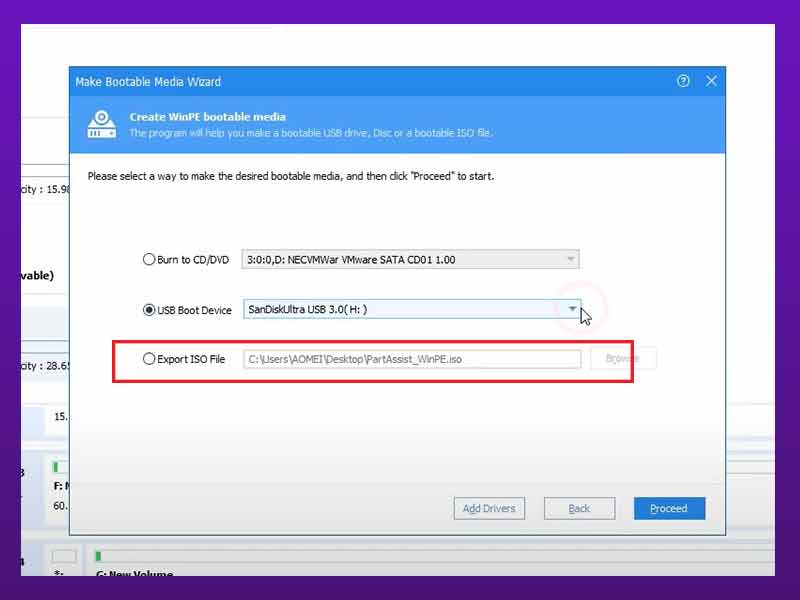
After clicking on the option, a pop-up window will open; click on Next. After that, three options will open in the next pop-up. Select the second option called “USB Boot Device”. and select the connected Drive that you want to make bootable. Start by clicking on the “Proceed Button”.
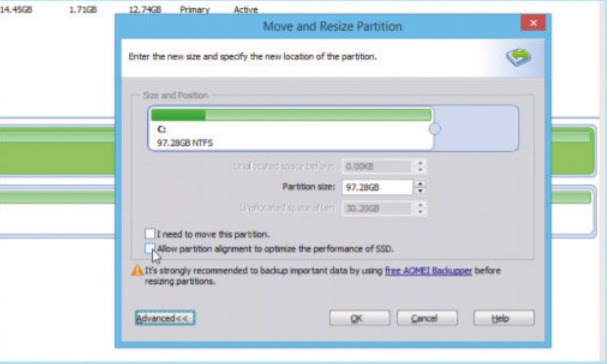
2. SHRINK THE MAIN PARTITION
Select your Windows drive (typically C:) and click Resize/Move Partition under Partition Operations. Use the slider to free up at least 30GB of space to the right of the Windows partition. If your drive is an SSD, click ‘Advanced>>’ and tick ‘Allow partition alignment…’ Click ‘OK’.
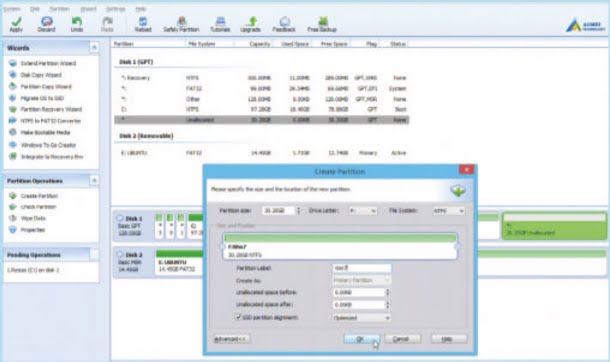
3. ADD A NEW WINDOWS PARTITION
Now select the newly created Unallocated space to the right of drive C and click ‘Create Partition’ under Partition Operations. Verify NTFS is the file system and click ‘Advanced<<’ to give the partition a suitably descriptive label, such as Win7, before clicking OK. Click ‘Apply’ > Proceed and reboot.
Also Read: How To Use Action Center In Windows 10

4. TWEAK UEFI SETTINGS
If installing Windows 7 alongside Windows 8.1 or 10, you may need to reboot into your UEFI (see the main text) to enable the Compatibility Support Module (CSM), plus disable Fast Boot and Secure Boot.
Once done, you should be able to boot successfully from your Windows 7 installation media. Please check this option; otherwise, it could cause problems while setting up dual boot Windows 10 System.
Also Read: How To Reinstall The Latest Windows 10
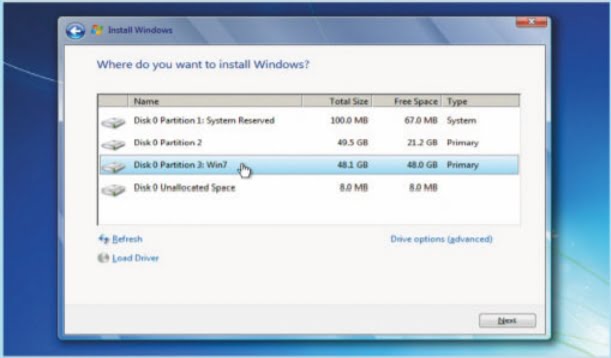
5. INSTALL A NEW COPY OF WINDOWS
Once the new partition has been created (check-in Windows), reboot using the installation media for your target version of Windows. The installation process is almost the same as for a regular Windows installation, but be sure to choose the newly created partition as your target during installation.
Also Read: How To Make The Most Of File Explorer In Windows 10

6. POST-INSTALL STEPS
When Windows reboots for the first time, you’ll see a boot menu listing the different versions of Windows you have installed.
If the 30-second delay is too long, or you want to change the default, click ‘Start’ > Run, type MSConfig, and press Enter, then make changes from the Boot tab.
Let Us Know How to Help You with this information. Boot Windows 10 System or Setup Dual Boot Windows 10 and Ubuntu.