
Cleaning up the disk in Windows 10 ✅ : Your hard drive has at long last come up short on space, and now you need to take care of business. The inquiry is: What? Nowadays, coming up short on disk space should be inconceivable. With terabytes of capacity accessible to you, how would you figure out how to deal with everything?
Here it is, crystal clear. In the past Windows fired a pop-up message – ‘You are running out of disk space’ messages, It wasn’t that quite a while. quickly looked by ‘You are running low on disk space.’ No issue, the time has finally come, how you are Cleaning up the disk in Windows 10?
Try not to freeze, however, next in this post, we give you all that you have to know to take care of this issue.
We additionally look at approaches to include extra limits, empowering you to move your information off your boot drive to clean space.
In addition, everything moves to the new drive. It’s everything here, so this post explains your disk space problems.
Check out what happens, when you come up short on space, and how to watch out for how much space is left. (If need to clean up the disk in Windows 10).
Window’s 1st alert is probably going to show up when you navigate File Explorer to the “This PC” window to see your driver’s use is spoken to by a red bar, as opposed to a blue one.
This shows up when your drive has under 10% of its storage left, despite the fact that the earnestness of the notice depends on the size of the drive.
For instance, a 64GB drive with below 6GB left is more stressful than 180GB free from a 2TB drive.
Monitor How much disk is used and needs to be cleaned up for Windows 10
It’s all very good realizing that your empty space is vanishing, yet what’s really occupying such space? In the next section, we will learn to track disk space for cleaning up the disk in Windows 10.
Your first step on the journey for information ought to be Windows’ own options: Explore to ‘Settings – > System – > Storage,’
What’s more, after a brief time, Windows uncovers what kinds of files are occupying the most room on your Pc system drive. You’ll see a list of categories for ‘Temporary files,’ ‘Apps & features’ and ‘Other,’

and you can click ‘Show more categories’ for a progressively exact posting of utilization by classifications as fluctuated as ‘Mail,’ ‘Videos,’ and ‘Documents.’
As you’ll see over the picture, you should utilize Windows’s new Storage Sense highlight to deal with this automatically, and clear temporary documents as required to keep your PC from coming up short on disk space.
In spite of the fact that Windows has an “Other” view to cover huge folders, it’s not able to effectively feature the individual documents and folders that occupy the most room. To look for these requires a “third-party” tree-mapping application.
Tree-mapping software gives a visual portrayal of each record on your hard drive(s) as blocks, with the size of each square compared to the size of the document in question. Later in this post, we explained how to check space using a third-party app for cleaning up Windows 10.
Check Disk Space with “Windirstat”
One Best free software is WinDirStat (https://windirstat.net)(get this from here), which you can download and introduce from its official site or add to your PortableApps toolbox for running on-request.
To add it to your toolbox, open the PortableApps stage, and snap ‘Applications -> Get More Apps -> By Category’ – you’ll discover WinDirStat in the ‘Utilities’ area.
After finishing installing, right-click the app’s icon shortcut and select ‘Run as administrator’ to permit it to check your whole drive, at that point see the step-by-step tutorial below to discover how to utilize it to target and – if vital – Remove individual files.
When you’ve figured out where all your drive space has gone, you can conclude how to handle the issue. In this way, turn the page…
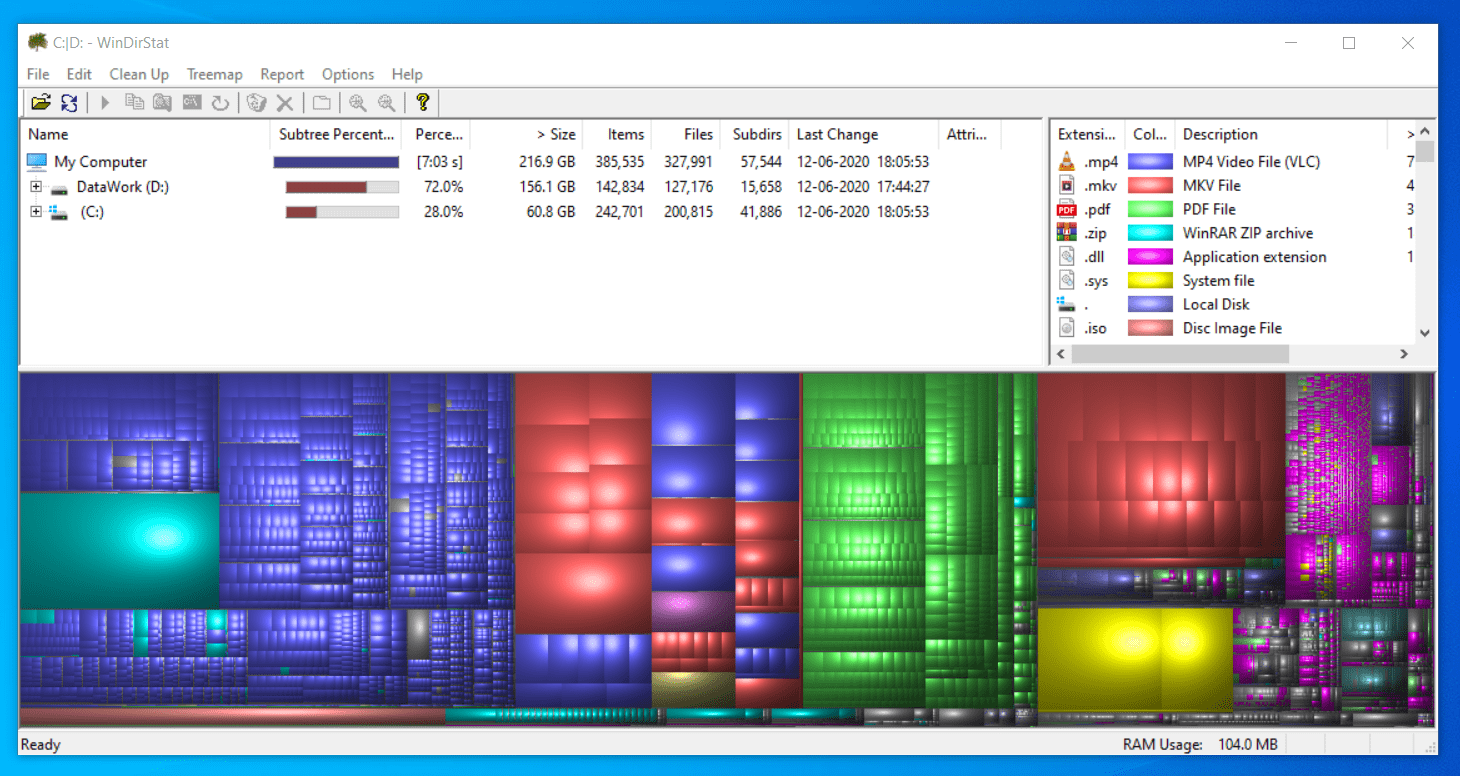
A. VIEW A outline: You can decide to monitor all drives or spot on a particular drive. Make your decision and click on ‘OK.’ Wait for WinDirStat to complete its investigation and you’ll see a three-paned window. The base gives a shading coded ‘map’ of your hard drive as indicated by how it’s being utilized.
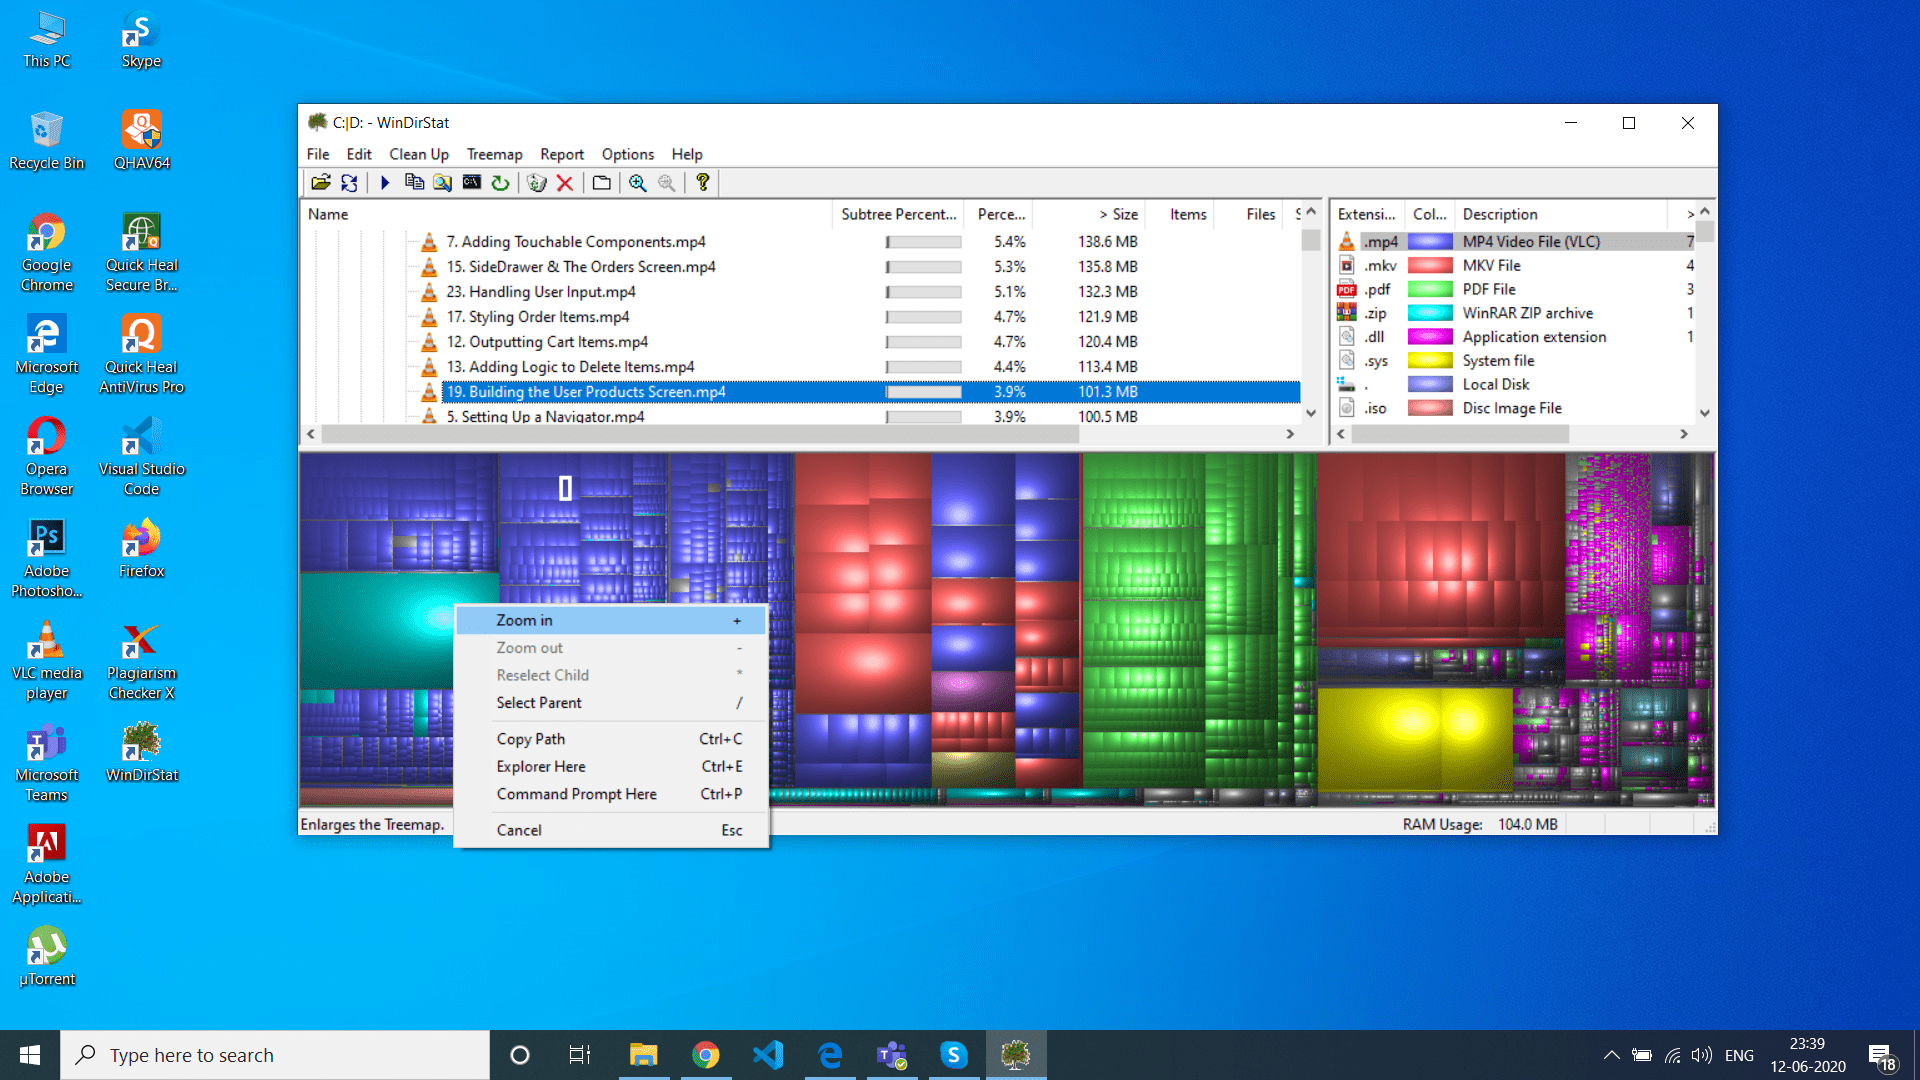
B. EXPLORE IN DETAIL: Click on the color squire map and its filename and file path will be shown in the upper left panel, which shows a customary envelope. Right-click and pick ‘Zoom in’ to see a guide of the following level down either a particular drive or the folder containing your objective record.

C. DELETE LARGE FILES: When you’ve decided a file is safe to delete, select it, and open the ‘Clean Up’ from the menu. You can remove it legitimately from here or select ‘Explorer Here’ to open a File Explorer window highlighting the parent folder, empowering you to look at it all the more intently.
More driver Notification
Windows Update additionally hurls a caution on the off chance that it finds there’s inadequate space to install the most recent updates – this normally shows up when you don’t have optional capacity attached to your PC for it to use as impermanent storage.
It can show up when there’s as much as still 11GB free on your drive for significant updates, yet more concern is if it shows when you’re attempting to introduce a total update, which demonstrates your drive has under 3GB left.
Since they’re intended to store explicit files and that’s it, they can be completely filled nearly, bringing about Windows hurling a low space disk cautioning.

The arrangement is straightforward – Type ‘Disk’ into the Search box and snap ‘Create and format hard disk partitions’. Find your Recovery segment in the menu, at that point, right-click on it and choose ‘Change Drive Letter and Paths.’

Snap “Remove” trailed by ‘Yes’ at the notice, and lastly ‘OK.’ Bingo – no more alerts for that drive.
Cleaning up the Disk in Windows 10 Before Buying More Space
Cleaning Up space on your PC has never been simpler, because of Windows 10’s new Storage Sense highlight, which is intended to render third-party applications, for example, “CCleaner” redundant.
Your first work, hence, is to utilize its administrations to free extra space on your drive. Explore the “Settings -> System -> Storage,” and select the “Configure Storage Sense or run it now” link.

By clicking the Storage Sense switch on and selecting a time when you want to run it – by default, it selected “During low free disk space”,
yet, on the off chance that you need to take a more “pre-emptive” strategy, you can run it month to month, week by week, or even every day. Look down, and you can design more alternatives –
For instance, deleting temporary documents, removing records from the “Recycle Bin” after a set period, and occasionally freeing the “Downloads” folder.
You can likewise design OneDrive’s on-request highlight with the goal that downloaded content returns to online-just if unopened for 1, 14, 30, or 60 days. Urgent for more space? Snap “Clean now” to play out a one-time free-up space.
Also Read:
How To Use Windows 10 Start Menu
How To Make Windows 10 Look Like Windows 7 ✅
Keep Important files
In case you have a Microsoft OneDrive account, the possibilities are you can take facilities of a relatively recent feature called “on-demand.” Instead of keeping everything genuinely stored on your PC,
a progression of easy routes is made instead, highlighting the online documents. These take up a small amount of space while guaranteeing your records are consistently available (inasmuch as you’re associated with the Internet).
so, all things considered, it returns to be on the web just to free up space on Windows until you next open it. To confirm the component is on, right-click the OneDrive symbol and select “Settings > Settings tab,” At that point click check “Save space and download files as you use them.”
Find duplicates Files
It’s astounding how effectively we produce duplicates of files – or close copies, digital pictures, with different attempts to get the ideal shot all by one way or another being left on your hard drive toward the finish of the procedure.
The Pro of Duplicate Cleaner – US$29.95 – can likewise chase out comparable files, yet before contributing, why not give AntiTwin (www.joerg-rosenthal.com/en/hostile to twin) prior?
Create Old Files Archive
Another approach to rescue space is to move documents and folders onto an optional storage drive, for example, a USB drive. On the off chance that you don’t have this opulence, you can rescue space by compressing up these once-in rarely utilized folders and documents.

Right-click the item(s) being referred to, and select “Send to -> (zipped) Compressed folder,” at that point sit tight for it to be joined into a solitary compressed file. Right-click this and pick “Properties,” at that point contrast its size with the first file.

if you get the best saving result, remove the first folder or document, after that, you can continue to free up more space.
Try Another Cloud
Another storage area you can utilize is your cloud supplier. We’ve perceived how you can go through OneDrive to clean up your PC, and different suppliers offer comparative highlights in their premium-for plans – Dropbox (www.dropbox.com) calls its proportional Smart Sync.
You have to explore an organizer inside your Dropbox folder, right-click it, and select ‘Brilliant Sync -> Online-only,’ or go for ‘Preferences – > Sync,’ select your account, and select ‘Online-only’ to make it the all-inclusive default.
On the off chance that you’d prefer to get to Google Drive or Dropbox organizers along these lines without a long paid service, for an irregular charge (US$39) you can utilize an apparatus called Mountain Duck 3 (Download for free trail https://mountainduck.io). This would be a good step to cleaning up the disk in windows 10.
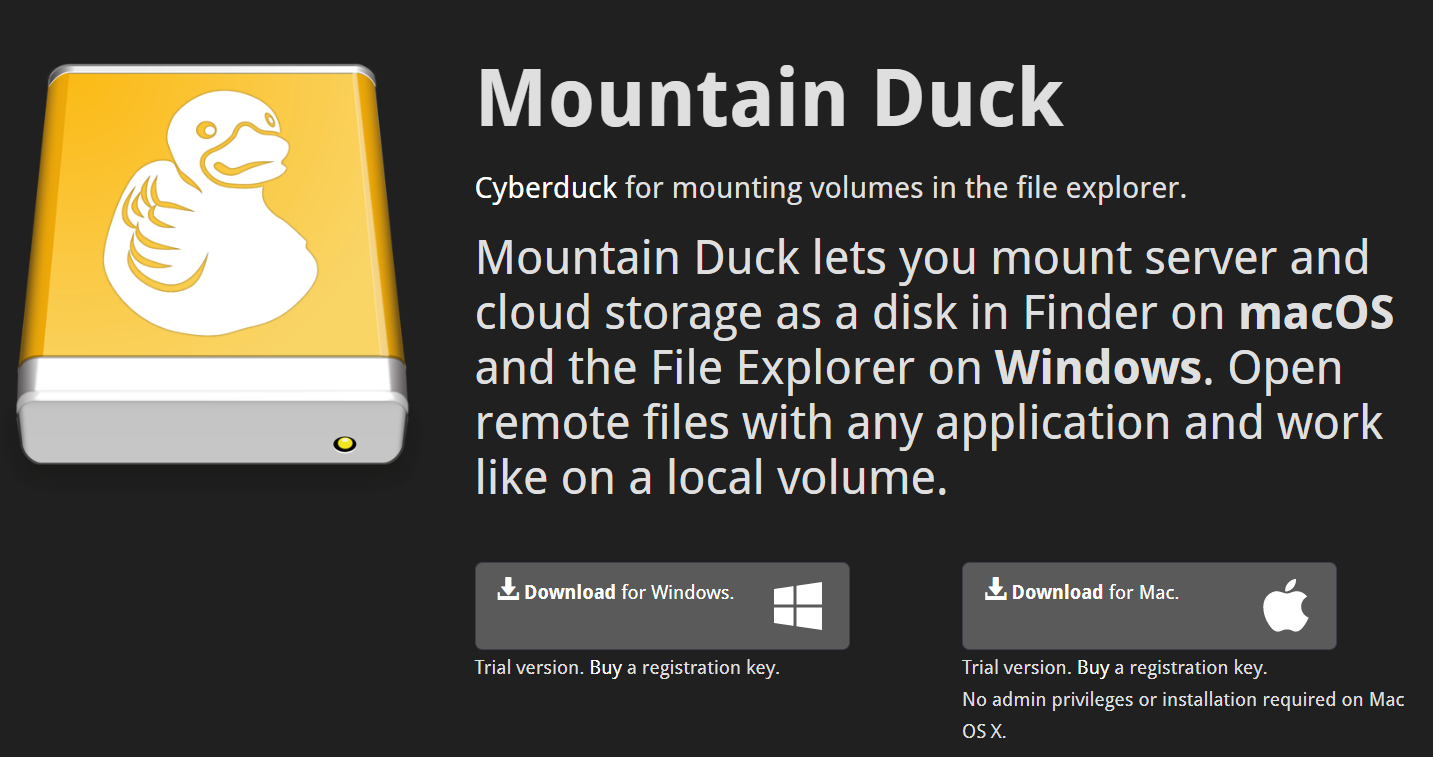
This can make a progression of virtual drives interfacing with a scope of online storage administrations and supports on-demand get to like that found in OneDrive over completely associated services. To include another cloud account for the first time set “Connect Mode” to “Smart Synchronization”.
Time to Move Files
The walk of innovation leads to expanded requests on your framework, especially if you’ve found an eagerness for space diversion, for example, gaming or 4k video editing. In case you’re basically seeking to extend accessible storage for your documents, you have two fundamental options.
The first is to purchase extra memory.Pc users can check whether their PC case has space for an extra internal hard drive – with 4TB drives at under $200, you can deal with everything but the most requested needs with a single buy.
Also read:
How To Set Up Dual Boot Windows 10 System ✅
How To Use Action Center In Windows 10 ✔️
Upgrade to Another Way to add space and clean up the disk
Before sprinkling out, shut down your PC, open the case, and check there’s an extra drive bay. Likewise, check your capacity gracefully has an extra SATA power socket (if it’s not, to get a cheap adapter do some Google search with ‘Molex to SATA power adapter’ ), and an extra SATA space on the motherboard.
You should also look for a “SATA” data cable, It can be below $1, but you need to be sure that it’s SATA III (6Gb/s), and also go for a right-angled cable on one site that has hard-to-reach sockets.
If you would like to go for an external driver, you have two choices: USB or NAS. USB costs are unbelievably serious – somewhat less expensive, truth be told, than inward models—so you have to pay S150 for 4TB (or less!) or push the vessel out and get 6TB for very little more. For the best performance, you should go for USB 3.0.
Apps to Move
There are two different ways to move applications to another drive: First, Windows Store applications (counting that pre-introduced with your PC, for example, Photos) can now and then be moved by use of “Settings – > Apps – > Apps features.”
Snap the application in question and search for a “Move” button – If it’s not turned gray out, click and select which drive to move it to, lastly Click “Move” once more.
Usually, the programming system is designed better way into the operating system so you can not move files from ‘Program Files’ to a new drive. One choice may be to uninstall and reinstall,
Yet, that includes some significant downfalls of losing your preferences and expecting the program being referred to permit you to pick where to reinstall the program.

A less difficult, idiot-proof alternative is to utilize SteamMover (www.traynier.com/programming/steammover). This shrewd instrument moves your files to your information drive yet leaves a “symbolic link” in its place.
This easy route fools Windows into deduction the system is still on your C drive, so it keeps on working consistently. It’s anything but difficult to utilize: Click on “…” under “SteamApps Common Folder,” then select “C:\Program Files.”
Ctrl+click the programs you intend to move, depending on their size, and how often you use them, at that point click the right-arrow button to move them the whole way across. Have you changed your perspective?
Basically, select your program and snap the left-arrow button to move it back, no inquiries posed.To move apps for Windows 64-bit users should check once in the “C:\Program Files(x86)” folder for 32-bit.
Also Read: How To Make The Most Of File Explorer In Windows 10 💻
MOVE DATA Strategy to Clean up the disk in Windows 10

A. CREATE NEW FOLDER First, open “File Explorer” and browse to the new store’s drive. Make another folder and name it as your username. Into this, make more folders named like having in “File Explorer”.for sample: “Pictures”, “Videos”, “Documents”, “Music” and so on.

B, MOVE YOUR FOLDERS Browse back to “This PC.” Right-click on “Documents” and select “Properties -> Location tab.” Click on “Move…” to peruse and select the “Documents” folder you just made. Snap “Select Folder” trailed by “Apply.” When the pop-up opens, click “Yes” to move your documents and folders to your new drive.

C. REPEAT IT YOURSELF Now rehash the system for the various folders recorded – be set up for a long time delay in the event that you have huge files to move across to your new drive. The advantage of this system is that once complete, you will be able to clean up space on your system without erasing anything.
I think you get what are actually you looking for.so, please give me an opinion or share your extra knowledge about Cleaning up the disk in Windows 10.