
Install Windows 11 Official: Microsoft is edging towards Windows 11. as it’s fully marked Windows 11 in this build. Microsoft will probably try and pass it off as a new operating system. When really under the hood, it’s perhaps just Windows 10 with a facelift.
First came the rumors, then some leaked screenshots, then some leaked videos. And now, an entire installable final version of Windows 11 has been launched. And you better believe that I installed it to try it out. So, precisely, I am going to explain the installation guide in this article.
So, Good news for those guys looking for Windows 11 iso, which is official. Microsoft recently released a new update. And in that update, they just told us we are releasing the Windows 11 iso file. Now, Users can Install Windows 11 Official using ISO File
If you want to go right to the part, please follow the below process on “how to Install Windows 11 Official” step by step.
Will Windows 11 have the same system requirements as Windows 10?
Requirements for Windows 11:
Approximately 64 GB or larger storage device – or more depending on data storage needs
Memory: 4 GB RAM or more
TPM: Trusted Platform Module (TPM) version 2.0
System firmware: UEFI, Secure Boot capable
Display: > 9″ with HD Resolution (720p)
Graphics card: DirectX 12 compatible graphics / WDDM 2.X
Recommended requirements:
The following system requirements are recommended for optimum performance:
Approximately 64 GB of available hard-drive space – or more depending on data storage needs
4 GB RAM or more
2.0 GHz dual-core processor or faster
1680 x 1050 screen resolution or higher
Can I Install Windows 11 On 2GB RAM?
Definitely not.
Microsoft preferred at least 4GB RAM to install Windows 11. See the Windows 11 system requirements.
Upgrade Windows 10 To Windows 11
TPM is basically a Trusted Platform Module. It’s basically hardware security for your computer. It’s all got to do with data encryption, decryption, authentication, and general stuff like that. You don’t require one of these to run Windows 10 and earlier. But with Windows 11, Microsoft has made it a point that if you want to upgrade to Windows 11 Without TPM checking, then you do need to enable TPM (Check the BIOS setting).
If you experience any problems after installing Windows 11, you can roll back to Windows 10 from Windows 11 without losing any files.
4 Ways You Can Install Windows 11 Using Official ISO File
I am going to look at the experience of performing a clean installation on Windows 11. this is not only a tutorial. Rather this is a demonstration to showcase the visual elements and the new process to install Windows 11 on your computer. I am going to show you the installation process as well as some customization for Windows 11.
- Upgrade Windows 10 to 11 Without TMP Checking
- Upgrade To Windows 11 Using Installation Assistant
- Install Windows 11 From Setup.exe file through the update.
- Install Windows 11 From a USB drive using an ISO file.
Windows 11 PC Health Check
Let’s go through the basic requirements needed to successfully install Windows 11 on your system, as outlined by Microsoft.
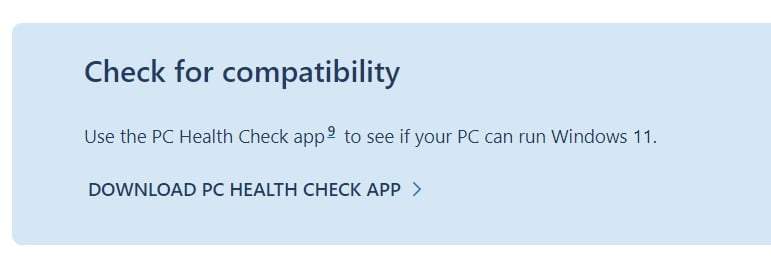
1. So, you have to go to the Microsoft website to find the link to the PC Health Check App that you need to download to test your system. And make sure that your system is capable.
2. After downloading, Follow the standard installation procedure. After the installation is finished, you need to click the Finish button, and it’s going to run the software that will check your computer.

3 The next window that should pop up on your screen is going to be “PC Health at a Glance.” Once you get to this window, you need to click where it says the “Check now” button.
Case 1, If TPM 2.0 Check Warning Issue 😭
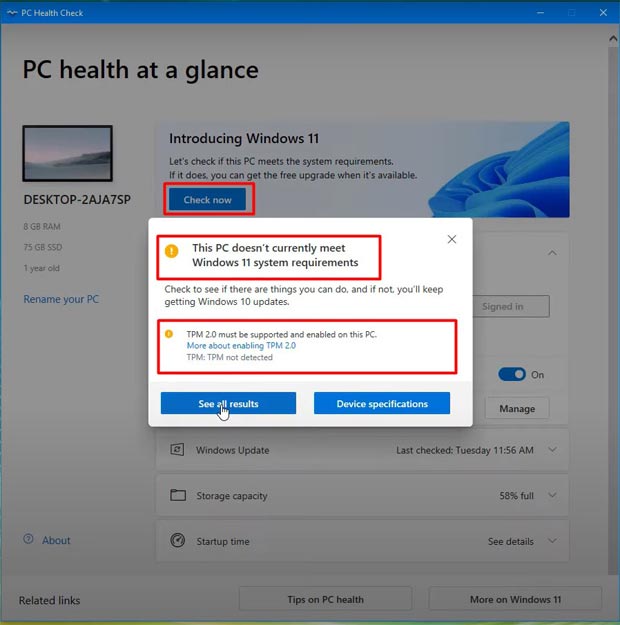
1. Suppose your system cannot handle Windows 11. it’s going to highlight the reasons Why? So, for instance, On My old laptop, it’s telling me that I don’t qualify. I don’t meet the requirements. It’s saying that this PC must support a secure boot, and it’s required to have a TMP 2.0. But, I Don’t Have!! Now, What?
Don’t Worry!! 😋 Check How You Can Install Windows 11 Without TPM Checking (On Unsupported Hardware).
Case 2, If Your PC Meets All Windows 11 Requirements
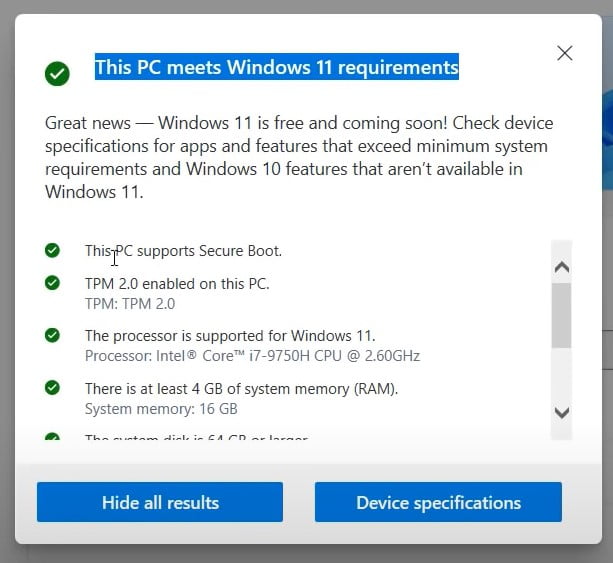
4. You can see the results. My new system is qualified to run Windows 11 👌 on this system, so it is more capable and more up-to-date. If your system is showing like me, then GREAT✌️, you can try the below methods.
[Method 1] Upgrade Windows 10 To Windows 11 On Unsupported Hardware
This is the latest method to install Windows 11 without having TPM or Secure boot checking on your system. I personally recommend you to follow this article: Upgrade Windows 10 To Windows 11 On Unsupported Hardware.
[Method 2] Install Windows 11 Using Installation Assistant
How to Install Windows 11 Using Installation Assistant. It’s really quite simple to do. And as long as your computer meets the minimum requirements set up by Microsoft.
Step 1, Download Windows 11 Installation Assistant
You need to visit the Microsoft website and download Windows 11 Installation Assistant.

Now, there are a few different ways to install Windows 11. We’re going to use is Windows 11 installation assistant. This is the new option for installing Windows 11 on the device you’re currently using.
NOTE: But before you download. You want to make sure that you qualify that your device meets the specifications. So you can click on the Windows 11 system requirements. And make sure that your computer allows it. You can use the PC Health Check App to verify that it will work.
Suppose you find that your PC doesn’t meet the minimum requirements to install Windows 11. check how you can bypass “How to Bypass TPM 2.0 Windows 11“.
So go ahead and click on Download now. And it’ll start downloading the installation assistant.
Step 2, Run Windows 11 Installation Assistant Exe file
1. Once the download is finished. Go to the download folder and double-click on the file.
2. It will ask for your permission. Click on Yes to continue.


3. It’s going to load up the agreement for you. Make sure you read through this install Windows 11 agreement. Once you’ve done that, you can go ahead and hit the Accept and Install button down here at the bottom. It’s going to start downloading Windows 11 to your computer.
4. It is step one of downloading Windows 11. it’s going to move over to step two, which is verifying the download. This one’s a little bit quicker, but again, it has to go up to a hundred percent.

5. It’s going to move on to step three, which is installing Windows 11. this one took a little bit longer for me, about 10 to 15 minutes.
6. So once the installation is complete. Your computer will automatically restart after 30 minutes. But the better way to do it is to click on restart now and restart your computer.
So it can load up Windows 11 and configure it. So you can use it right away.

7. Once your computer restarts, it’s going to continue working on the updates. It says, please keep your computer on, so don’t turn off your computer during this time, and your computer may restart a few times during this process.
8. Once that’s complete. You are done. Enjoy!
[Method 3] Install Windows 11 Using Setup.exe File To Update the Process
Windows 11 Compatibility Check
The first thing you need to do is to make sure that your computer meets the minimum system requirements, and you can do this by using the Official PC Health Check App., which you can download from this micro support website. Scroll down at the bottom.
Once on the website, you can click the download button and open the application. Then we’re going to install it. Once it is installed. Click on Finished. To check if Windows 11 will run on your computer, click the Check Now button. As you can see, this particular computer meets all the requirements.
1. Download the app > Run the app > Check Health. If it’s saying, “This PC meets all Windows 11 requirements,”. Then, you can follow the below methods.
If you found the “This PC doesn’t meet the minimum requirements windows 11” error, then you need to enable TPM or Secure boot options from bios. also you can solve this issue by execute this methods (Click here).
Next, I’ll also show you how you can set up a bootable USB drive.
Step 1, Download the Windows 11 ISO File
1. Open your favorite browser. Visit the Download Windows 11 Disk Image (ISO) page. Scroll down and Scroll down to the Select Edition section at the bottom. Select the “Windows 11”. Click on the “Download” button > Select Language > Click on the Confirm button > Next, Click on the “64-bit Download” button. Wait until the download is completed.
Step 3, Unmount The Windows 11 ISO File
Once you finish downloading the iso, install Windows 11.
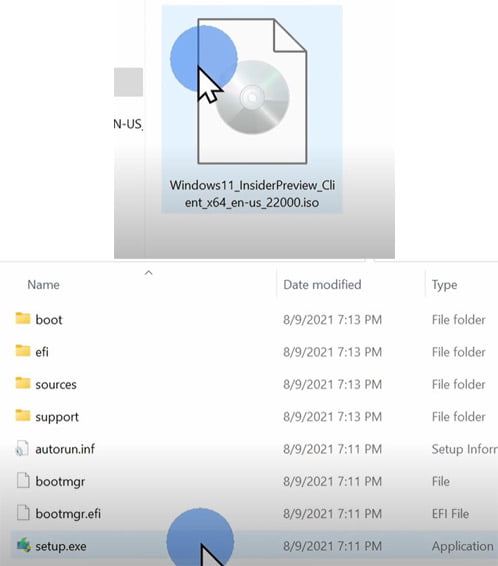
- Navigate to your download location; simply double-click on the iso file. That’ll mount the image.
- Then, you can click on setup.exe to kick off the installation process.
Once you start the installation, you have two different options
- You can do an in-place upgrade where you keep all of your apps and files.
- You can also choose to keep nothing, in which case you’ll have a completely clean install of Windows 11.
So, The choice is yours.
If you find any error, something like – “This PC can’t run windows 11,” – You can easily fix this issue by following this method (Click here).
[Method 4] Install Windows 11 Using a Bootable USB Drive
If you have already downloaded the Windows 11 ISO file, you can go to the steps. If not, please visit the Download Windows 11 Disk Image (ISO) >Select the “Windows 11” > Click on the “Download” button > Select Language > Click on the Confirm button > Next, Click on the “64-bit Download” button. Wait until the download is completed.
Step 1, Create Installation Media Or Bootable USB
As you know earlier, with this Windows 11 ISO file, you can make several types of installation media, which all contain the exact same copy of Windows. But we are not going to burn this ISO file to A DVD because not every computer has one these days.
On the other hand, burning CDs is Hard, Time-consuming, and Costly compared to making a simple USB Bootable drive. So, We will create a bootable USB drive. This is how:
System Requirement For This Windows 11 Installation Guide
1) You will need an 8-gigabyte or higher-capacity USB stick.
2) A desktop or laptop PC.
3) At least two gigabytes of RAM.
4) A decent processor on your existing machine.
5) Windows 11 ISO FIle Official
6) Download a copy of balenaEtcher or Rufus.
1. Here, We are going to use a USB drive. This means a flash drive that contains a bootable Windows 11 setup. Because most of the computers nowadays come with a USB port.
2. Download balenaEtcher from the official site. Install it and launch the software.
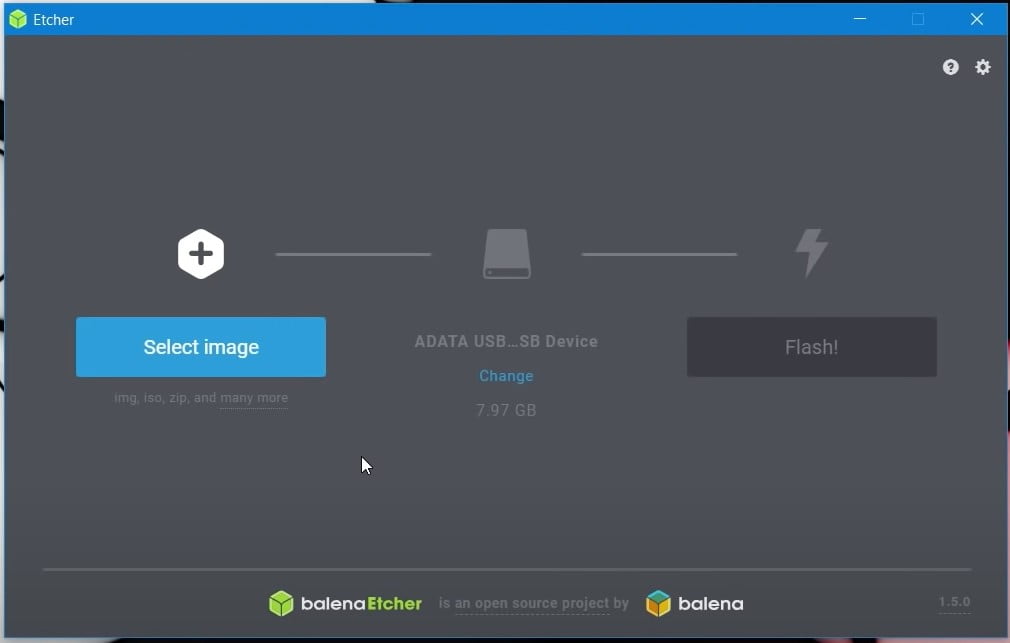
3. Click on the “Select Image” option > Now browse to the Windows 11 ISO file and select the ISO image file.
4. Click on the Select Drive option > browse and select your USB drive. (Most of the time, this software automatically detects the external USB Drive).
5. Last, Click on the “Flash” button to start. Wait a few moments to prepare and set up your bootable USB, depending on the speed of your computer and USB stick. This could take anywhere from a few minutes to about 15.
Once that is done, now, your flash drive has become a bootable USB DVD. Go to the next step.
Step 2, Connect the USB Drive and Restart the System
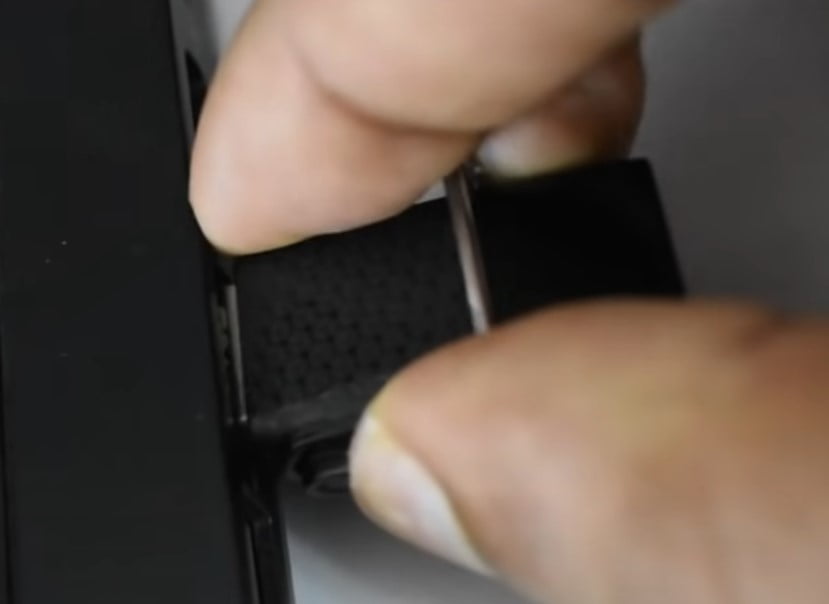
So, let’s install the Windows 11 official OS on as many PCs as you want. Plug the USB drive into the computer that we want to install Windows 11 on. And restart or turn off the computer. Once you can see your PC is completely turned off. So, let’s begin the next phase.
Step 4, Boot USB Drive From BIOS
The most important part is that as soon as it is powered on again or restarted. When you see your brand logo or motherboard logo, press the BIOS key on your keyboard. Let me freeze it for a second.
For some PCs, the bios key would be F12; for some, it’s “Delete,” and for me, it’s F2; maybe yours is F2 as well. I suggest you find your bios key first by simply trying to hit each one of them while you are booting up or simply search on Google.
NOTE: In my case, I am using a DELL machine. If you are using any other company, make sure you need to boot the computer from the USB drive. The first thing that you know, your computer will need to be a UEFI bios-type computer to run this. So please enable UEFI and TPM 2.0 options from bios. So, basically, what happens is older computers have bios, which is the basic input-output system.
1. Once you Press the bios key. You will boot into your bios menu: AKA, UEFI, BIOS Utility.
2. In the bios, you can’t use your mouse to perform any action. Instead, you have to use your keyboard.
SOME IMPORTANT BIOS KEY USES:
- To navigate through bios, use “Arrow keys”.
- To choose an option, use “Enter”.
- To go back, use “Backspace”.
- To quit from the bios, use “Escape”.
- As well as to “Save and exit.” You can use the “F10” key.
Once you are in the BIOS. Go to Boot Options. Here, you can see different boot options.
1. From the “UEFI device priority.” You need to change the “1st boot device property”. Simply “Enter” on this option.
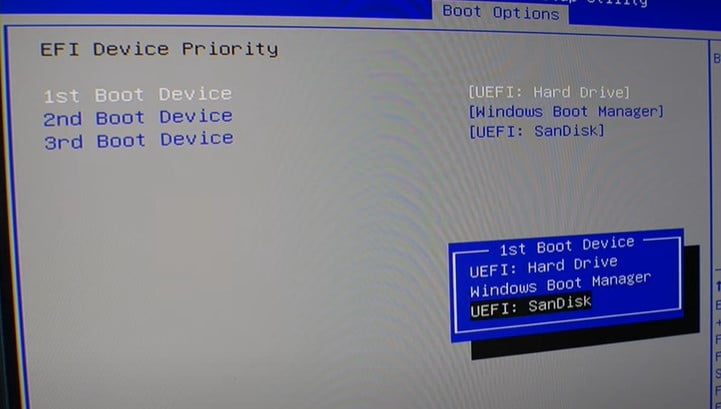
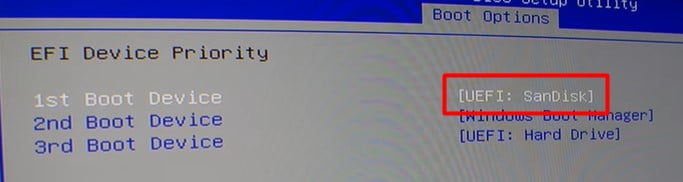
2. You can see a list of boot device options. Simply Select the “UEFI USB drive” as the first boot option. In my case, it is “UEFI: Sandisk.” Once you do that, go back to the “Boot options” menu.
NOTE: Make sure your Boot drive is selected as a UEFI type. I mentioned above of this section above.
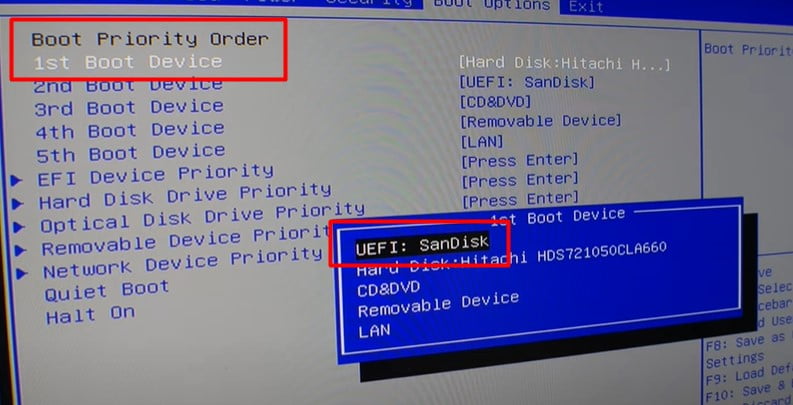
3. Now you need to “Change the Boot Order”. In the “Boot Priority Order” list, select the USB drive in which is the Windows 11 ISO file located. You can Enter on the 1st boot device option. And then select the UEFI USB drive from here.
2nd Option: many people have other Options to set Boot Priority Order using the UP and Down method.
- Press the PLUS [+] key to move the order to higher in the boot list.
- You can use the [-] key to move the order to lower in the boot list.
4. Once it’s selected. Press F10 to save all the changes. Now, it will start to boot.
6. It Doesn’t matter if you have used the BIOS or Boot Manager. You will see this screen asking you to “Press any key to boot from USB or DVD.” So press some random key on your keyboard. And it will boot up the Windows installation setup. Now, go to the next step to Install Windows 11 Official.
Method 2 For BIOS Setting (You Can Skip This Method If Above Method is Works),
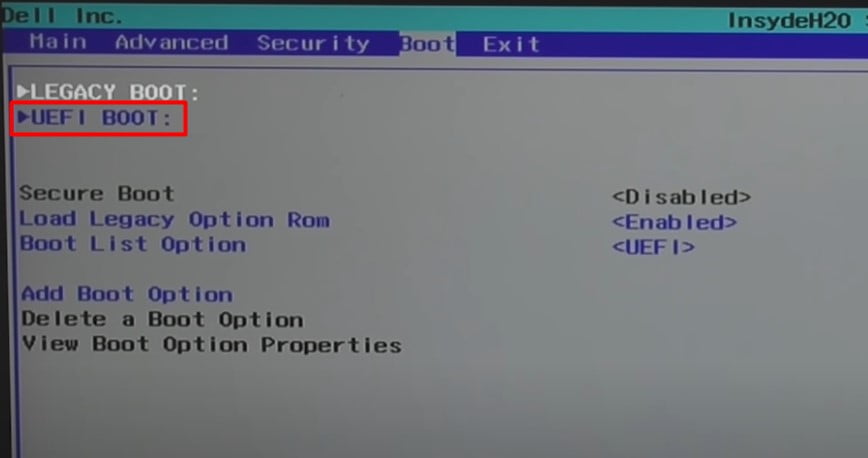
So first, you need to find the boot menu and then find the boot device property or something sounds familiar. For me, it’s UEFI BOOT.
NOTE: All the bios are different from each other depending on their motherboard manufacturer. Now you can see in the picture the bios of a Dell laptop.
We don’t have the option called “Boot device property,” but you will see the option if you are using a desktop or some other laptop.
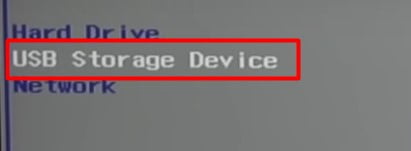
3. So, make your first boot device a “USB Storage device” from the boot device properties. If you are using a Windows DVD to install, I suggest you choose “DVD Drive.”
4. Once you have done that, “Save and exit” by pressing the “F10” key. For most of the PCs, they only need to do this step.
5. But for some devices like this Dell laptop, it has an option called “Boot Manager.” If you have the boot device property in your Bios, you can skip this one. Now, simply choose “USB Storage Device.”So you can press F12 to get to the boot manager from the bootup screen.
Attention! For this particular computer, there is no option (Called “Boot Device Property”) to change the first boot device in bios. Still, it had an option called boot manager, which is not bios exactly, but we can access it from the bootup screen (Only if your computer has one) by pressing the boot manager key (which is F12 for this PC). We will show you the boot manager part in a second. (It may be helpful if you have the same procedure to choose the boot device). We are explaining this bios part only for all the other computers that are not doing this (Changing boot device) via the boot manager but through bios. So follow the bois part if you have a boot device property option.
Step 4, Install and set Windows 11 Official
As you can see, we have just booted up into the Windows 11 installation setup. So, let me walk you through. The new installation screen is a big improvement over the options for Windows 11. you can see the new logo in this Windows 11 build.
There are still some legacy UI elements left over, including this UI, which has been present since the introduction of Windows Vista at this stage of the installation process.
NOTE: Before that, make sure you are plugged in and connected to a stable power source. As well as Make sure that you have at least 90% battery left on the device.
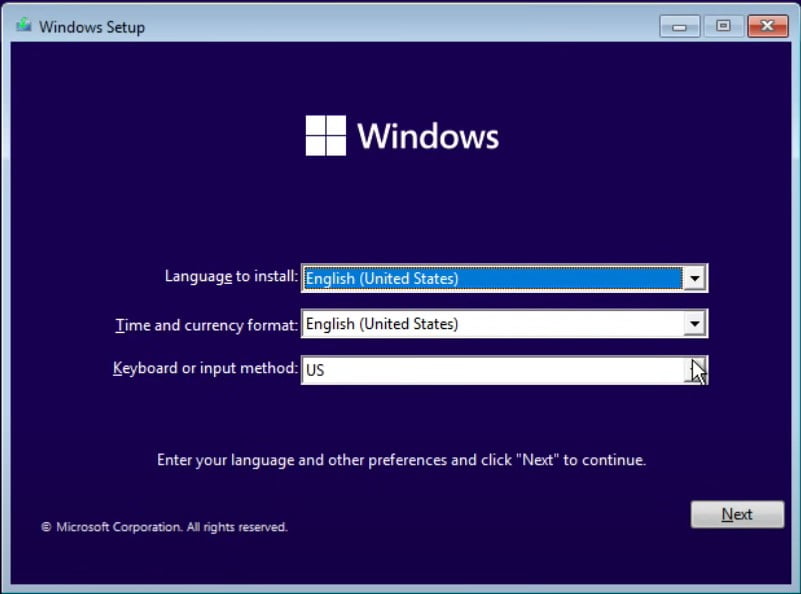
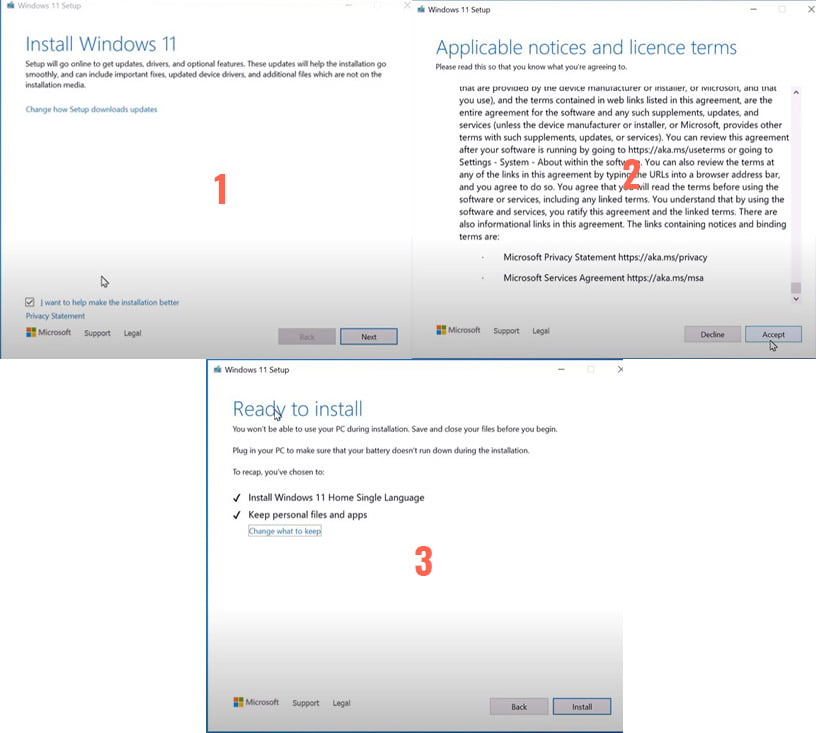
1. On the Windows Setup screen, we must first need to Choose a language to install, choose your “Time and currency format, ” and finally, the “Keyboard or input method,” for me, all the defaults would be fine. So, let’s go ahead and click on the Next option. If you find any error like “This pc can’t run windows 11”. Check the link for how to solve this problem.
2. Now, click Install Now, and it will start the installation setup. Now, it is asking you to enter the product key to activate Windows. If you have one, use it here, or you can do it later.
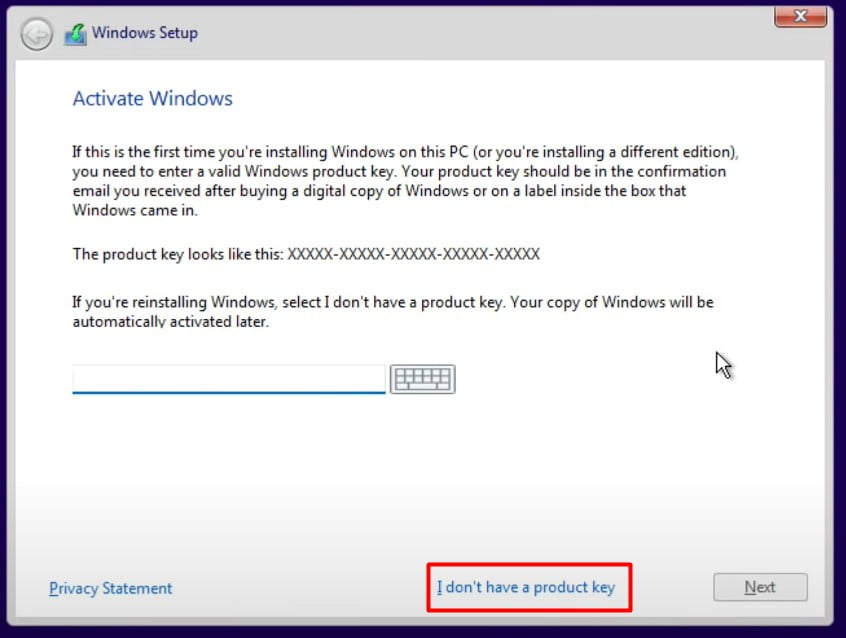
If you have a Windows 10 key, that will work here as well. It will accept the exact same key format. so your Windows 10 product key can be used to activate Windows 11.
3. In case you don’t have one. Click on “I don’t have a product key.”
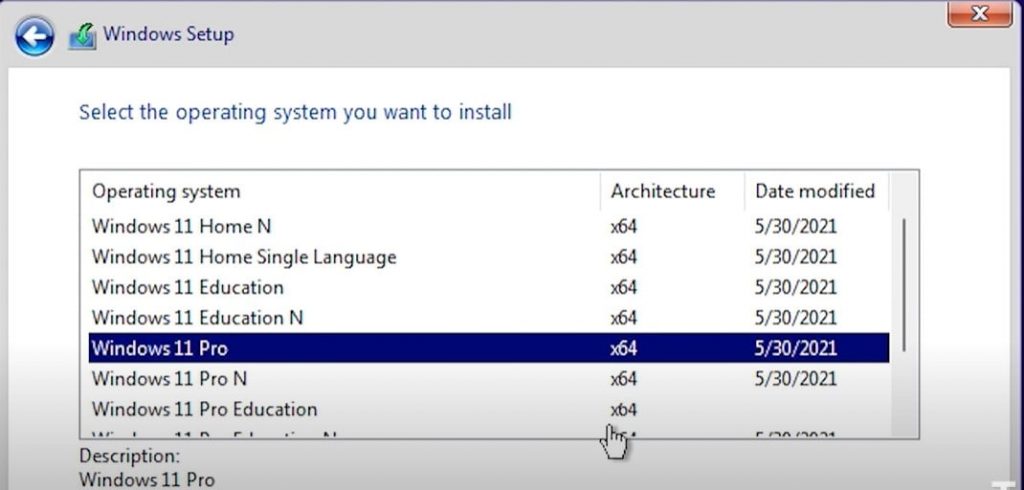
4. Next screen, you can see all the different versions. It looks like they’re keeping the same name and convention like home, Pro Education, Windows Pro, pro for workstations, that sort of thing. I’m just going to select “Windows 11 pro x64”.
5. Now, it will show you the Microsoft terms and conditions to use their software, so scroll down and check the “I accept the license terms” box. Now click on Next,
6. Next, From here, choose the “Custom: Install Windows only” Option.
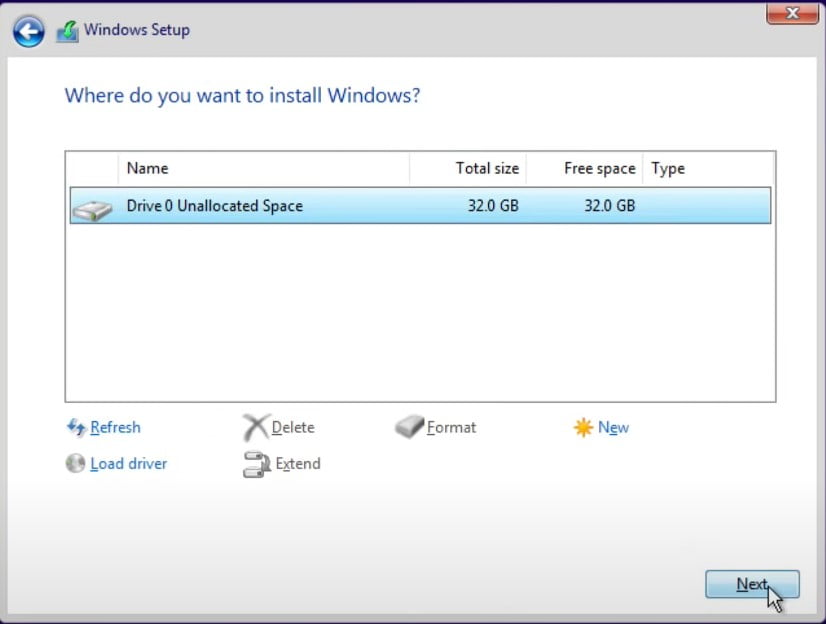
7. You need to set a new fresh install with a new partition created. And then click on Next.
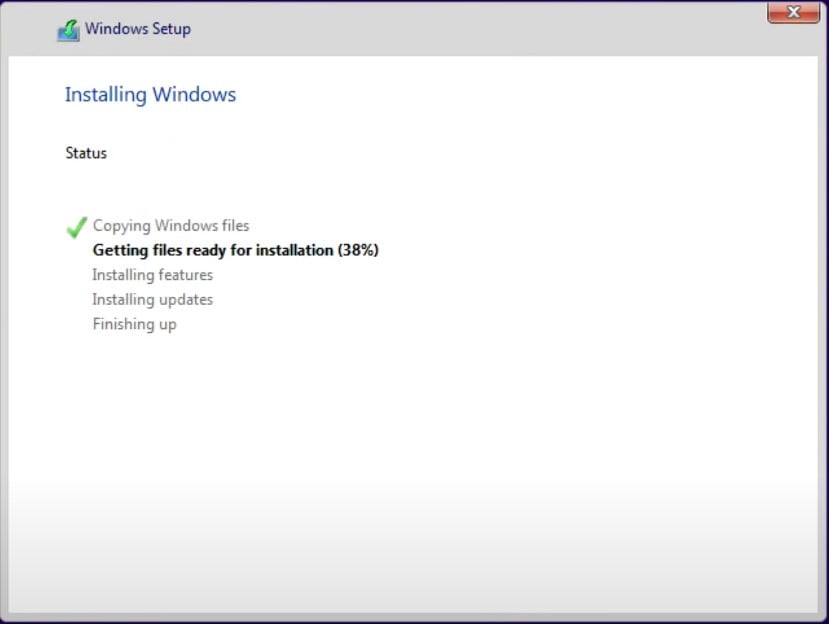
8. Okay, The next screen is very familiar; it looks exactly like Windows has since Vista, so you need to let this go through. Wait until the installation process is completed.
NOTE: Once it’s done this, it should reboot automatically. If it hangs, don’t restart the computer. Just let it do its thing because it is still working in the background.
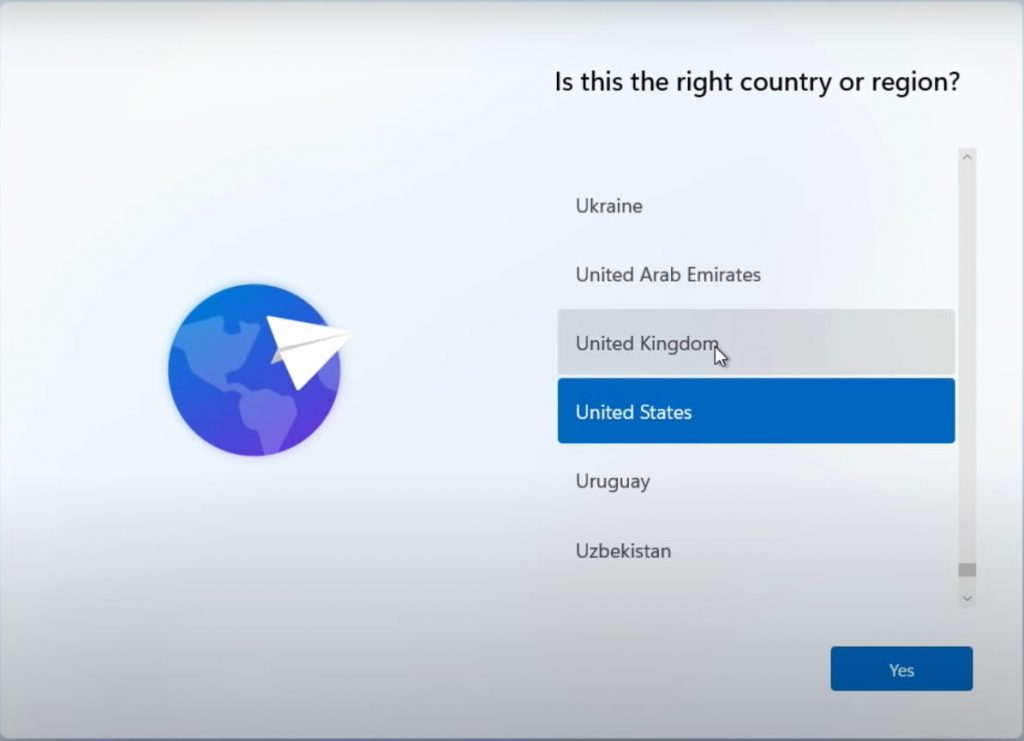
9. Alright, Once you are done. You’ll be presented with the new Windows 11 out of box experience. We can see the UI has changed. So choose your Country or Region. And Click YES.
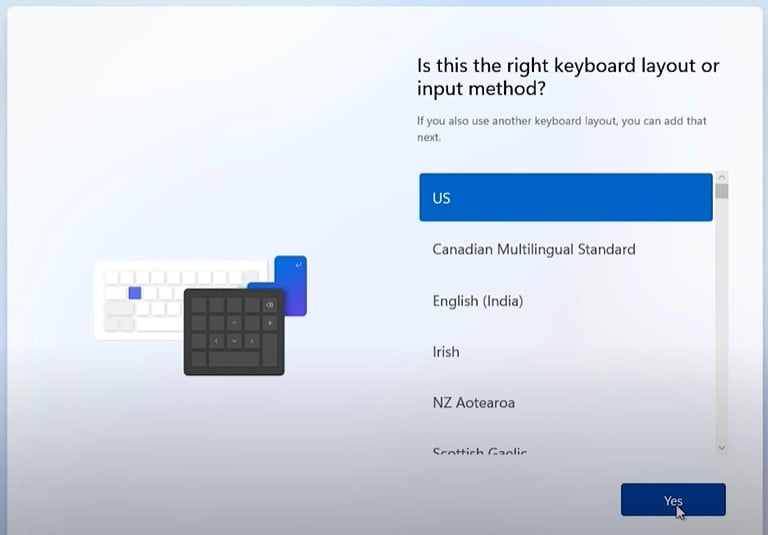
10. Select Your Keyboard Layout. I’ll be selecting the USA.
11. Then Windows 11 will go through and check for updates from Microsoft. Let it be updated.
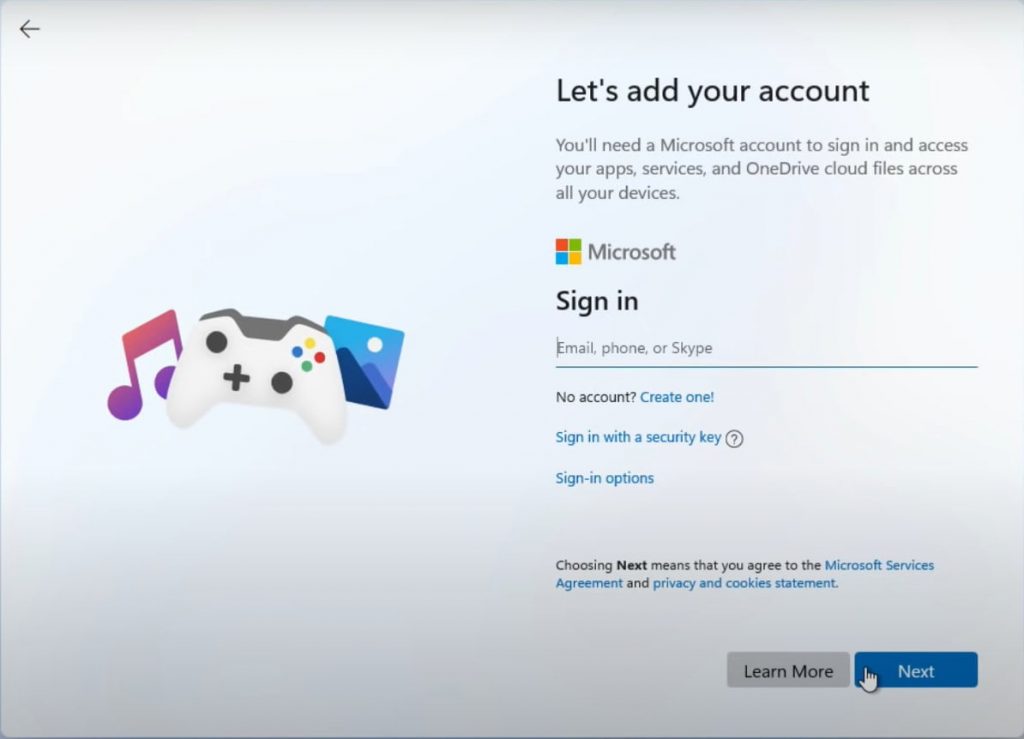
12. You’re going to be prompted to log into your Microsoft account. You can create a local account instead. Simply enter your Microsoft account email address and password, and you’ll be able to move on to the next step.
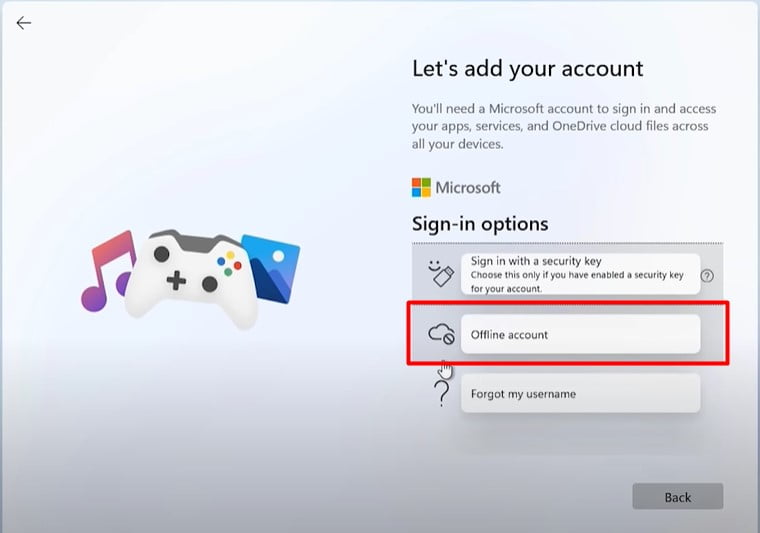
Or you can actually use an Offline account. Click on “Sign in options“. And here, you need to choose an “Offline account.”

13. Next, Click on the “Limited experience” option. I don’t want a local account. Type Your Name > Click Next > Type Password > Click Next > Select “Security Question” and Type Answer. Click Next.
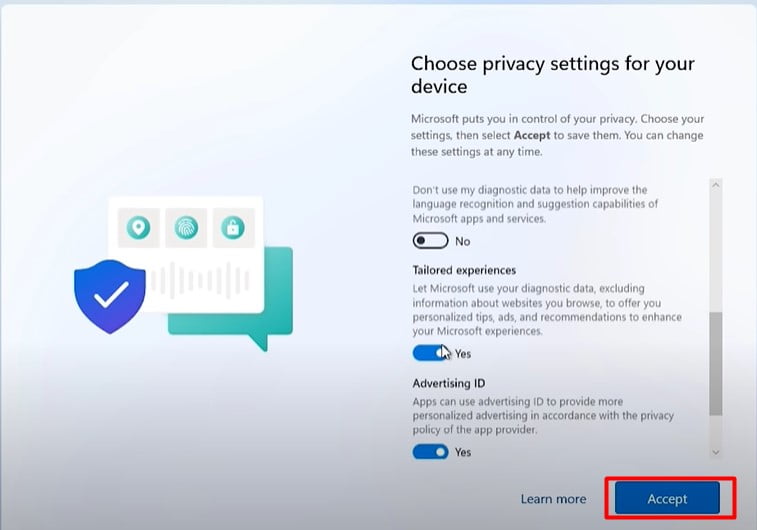
14. On the Privacy screen, click on the “Accept” button. If you want to turn off any option here, please read first as you need.
15. Lastly, it says it’s gonna get ready and take it to the desktop. Enjoy. Please give us your feedback on “How to install Windows 11 Official”.
People Also Ask
What will be the features of Windows 11?
Some eminent highlights would be a presentation of Fluent design, Cortana improvements, a New task changer, the new control center(notification center), feature updates to the edge, and many more changes.
Generally, the entire design is being contrasted, and Windows 10X, the OS Microsoft, won’t ever finish. It was principally intended to offer better ease of use with contact displays and dual-screen gadgets to equal Chrome OS. Rather than being a totally new form of Windows, it’s anything but a more refined adaptation of Windows 10.
Simplified user interface for users
Multi-app support through snap features
Rather than delivering an altogether new and different version of its System OS every three years, Microsoft is adopting an Apple-like strategy for resulting Windows releases.
Will Windows 11 be a free upgrade for all Windows 10 users?
The Windows 11 update would be free for Windows 10 clients for smooth progress. Nonetheless, if a client is, as of now, utilizing Windows 8, upgrading to Windows 8.1 would make them qualified for a Windows 11 free update.
Windows 11 Release Date
At Microsoft Build 2021, Satya Nadella announced to us that he has been utilizing the “next generation of Windows” for a while during his feature discourse.
A Microsoft occasion is planned on June 24 at 11 AM ET and 08:30 PM IST based on what is known up until this point. Now, You can Install Windows 11 Official using an ISO File.