
Windows 11 BIOS Settings To Avoid Getting Any Error: When you try to set up Windows 11. You may have experienced various issues because of the wrong bios configuration for Windows 11. One of the most common problems is “This PC can’t run Windows 11”. In this article, you will learn the Bios setting for Windows 11 installation.
I’ve actually tried a core i3 intel from about 2015. The other one was a Core i5 Intel from 2014, and the last one was a Core i5 Intel machine from 2017. all three gave me the same error message.
It’s showing me the “this PC can’t run windows 11” error. Please configure your BIOS by following this (Windows 11 BIOS settings) guide. If you can not execute this guide, then you can see how to solve the “This PC can’t run windows 11” error without enabling UEFI and TPM or check How to Bypass TPM 2.0 To Install Windows 11.
What is TPM?
It’s something called TPM or a trusted platform module, which is a technology for security at a hardware level.
If you use Windows Hello, fingerprinting stuff, face recognition if you use BitLocker to encrypt a drive. These are capable of using the TPM., the trusted platform module for the cryptographic keys.
You actually use BitLocker to encrypt the hard drive. This means, as an example, if you would use Windows Hello to log in to your pc. If that trusted platform module were removed from your pc, you would never be able actually to access that information ever again.
Now, if you go into your windows security app and go on the left side to devise security.
You will probably see the security processor here by clicking on processor details. You’ll actually see what you have in a TPM or what type of trusted platform module technology chip you’ve got in your computer—also, the manufacturer’s version number and its specific hardware version numbers.
Most of the time, people don’t really know what it is. And so some PCs have it disabled. But still, have one on board a lot of PCs. Older PCs don’t have one. Depends on the computer.
What is UEFI?
You probably have started hearing the term UEFI a lot more lately, along with all the Windows 11 news. What exactly is UEFI, and why do you need it?
UEFI stands for unified extensible firmware interface. And it is the next-generation interface between the operating system and platform firmware.
it replaces the antiquated legacy basic input/output system. Aka BIOS, which has been around for years. The UEFI consortium created the UEFI standard, which consists of over 140 technology companies.
UEFI was developed to simplify and secure the pre-boot environment preventing injection of dangerous code and to improve interoperability between systems.
BIOS has significant limitations as it relates to modern hardware. It is limited to only 16-bit processor mode. And one megabyte of addressable memory. UEFI, on the other hand, supports either 32-bit or 64-bit processor mode. And can access all the system’s memory. You need to enable it. Apply the below methods for Windows 11 BIOS settings.
How To Check If Your System Has A TPM Chip?
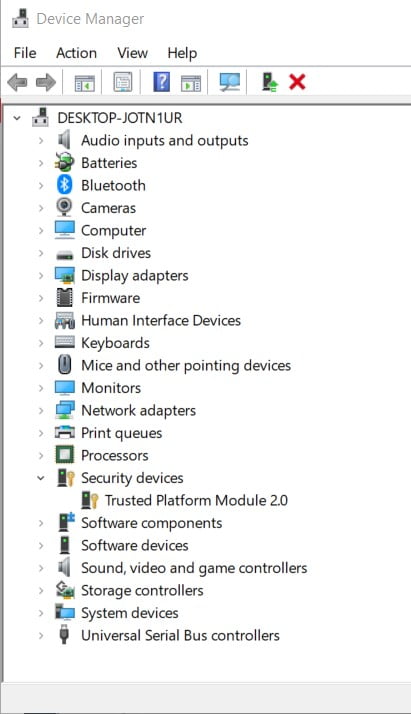
1. Go to the search box. Type “device manager.”
2. Click and open the Device Manager and expand and check the “Security Devices” option to see if your system has a TPM chip or not.
3. If you have TPM, then press the Windows key + R key. It will open the RUN box. Then type the word “tpm.msc” and click on OK.
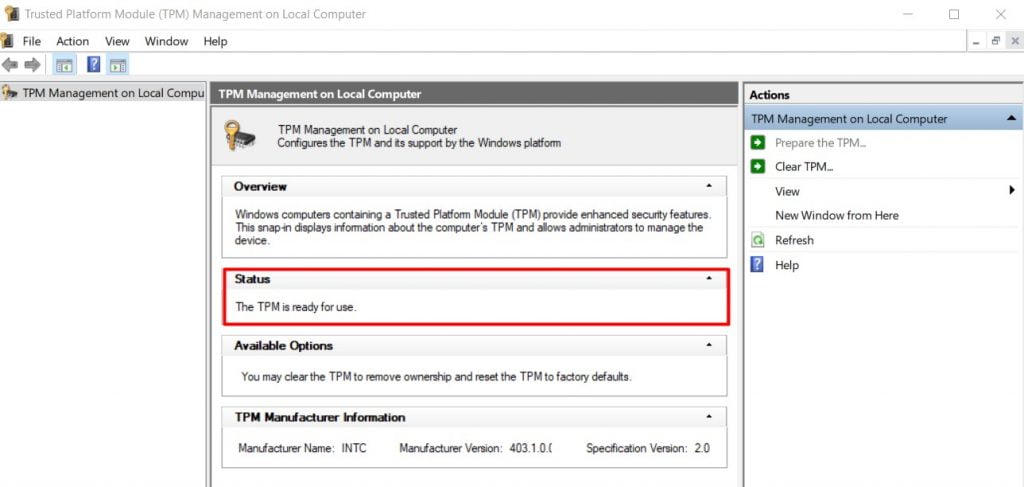
4. Check into the TPM Management widget. Look at the Status section is showing “ready for use.”
If the TPM is not showing in the Device Manager or the status is not showing “ready for use” in the TPM Management widget. Then follow the below methods to enable TPM Secure Boot.
Read More: How to Rollback Windows 11 To Windows 10 [Downgrade Windows 11]
TRENDING: How To Install Windows 11 Official | Released Windows 11 ISO Download
Upgrade Windows 10 To Windows 11 Without TPM (On Unsupported Hardware)
This is the best and easiest method to upgrade Windows 10 to Windows 11, totally free even if you have old PC hardware if your system does not meet system requirements to install Windows 11.
How To Configure BIOS Settings for Windows 11
We will show you the most used motherboard.
- MSI Motherboard
- Gigabyte Motherboard
- Asus Motherboard
- Lenovo Bios Settings
- BIOS Settings MSI X570
- AMD BIOS Settings For Windows 11
Read More: How to Fix Error “This PC Can’t Run Windows 11”
Read more: How To Upgrade Windows 10 To Windows 11 Without Losing Data
How To Enable TPM 2.0, Secure Boot & UEFI On MSI BIOS?
Two of the PC requirements to install Windows 11 are that both TPM 2.0, UEFI, and secure boot must be enabled in your system. We’ll look at both settings in bios that may need to be enabled. And it’s a cool breeze if you follow our guide.
TASTED ON: we’ll be doing this with an MSI p550 tomahawk, which is an AMD board. We also tested with an Intel Z390 Tomahawk B360 gaming arctic and an older z270 x power gaming. This works with all these models.
How To Enable UEFI On MSI BIOS
1. So, Tap delete to get into bios. We’ll go to the advanced mode by pressing F7.
2. In Settings, Go to the Advanced option. Then, go to Windows OS Configuration.
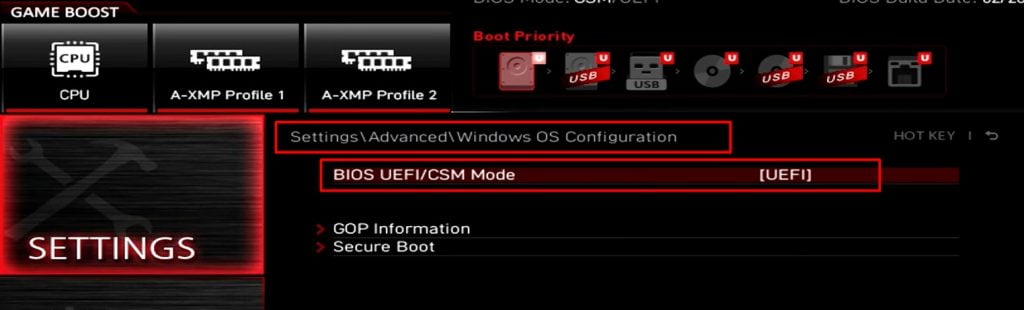
Here, I need to check and make sure the BIOS mode is set to UEFI.
Suppose it’s not (or set CMS). You’ll need to change this to UEFI first and then hit F10 to Save and Exit.
In slightly older bios versions. This may be listed as Windows 10 whql support, and older boards may have a Windows 8.1/10 whql support line, which will enable it.
3. At this point. It’s important to hit F10 to Save & restart. And Tap Delete to get back into bios.
IMPORTANT: If you try to install the secure boot keys before saving & restarting. The end dialogue is actually to reset without saving, which will put you in a loop where the Windows OS still has CSM selected. And it’ll block your enabling of secure boot. To Save & Restart first.
NOTE: Also, when you change CSM to UEFI. Your computer may restart a few times or actually beep a few times and not post if you wait 30 seconds without anything happening on screen. Just turn off your power supply, wait 10 seconds, and turn it back on. And hit power and start tapping delete again.
Install & Enable Secure Boot Keys On MSI Motherboard
Once you have restarted using UEFI and get back to the BIOS, Now We will enable secure boot to install windows 11.
1. Again, you need to go to Settings > Advanced > Windows OS Configuration.

2. Next, Go down to Secure boot and hit enter. We’ll install the keys. First, going to secure boot mode, we’ll change from Standard to Custom. Then the options below will turn active.

3. Next, We will choose “Enroll all factory default keys.” The first dialogue confirms installing factory default keys, and the second will ask to reset without saving.
You can click No. But you may need to Save and exit if you have any issues with the next step.

4. We’ve installed the keys. Next, you need to select Secure Boot and choose Enabled.
Enable TPM 2.0 On MSI Motherboard
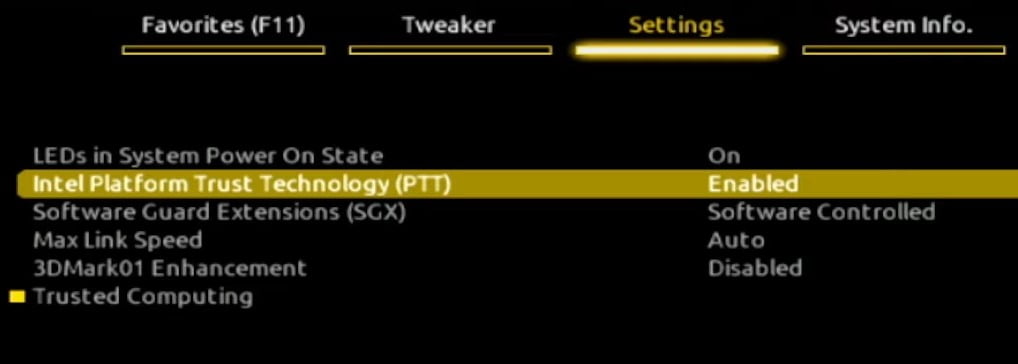
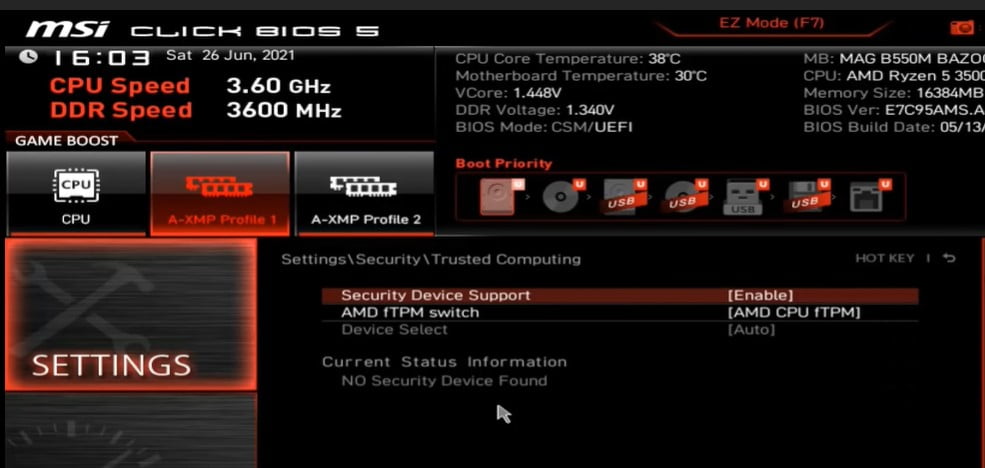
1. Pressing the escape key a few times will get us back to the main settings menu.

2. Now, we’ll select Security and then Trusted Computing, and then we’ll put Security Device Support to Enabled. You won’t see updated status information until you hit F10 to Save Config and Exit.
Check whether TPM 2.0 is Enabled or Not On Bios
Suppose you want to verify what you’ve done. Tap Delete to get into BIOS and go back to Settings > Security > Trusted computing to see the new status information. You should be able to see the status information listing TPM 2.0 as being active.
Method 1, Windows 11 Bios Setting on Gigabyte Motherboard
1. Turn on or Restart your system. Make sure to boot from a Windows 11 bootable USB drive (If you have a bootable drive).
2. While the company logo shows up. Keep pressing the Bios key to enter into BIOS. I am using an ASUS motherboard. So, I will press the “Delete” key to enter into bios.
NOTE: You may have been using another company’s motherboard. So it would help if you pressed the bios key. If you don’t know. Please search on the internet and read forums. You will get your bios key. (Most cases:f2,f12, etc).
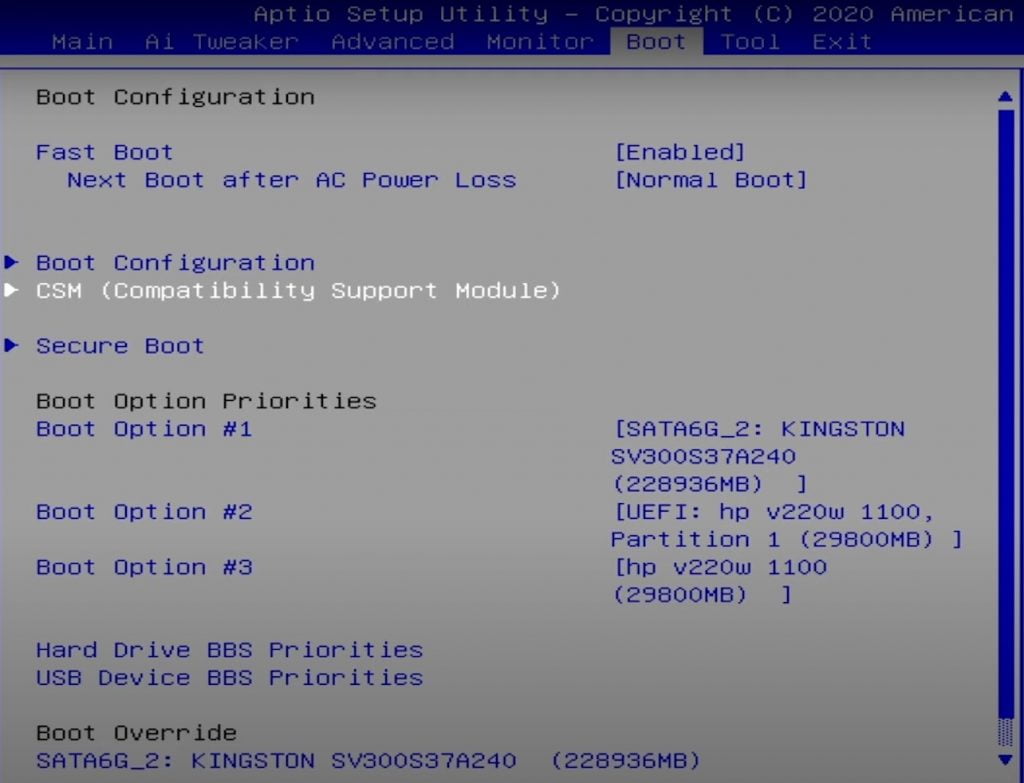
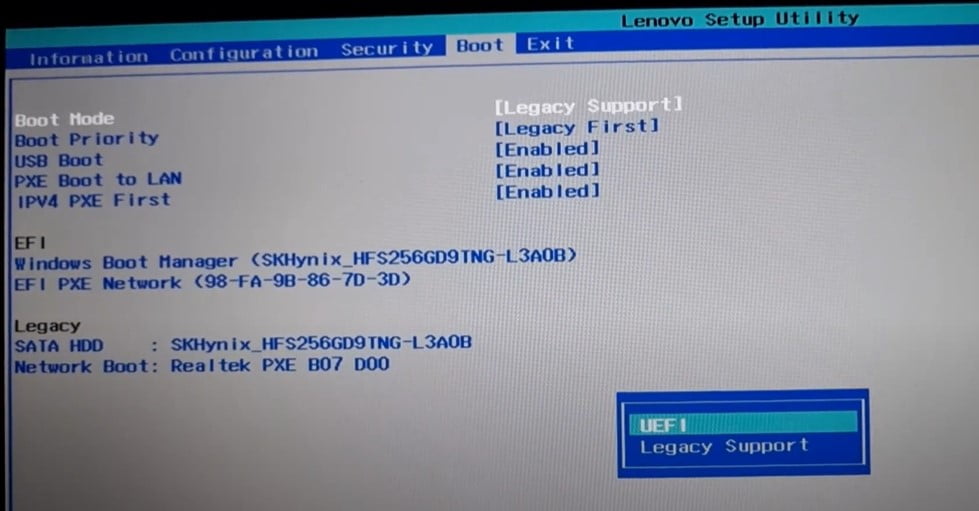
3. Once you are in the BIOS. The first thing you need to know is that your “Storage boot option controller” setting is “UEFI” selected.
4. Go to the Boot option by pressing the arrow key (if you can’t control the mouse).

5. Here, you will find the “Storage boot option controller” option.
6. Click on it. It will show a pop-up with different options. Select the UEFI option from here.
- If you notice, other options are selected as Legacy mode. It would be best if you changed those options to UEFI mode.
IMPORTANT: Without Selecting the UEFI option. You can’t install Windows 11. Because Windows 11 will install only in UEFI mode. Suppose you are trying to install it in legacy mode. You will never install Windows 11.
8. Next thing is, You need to enable the TPM option. In the latest Gigabyte motherboard, this option is located in the “Settings” option. So, navigate to the Settings option.

9. Select and enter the “Miscellaneous” option. Here, you can see an option called “Intel platform trust technology” (In my case). Yours may have different options in different places. But it would be best if you found the TPM option.
10. If this option is disabled. Make sure to change this option to “Enabled” mode. It will ask you for confirmation. Select YES to give permission.
11. After this, it will restart. Now, you need to boot your system from the “UEFI USB Drive.” You can see two types of USB drives here. Make sure you select the USB drive, which is in UEFI mode.
12. Now, you are able to install and set up your windows 11 successfully.
<br/>Method 2, Windows 11 Bios Settings On Asus Motherboard
1. First, you need to reboot or turn o your system. (If you don’t have Windows 11 bootable device). Press the Delete key (Yours may be different) to enter into the Bios Setting.
2. Next, you need to select the Boot option from the main menu.
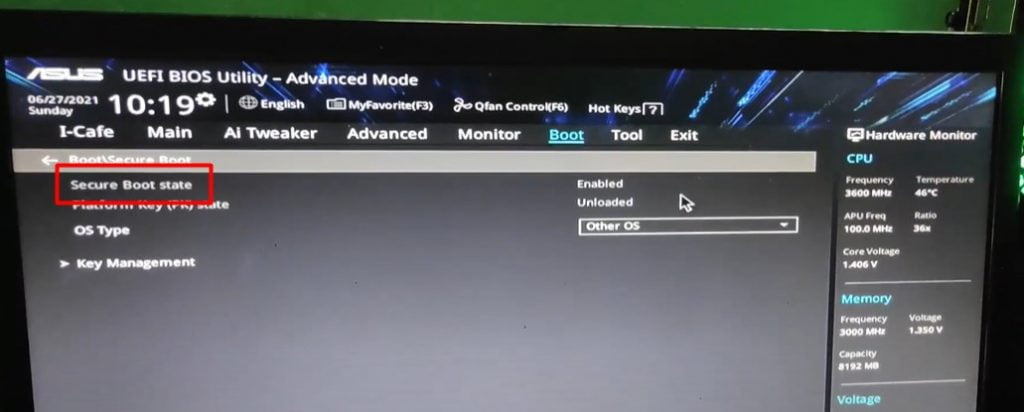
3. Here, you can see an option called “CSM (compatibility support module).” Select and enter into this setting.
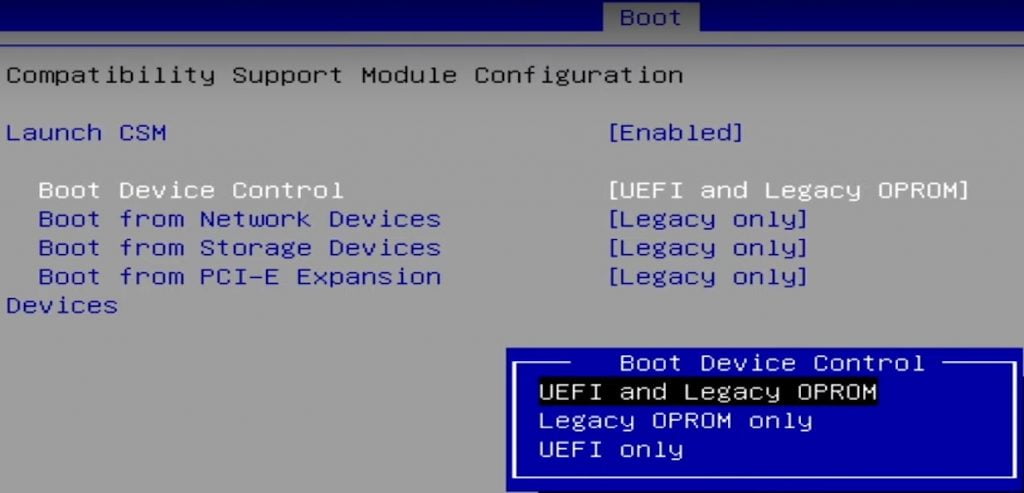
4. Here, you can see a bunch of list options. You need to change some settings here.
Select the “Boot Device control” option. Select any one option. either “UEFI Only” or “UEFI and Legacy OPROM.” as you can see in the first picture, the next option is “Secure Boot.” Enter this. If it is disabled, please make it Enabled.
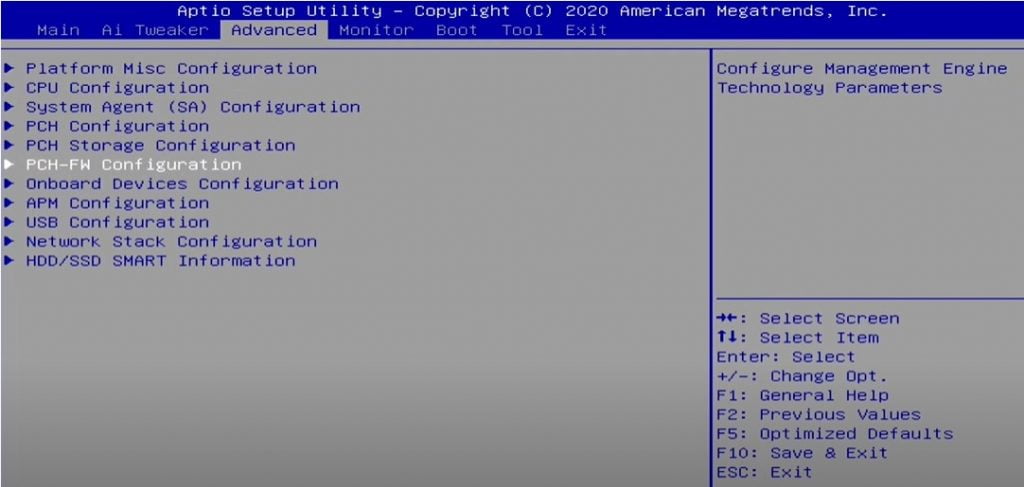
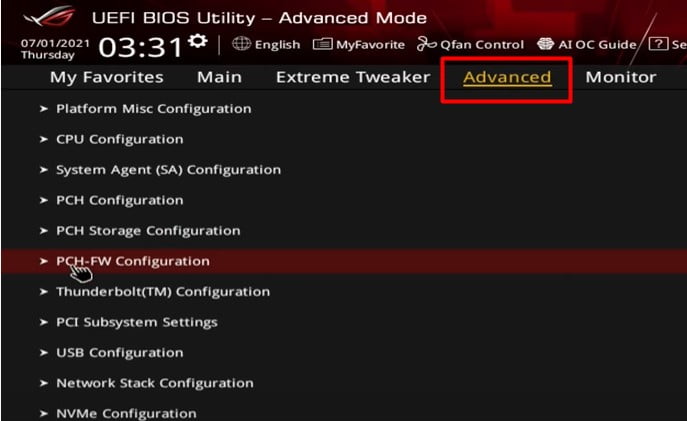
5. Now, Press the “ESC” key to go back to the main setting. And then go to the “Advanced” option. Here, you need to select and enter the “PCH-FM Configuration” option.
6. Next, Here you can see an option called “TPM Device Selection.” Press enter on this option.
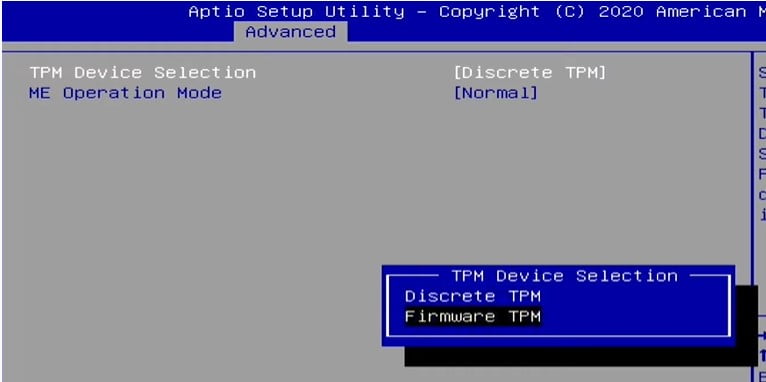
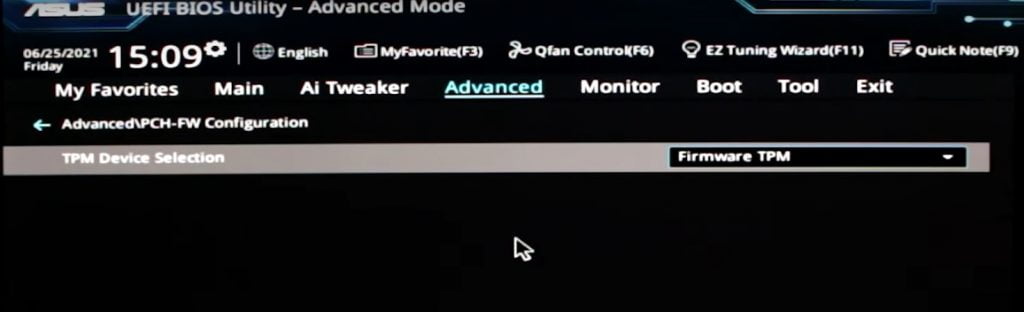
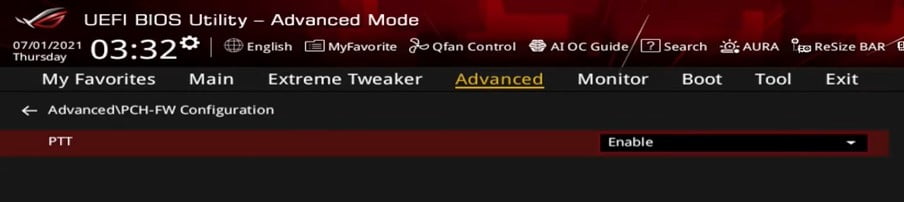
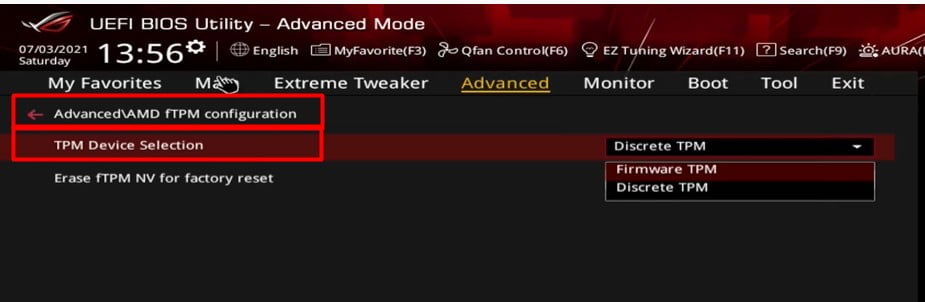
7. Then, a new list of options will open. You need to select the “Firmware TPM” option. Press enter. Now, you can see a message. Please read carefully what you are doing.
8. Next, Go to the back and Save the settings by pressing the “F10” button.
Now, Your system will restart again. then boot from the USB drive where windows 11 ISO file is located. See the Windows 11 Installation Guide. Now you are good to go.If this post “Windows 11 BIOS Settings” helpfull for you,please give us feedback. or if you find any other solution about Windows 11 BIOS Settings.
Method 3, Lenovo BIOS Setting
1. Once You’re in the bios. Go to the Boot section, where we are going to select Boot mode. Select the UEFI option.
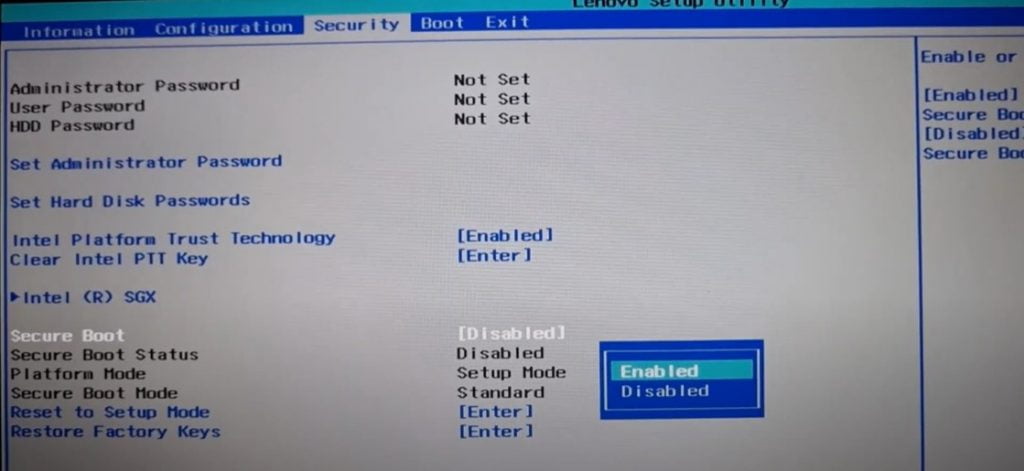
2. Then go to Security. Go down a bit to Secure Boot. Enter and then select Enabled. After that, press F10 to exit and save the settings at the same time.
3. Also, Click on the “Intel Platform Trust Technology” and Enable it.
Method 4, Windows 11 BIOS Settings On MSI X570 Motherboard
Simply enter into your bios using the BIOS key for your keyboard.
Go to the following option:
- Click on the “Settings” > Click on the “Security” option > Next, Click on the “Trusted Computing” option.
- Here, you can see an option called “Security device support.” Click on it.” it will show you a pop-up. Here, you need to enable it. Choose the “Enable” option from the pop-up options.
- Next, Enable the AMD fTPM switch option.
- Now, Save the changes. Then your system will be restarted, and now you can start the Windows 11 installation process. Also, you can check additional settings for msi bios manual.
Method 5, AMD BIOS TPM Enabled
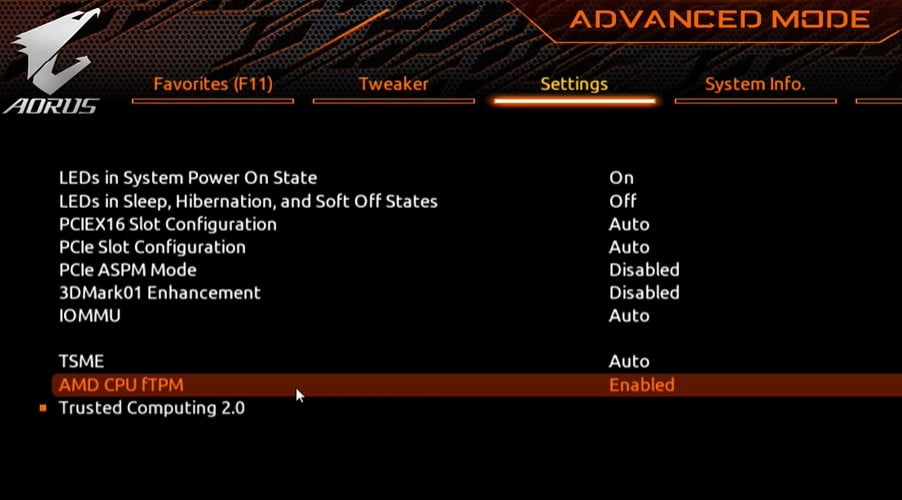
- Go to the Settings tab. Find the option called AMD CPU TPM and Enable it.
Check, the Intel B660 Motherboards specifications and how it will help you to install Windows 11.