
Troubleshoot Discord Screen Share No Audio Issue [Mac, Windows]: If you are playing games or you are working on another project.
Suppose you need to share the desktop screen with your friends using Discord. Sometimes, you notice Discord Screen Share No Audio issues. At that point, you are stuck in the issue.
In this post, We will explain how to solve your Discord Screen Share No Audio issue. This is really very simple to do.
This issue happens because of numerous reasons, for example, Primary settings mismatch or driver conflict. So we need to troubleshoot the Discord Screen Share no audio issue in a step-by-step way. This problem has different troubleshooting techniques and steps.
Successfully tested and your discord screen share on audio problem on macOS is fixed.
Method 1, Fix Discord Stream No Audio Mac Using Soundflower
PURPOSE:
Route system audio (From a browser or any other program) into a voice chat along with a microphone input.
REQUIREMENT:
Make sure you have:
- OBS: Click to install
- VBCable: Click to install
- *Soundflower: Click to install
*After downloading Soundflower, open it, then run the installer (Soundflower.pkg) by holding option [⌥] while right clicking it and then clicking Open. The first time you run the installer (Soundflower.pkg), it will ask for your admin password, and will FAIL!
A security alert will appear, with a button to take you to the System Preferences > “Security & Privacy – General” pane. Once there, click the lock icon in the bottom lower left corner first, enter your password, then click “Allow.”
After that, RUN THE INSTALLER AGAIN. It should inform you that the installation was successful.
Make sure VB-Cable and Soundflower are installed properly by pressing the [![]() ] button in the menu bar (Top of the screen). Soundflower (2ch), Soundflower (64ch), and VB-Cable should all be there.
] button in the menu bar (Top of the screen). Soundflower (2ch), Soundflower (64ch), and VB-Cable should all be there.
STEP 1: Configure Multi-Output Device
- Press Command+Spacebar, enter MIDI, then press enter
- Click the [+] button in the bottom left, then Create Multi-Output Device
- Click the checkboxes in the Use column next to VB-Cable and your headphones device (Only those 2 boxes should be checked)
- Make sure VB-Cable is selected next to Master Device and 48.0 kHz is selected next to Sample Rate
For convenience, rename your output device to IOMerge by clicking on the default name (Multi-Output Device) in the left column.
STEP 2: Configure OBS
- Open OBS. Make sure you are using a fresh scene.
- Click the [+] in the Sources panel, then click Audio Input Capture.
- Under Create New, enter Microphone as the source name. Click OK.
- For Device, change Default to your preferred microphone input. This may be your Device’s built-in microphone or an external microphone. After that, click OK.
- Click Settings, then Audio
- Under Global Audio Devices, change Mic/Auxiliary Audio to VB-Cable.
- Under Advanced, change Monitoring Device to Soundflower (2ch).
- Click Apply in the bottom left, then OK.
- In the Audio Mixer panel, you should see Mic/Aux and Microphone. Click the gear icon next to either volume slider, then click Advanced Audio Properties.
- Under Audio Monitoring, change Mic/Aux to Monitor and Output. Change Microphone to Monitor Only (mute output). Then click Close.
STEP 3: Configure Discord
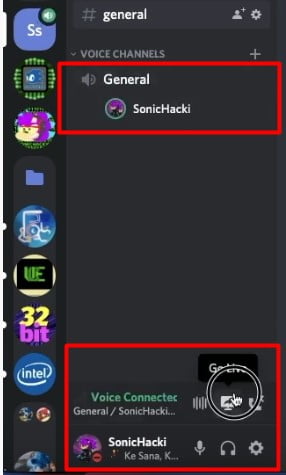
- Click the gear next to your username to enter User Settings
- Under App Settings, click Voice & Video
- Change Input Device to Soundflower (2ch). Change Output Device to your preferred headphones or speakers
- Because your system audio will go through the same input as your voice, the same audio filters will be applied (Noise removal, echo cancellation, automatic gain). Still in Voice & Video, scroll down into Advanced to Voice processing. Experiment with these settings until your system audio sounds good. I find it best to disable Automatically determine input sensitivity under Input Sensitivity.
- Finally, in your Mac’s menu bar, click
 and change your audio output to IOMerge (or whatever you named the Multi-Output Device)
COMMON ISSUES:
- System audio is suddenly very slow and low-pitched
- Solution: Restart computer
- Can’t change volume
- Solution: Open Audio MIDI Setup again and find your headphones/speaker device. You can change the output volume by adjusting the Master slider.
- Audio sharing is very choppy through the voice channel
- Solution: Lower the audio sensitivity in Voice and video settings.
Now, It should be fixed the Discord Screen Share No Audio issue on Mac.
Method 2, Mac Screen Sharing Audio Workaround Using Loopback
I’ll explain to you the best option to get sound working on Now, It is the second method for the Discord Screen Share No Audio issue on Mac.
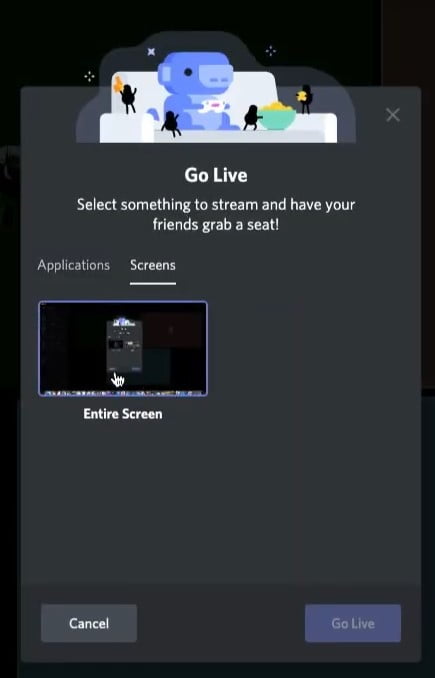
you will need to go through a workaround. How you are able to fix the Discord screen share on the audio issue on Mac. as you presumably realize the “Go Live” option on Discord on Mac has a few limitations.

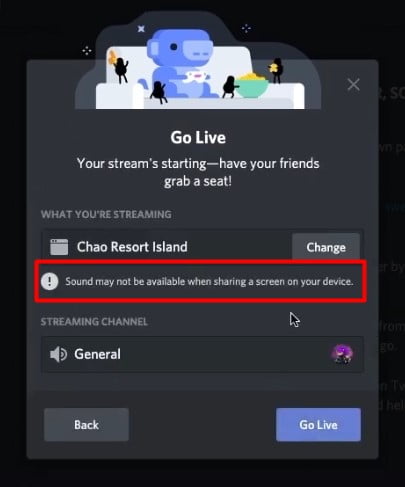
So how about we join a dummy server voice Channel. What I mean, in the event that I go to Go Live and need to stream an application. it says here “Sound may not be available when sharing a screen on your device”
Also, go to screen sharing and it’s likewise showing the same Discord screen share with no audio issue on Mac.
So the issue is the Go Live audio-streaming thing is only viable with Windows 10. it doesn’t support Windows 7 or Windows 8.1 not to mention macOS and Linux versions. But You can fix the audio not available on the discord screen Mac by using LOOPBACK and iShowU. I am using Loopback for the audio output.
In this section, I’m utilizing Mac OS. I’ll be explaining to you a bypass method. you can utilize it to get sound from applications or games working on Mac. so you can have it also on your Discord stream.
For this workaround, you need to get a program called Loopback.So this is what it looks like. You can see the above picture.. if you manage to get a copy of this application.
1st, You have to download it > Install it and open it.
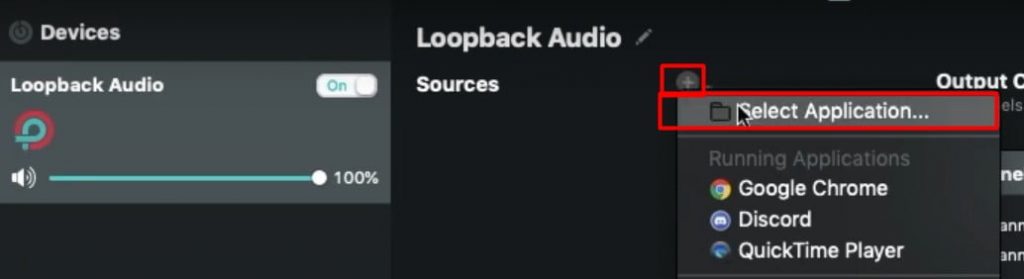
2nd, Once you are in Loopback app. What you will do is, you need to click this “[+] Add button” and afterward select the application that you need to get the sound streaming.
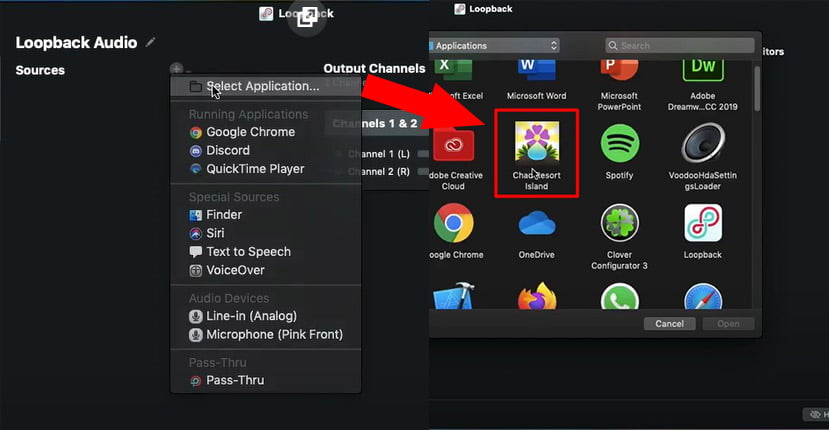
I need to choose the stream for example: Chao resort Island. It’s a Sonic fan game.
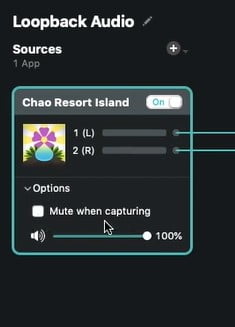
3rd, What’s more, from here you need to click on options and ensure you uncheck this “Mute when capturing“. And also, you are able to adjust this volume

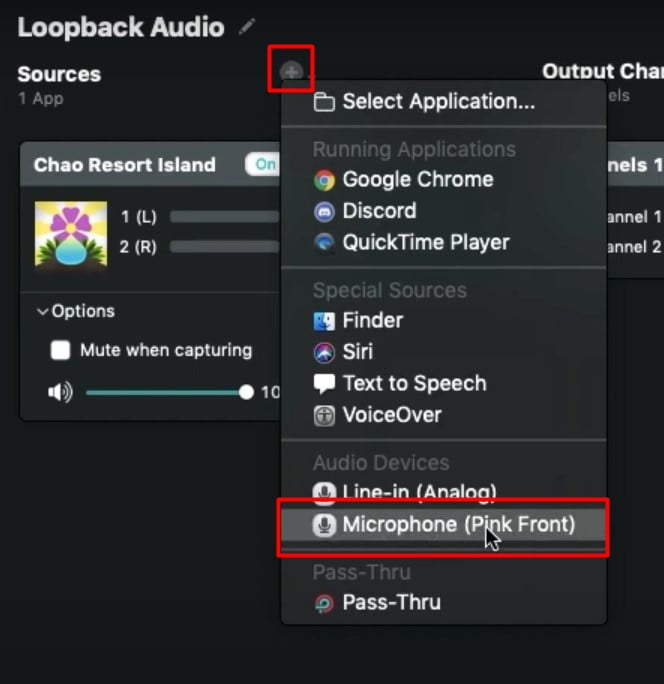
4th, Besides, You need to add your microphone. obviously, from here it says microphone.
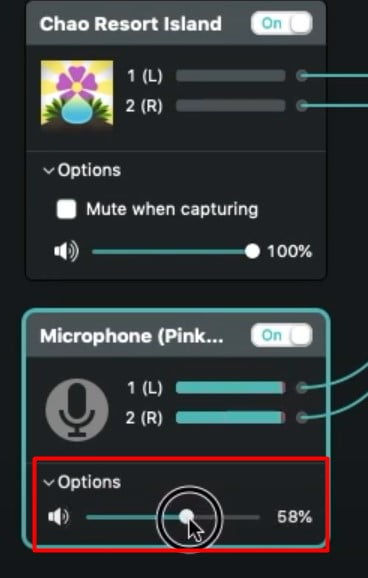
Even you are able to change the microphone here. you can see exactly how loud it is.
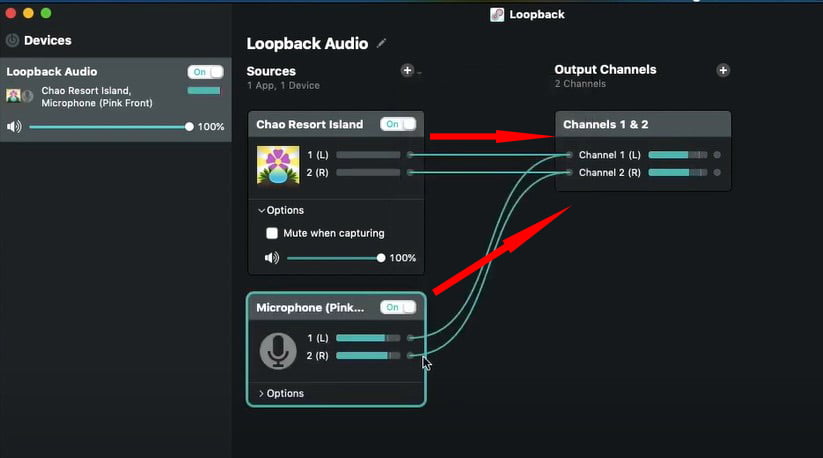
5th, What is happening at this moment, it’s merging the sound coming from the application and the sound from your microphone. it will combine to make one virtual input.
What’s more, the right-side box court will get the contribution from loopback hearing your voice and the game sounds that is how it works.
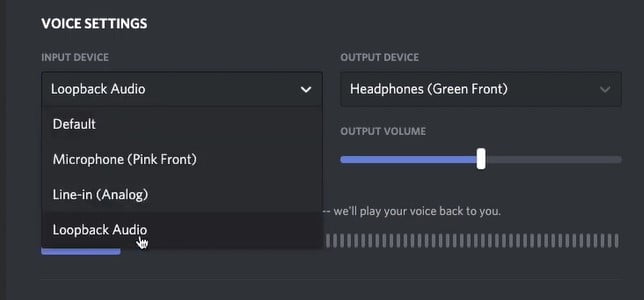
6th, Now, You will need to open Discord. And then, Go to the User settings. Select the Voice and Video option, and you need to choose the input device to loop back audio.

7th, Afterward, Scroll down, At the bottom would you like to choose “Automatically to detect the input sensitivity“. Make sure you switch it off.
The explanation is why you want to switch this thing off. because, in some parts, if the application has some soft music. the music will be cut off because of the automatic sensitivity detection. it won’t detect the softer parts of your game music or application.
8th, Now, We can close it. so we’re going to test this out. I’m going to join the voice Channel. also, I’m going to stream the screen. I mean the resort island here. even if it still shows “Sound may not be available when sharing a screen on your device”.
But, you will be able to hear the game sound. Also, the other people should be able to hear the sound. Indeed capture Device, I mean the QuickTime Player even records from the loopback sound.
If somebody isn’t on the voice chat and hasn’t really joined your stream. Also, they are able to hear the in-game voices. So because the sound of the gameplay or the application is really routed through the voice part of Discord, I couldn’t say whether you really comprehend that, but that is the way it works. I hope you like our method to fix the Discord Screen Share No Audio Issoe on Mac.
In this section, I will show you how to screen share Discord on iMac. So recently, I had a really hard time trying to screen share on iMac. It’s just like it didn’t work. Every single post shows Microsoft computers. and it just didn’t help.
To do this. I’m gonna go straight into it.
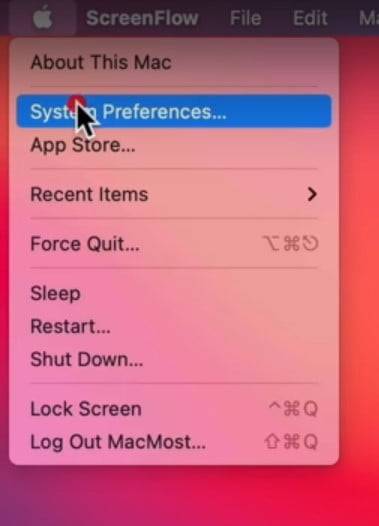
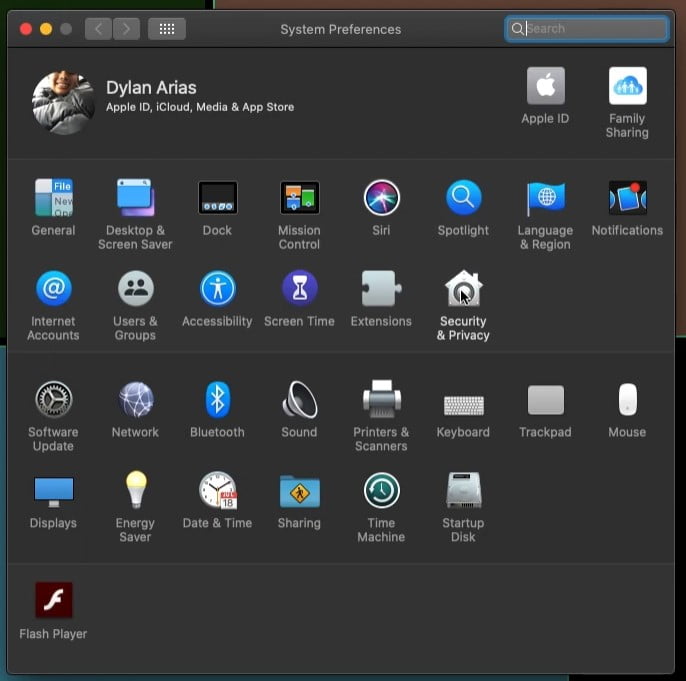
1st, You need to go to the System Preferences. Please wait until it loads. You need to go to the Security and Privacy option.
2nd, Once you are in the Security and Privacy window. Go to the Privacy tab.
3rd, Scroll down and find the option called “Screen Recording.” Select it and click on the little “Lock” icon at the very bottom-left of the box.
4th, It will show you which apps are using the screen recording feature. Make sure you add the Discord app to this, as you can see in the picture. I have added the Discord app and QuickTime player.
So as you can see in the picture. My Mac is now able to share a screen. I could mount two screens, and I actually liked this head before I wasn’t able to do this. So like as you can see they can, I can see my screen and also it will fix the “Discord Screen Share No Audio” Issue on iMac.
In this section, we are going to see how to troubleshoot issues related to discourse,Screen share audio not working in Windows 10 computers.
For example, if you have a voice channel or you simply have a call with someone. Click on ‘Share Screen”, at the bottom left.
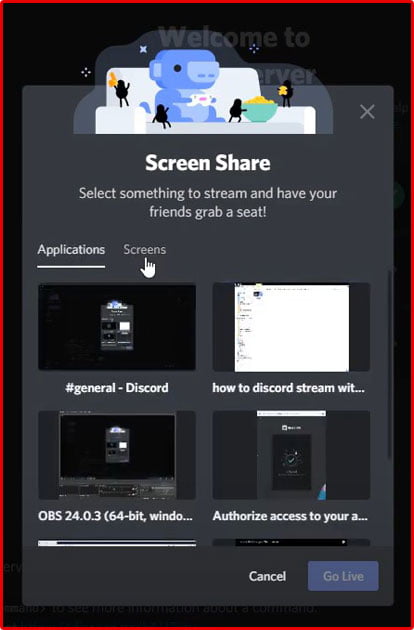
You can see (See Image) all the apps I have opened already. What’s more, You can likewise go to the Screens tab.
So these are my opened screens. however, when I am sharing my screen. it won’t record the sound and the discord share screen goes black. so you can’t, the other person can’t hear the discord sound. To fix this issue, you need to do something little.
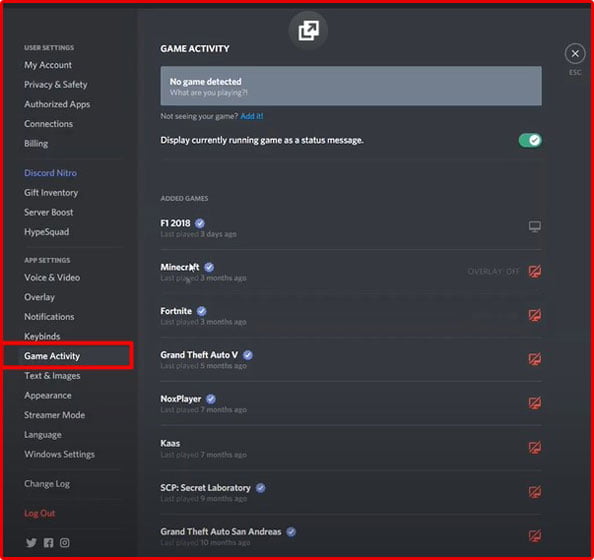
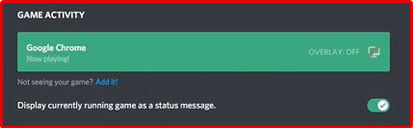
You need to go to your Discord Settings at the bottom-left of the window, afterward, click on the game activity option.
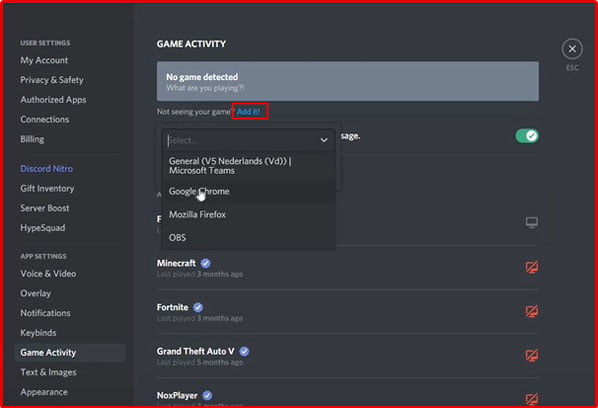
And afterward, you need to choose the application you’re utilizing. so you need to click on the “Add it” link. What’s more, here I need to utilize Google Chrome. so I selected Google Chrome.
So for example, If You need to share a YouTube video with sound. Also, I can share the screen with friends on Discord. they can hear it also.
If you add chrome to this. Presently you can return to the channel and when you click on the share screen option.
After that, choose a screen that you need to share.
Presently, you can see the streaming channel option. And, you can and the other persons are able to hear the Discord screen share audio.
Solution 2, Reboot Your System
So if this issue happens again, the second troubleshooting strategy is to Reboot the PC. Rebooting the PC will invigorate your windows and the issue may be resolved for your Discord application.
Solution 3, Administrator Permissions
If it is still not working, at that point right-click on this application and afterward click on properties.
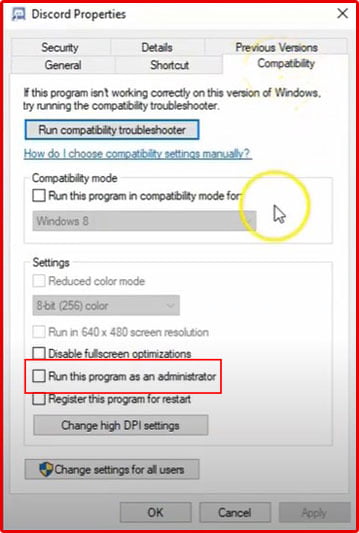
In the properties, and in the compatibility tab, Click to check the “Run this program as an administrator” option. and afterward, click on Apply and snap on OK once more.
And afterward, open this discord app with the administrator. Snap yes for user control permissions. And afterward, check if this method affected or not.
Read More: How to get DISCORD NITRO FREE
Solution 4, Window Audio Service
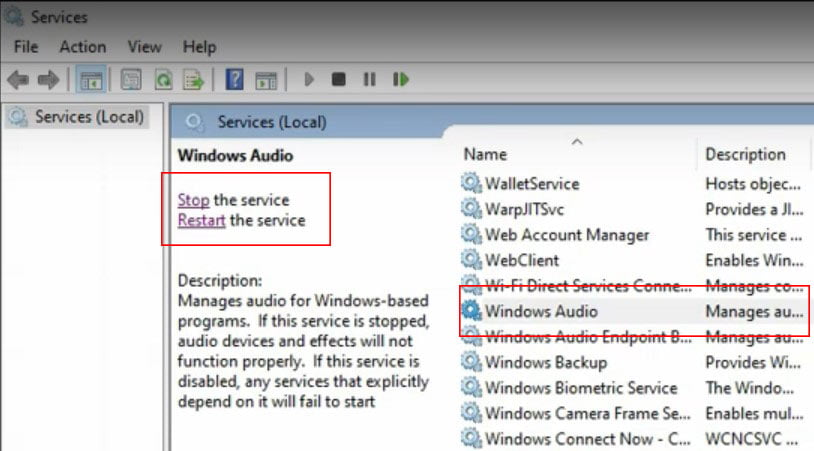
The next solution is to open the run box and then type “services.msc” and press Enter. next, choose any of the services and press a W on your Keyboard and afterward find Windows audio service, and Restart this service.
After that, close your Discord application and open it again and check if the issue is gone or not.
Read More: Discord No Route Error? How to Fix it?
Solution 5, Windows Sound Settings
The next strategy is to type sound in the search box and afterward click on sound settings.
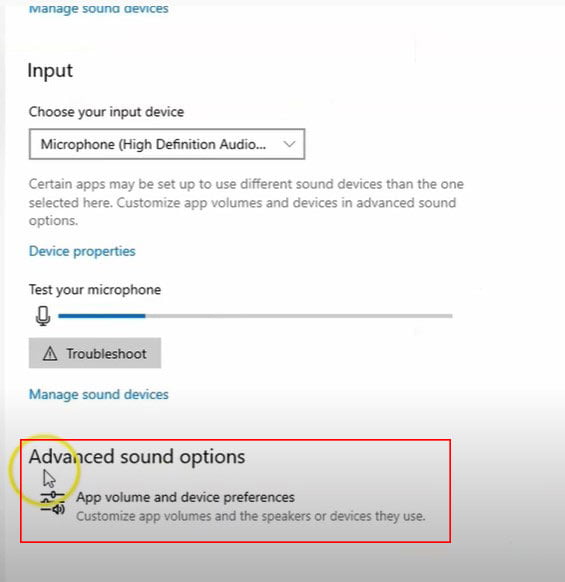
In the sound settings, you need to scroll down and click on the app volume and device preferences option.

On the next screen, You would find them discord over here. So you need to ensure that App Volume isn’t muted. if this is muted, you need to click on this mute icon and unmute the app volume setting.
So close the setting window and the application, and check if the Discord Screen Share no audio issue is fixed or not.
Read More: How To Link Your Phone To Windows 10?
Solution 6, Discord Voice and Video Settings
If the Discord Screen Share No Audio issue doesn’t resolve, then you need to click on Discord user settings here.
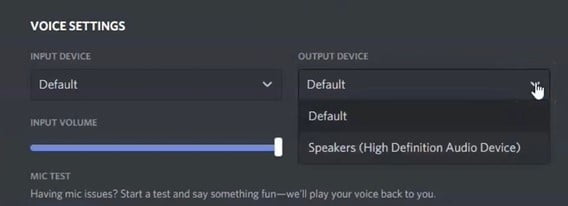
In the user settings, Click on Voice and Video, In this setting, you need to check if your input device and the output device is correctly set up.
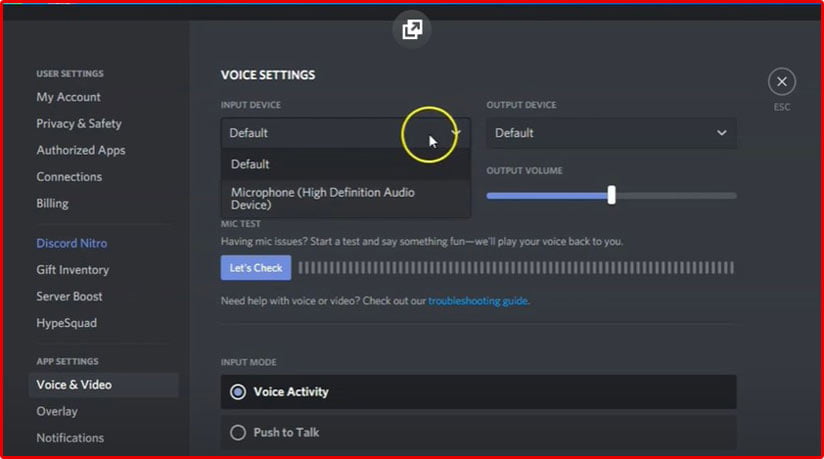
Also, if this isn’t correctly configured, you can simply open the dropdown and choose the audio Device, anything you want to select, and select output device too.
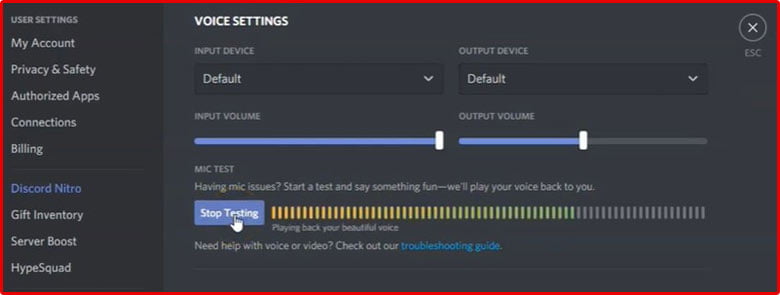
To check if this is appropriately configured. Also, check if the Mic is working or not . On the off chance that Mike is currently working or not, you can simply tap on the Let’s check. Hello….Hello…
Now check again the problem is gone or not.
Solution 7, Push to Talk
If the above method isn’t working, at that point you can likewise choose the push to talk option to force the mike to work. And furthermore, you can tap on Keybind settings to bind the keys for the Push to Talk. To add a Keybind, click on “Add a Keybind”.
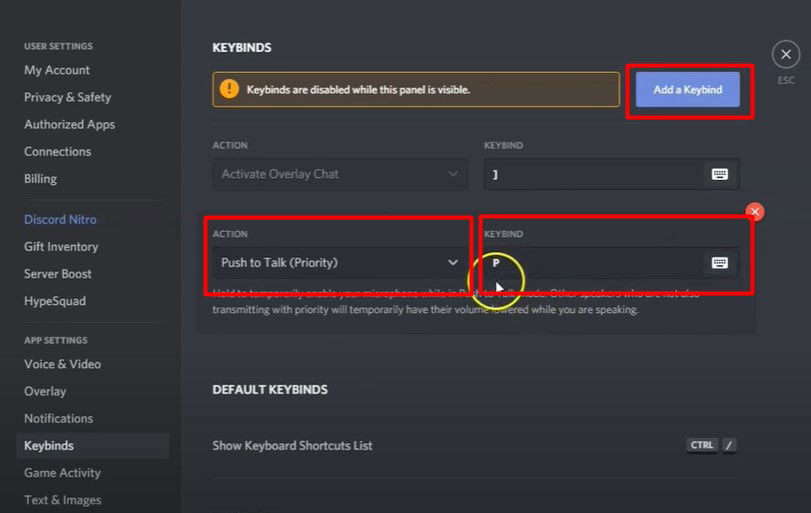
And afterward, Open the Action dropdown, you need to choose the Push to Talk(Priority). Also, for the Keybind you need to press any of the keys. Assume I press P here, so it will come “P” as a Keybind for me, and afterward click on escape.
Latest Posts
- Top 25 Best Discord Furry Servers in 2024

- How to get Discord Nitro Gift
- Discord Nitro Youtube Premium Not Working – How To Fix?
- How To Unban Someone On Discord [Mee6, Dyno, Carl Bot, Android, iPhone]
- How TO Install BetterDiscord [Themes,Plugins,Custom CSS]


Solution 8, Update Your System Audio Driver
If the problem actually doesn’t resolve, at that point we need to check the sound drivers. if the sound drivers are appropriately configured, appropriately installed, or not. So right-click on the Windows Start menu and afterward click on Device Manager.
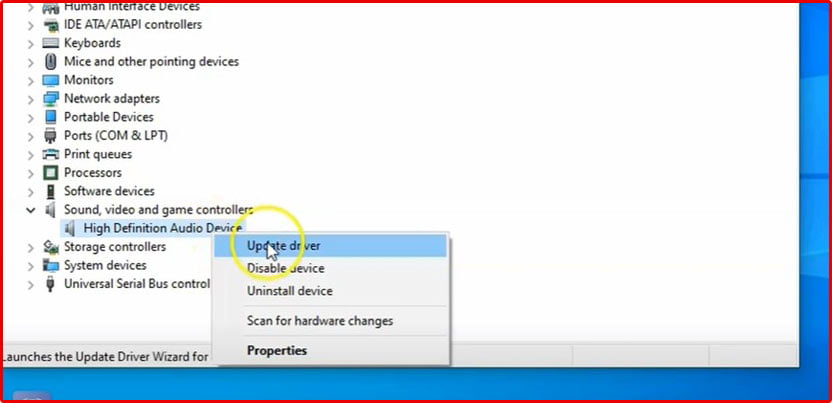
In the device manager setting, Find and choose the “sound, video and game controllers” and expand this dropdown. And afterward, you need to right-click on the Audio device and click on the Update Driver. A pop-up window will open.
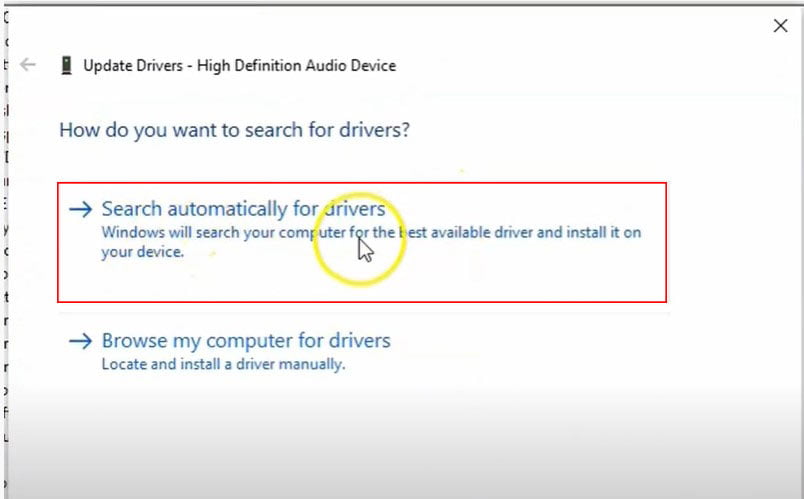
Select the “Search automatically for drivers” option. and afterward, it would install the latest drivers. or then again it would see the best audio drivers for your system are already installed.
Close the setting. Check if the issue is settled by opening the Discord app.
Solution 9, Reinstall Driver
At that point right-click on the Audio device and afterward click on Uninstall Audio device and afterward select the Uninstall option. It would uninstall your audio Device from your PC. and afterward right-click on the Desktop Name and afterward click on “scan for hardware changes”.
When you do this, you would get the sound driver’s sound Device installed on your PC by the default drivers. So once you complete this process, you can check if the Discord screen shares no audio issue is solved or not.
Solution 10, Remove Old Data and Reinstall Discord
If the Discord Screen Share No Audio issue still happening, at that point open the Run box, and afterward you need to type %appdata% and Press enter. The Appdata folder will open, and you need to delete the Discord folder.
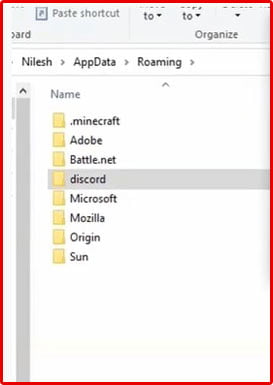
Before you delete it make sure to open the task manager and check the discord application isn’t running in the background. Otherwise, the folder won’t be erased.
So the discard folder is presently deleted.
And afterward, open the Run box again and type %localappdata% the Box and afterward Press enter. The Local folder will open.
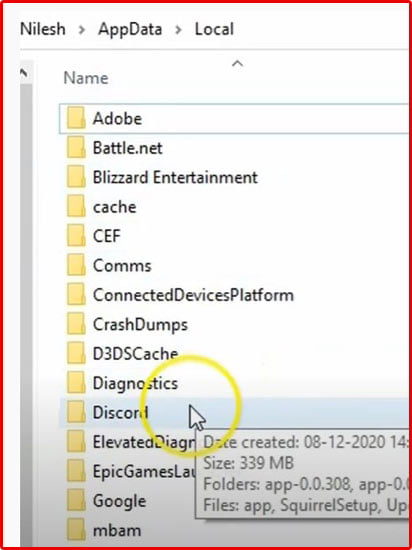
You need to delete the Discord folder also.
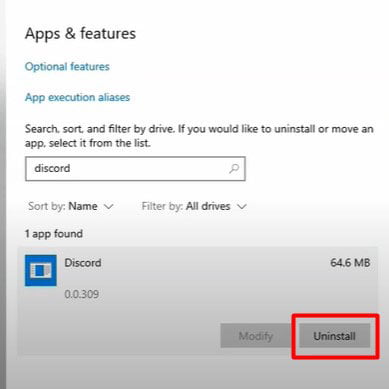
And afterward, you need to Right-Click on the Windows Logo and then click on Settings, and then click on Apps. in the search box, type discord, select the discord, and then click on Uninstall. And then we have to download the Discord application again and Install it again.
Read More: Discord Overlay Not Working? 100% Fix Method
Solution 11, Windows Sound Control Panel
You have to right-click on the start menu and afterward go to settings or probably I’m simply going to type audio settings or sound settings on the search box.
Simply click on sound settings. the Windows Sound Setting will open. You need to find the Sound Control Panel option. Simply click on the option. A sound setting pop-up window will open.
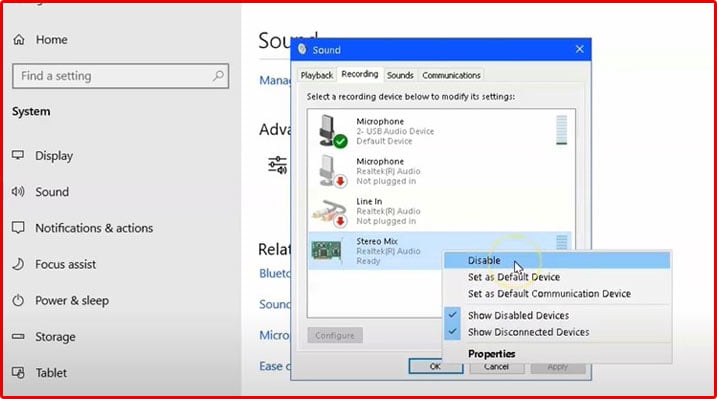
Go to the Recording tab, you would find various options over here. if you have a stereo mix option here, then click on it and afterward click on Disable. So I simply disable this stereo mix and afterward click on OK, close this pop-up box, and afterward close the settings too.
Presently go to the Discord application. you need to open User settings. In the user window, click on Voice and Video, And then in the output device, it is currently configured as Default. You can choose your headphone as an Output Device and in the Input Device, you need to choose a Microphone.
Or If that you’re getting the right audio with the input device, at that point you need to leave it as default. Afterward, click on the Cross icon to close and settings are changed.
So I believe these troubleshooting steps would help you with settling your Discord Screen Share No Audio issue. if you like this Post, Please share this. Also, leave your valuable comment below on which solution is working for you or any other solution you found.
Some PC systems will permit you to empower the Stereo Mix, an interior sound part of your PC framework, under the Recording devices accessible in your Windows Sound settings. Once enabled, you can choose this gadget as an input device or microphone on Discord:
Open Discord > Go to User Settings > Click on Voice & Video >Change Input Device: Stereo Mix
This permits you to send the sound from your PC as input to Discord. While this is set your normal microphone will not be connected as an input device so you will not have the option to talk through it.