Customize Windows 11 Start Menu Change | Classic Start menu: Here for troubleshooting, and welcome back to another post. This is yet another Windows 11 customization guide (Change Windows 11 start menu to Windows 10 start menu), and it’s something that I’ve definitely been looking for. Basically, if you hit the Start icon, You’ve got the new windows 11 menu over there.
Suppose you are one who is fond of scrolling through all of your programs. In the new windows 11, you have to click all apps options in the top-right. And then you can see all the apps over there. This is a little bit annoying, but it’s something you could get used to. However, you can customize Windows 11 start menu.
I personally use this list way more often than I actually thought. And getting back to the original windows 10 start bar is something I’d definitely like to do.
Top Post: Speed Up Windows 11 | Optimization For Gaming and Development
How To Change Windows 11 Start Menu To Windows 10 Classic Start Menu
Something about the new Windows 11 version or at least the insider preview, which it is currently. You can change the windows 11 start menu to windows 10 without any third-party downloads. customize windows 11 start menu is very straightforward.
That’s exactly what I’ll be showing you in this post, even though I’ll be disabling it after the end of this article. So that I can make windows 11 posts in a more windows 11 environment, rather than one more familiar to Windows 10.
1. So to begin, press and hold the Start + R key together to bring up the Run dialogue box.
2. Inside the run box, you need to type in Regedit and then click on Ok. Then, click Yes when prompted for admin permission.
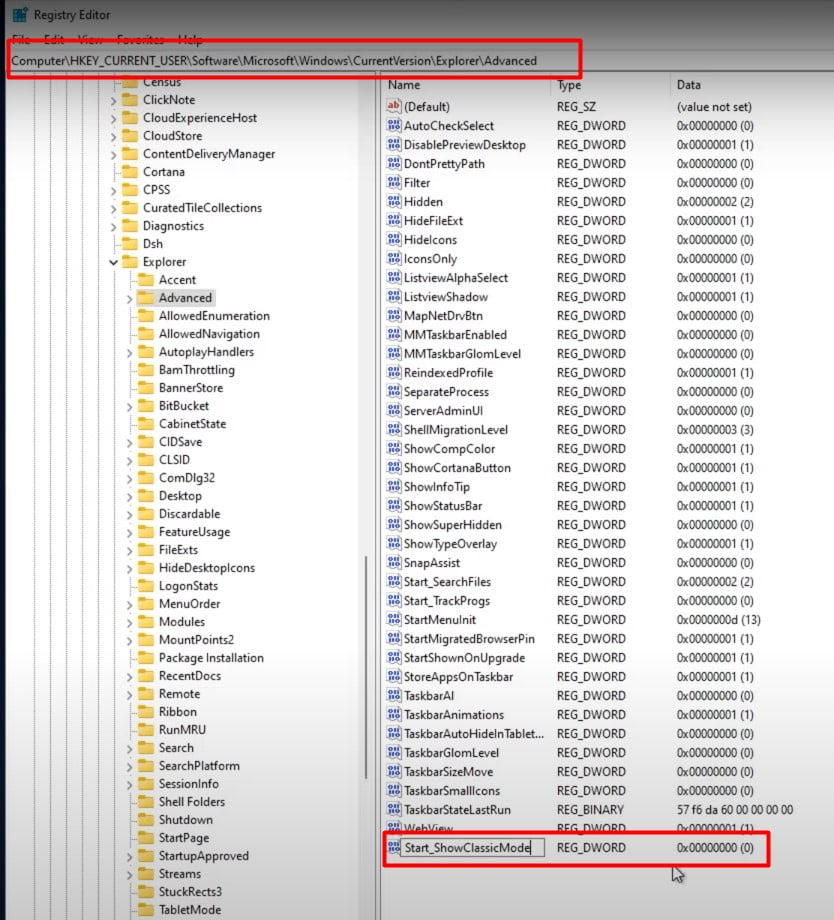
3. Next, It will open the Registry Editor. Inside of the screen registry editor over there. You need to look on the left-hand side at these folders here, in which you have to navigate across to the following folder path:
HKEY_CURRENT_USER\Software\Microsoft\Windows\CurrentVersion\Explorer\Advanced

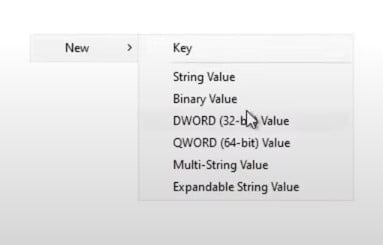
3. In the Advanced folder. You’ll see a whole bunch of items on the right-hand side. Now, all we have to do is right-click on the white space on the right-hand side. Choose New > DWORD (32-bit).
For the name, we’ll make it exactly start with a – capital S-Start, underscore[_] capital S-Show, classic capital-C, and Mode capital-M. [The name is – Start_ShowClassicMode].
4. Next, Click anywhere to Save this.
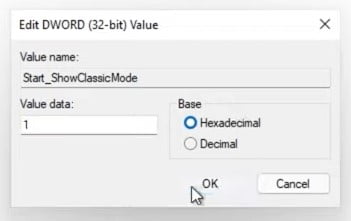
5. Please double-click on it. It will open a small pop-up window. You need to edit a value inside here. And also, make sure “Hexadecimal” is selected.

6. All we’ll be doing is, we’ll type in 1 and then press Ok to save.
7. After doing this, all you have to do is restart your windows computer. I’ll simply try logging out to check if that works as well.
You don’t have to restart, but you can do that if you’re more comfortable than logging out and logging back in. We now have successfully changed Windows 11 start menu To Windows 10 start menu. But of course, you can see it’s windows 11.
You can check it by clicking the start button up here. We still have the old change account settings button, which pulls us into the new settings window over here. So we are still running Windows 11 though things are brought back to a bit more of a familiar environment. I much prefer this. After customizing the windows 11 start menu, you can bring back Windows 11 start menu again.
And I am using this on my main work computer when Windows 11 eventually gets released. For now, I’ll leave it back in the original windows 11 start menu just for a more accurate article. You can check windows 11 other new features.
Read More On Windows 11
Fix Wifi Not Working On Windows 11 | Wifi Not Showing
4 Ways To Remove Login Password From Windows 11 PC
How To Remove Activate Windows 11 Watermark Permanently
How To Turn On Or Turn Off Animation Effects On Windows 11
Customize Windows 11 Taskbar | [Change Position, Taskbar Size, Align Icon]
How to Rollback Windows 11 To Windows 10 [Downgrade Windows 11]
1. Re-open the Registry editor as I opened the above post.
2. Navigate it to this folder:
HKEY_CURRENT_USER\Software\Microsoft\Windows\CurrentVersion\Explorer\Advanced3. You need to find the “Start_ShowClassicMode” name and double-click on it.
4. You need to set the value 1 to 0 and close it or simply delete it. After doing that I can try logging out [Restart] once again. and after I sign in, we start. you can see, we’re back at the new start menu that I personally don’t like as much as the old one.
Go to the next method how can you customize Windows 11 start menu another way?
Add Settings & Other Icons Next To The Power Icon On Windows 11 Start Menu [Customize Windows 11 Start Menu]
Customize Windows 11 start menu by adding a Settings icon and other options also.
1. Right-click on the Windows Start icon. Select Settings.
![Add icon next to start menu next to the power icon Add icon next to start menu next to the power icon [Customize Windows 11 start menu]](https://newscutzy.com/wp-content/uploads/2021/09/Add-icon-next-to-the-power-icon.jpg)
2. Once you are on the Settings window. Click on the Personalization option from the left sidebar.
3. Scroll down and select the “Start” option.
4. Next, you can see an option called “Folders.” Click on it.
5. In the next window, you can see a bunch of options here. You need to click on the toggle button next to the option. Suppose you want to add the “Settings” option next to the power button. Turn on the toggle button.
Suppose you want to add other options, like File Explorer, Downloads, Music, Pictures, etc. Just turn on the toggle button.
Move Windows 11 Start Menu To Left Side
I’ll be showing you how to move the Windows start bar from the center of your screen to the left-hand side as with previous versions of windows. Of course, I am currently using Windows 11. it’s presently a windows insider. But of course, this will apply to the full version.
1. Open Windows 11 Settings by right-clicking on the Start menu icon.
2. Then, Click on the “Personalization” option.
3. Next, scroll down and find the Taskbar option.
4. In the Taskbar windows, You can see many options: Well, of course, you can customize:
- What is currently Visible in the taskbar,
- Taskbar corner icons,
- Taskbar corner overflow and
- The Taskbar behaviors.
Check our fully Windows 11 taskbar customization article. By following the article, you can change the taskbar size, taskbar like windows 10, taskbar icons size, etc.
5. This last option is what we’re looking for. Under Taskbar behaviors – You’ll see the Taskbar alignment option. Change this from the center to the left, and you’ll notice everything goes back to the way it was mostly on windows 10. This is how you customize Windows 11 start menu (Change Windows 11 to the classic Start menu).
