
Nvidia Optimization On Windows 11 (Nvidia Control panel Setting for gaming): Suppose you are a gamer and have moved on to Windows 11. Now it’s time to Update/Install Nvidia Driver on Windows 11.
You will now have an update to GeForce drivers for Nvidia, So if you have a gaming machine with an Nvidia graphics adapter. I talk about it because I don’t often talk about driver updates unless they are security.
Because these are the first Nvidia drivers officially released for Windows 11, these drivers are not just updates for better gaming and some games; they are officially compatible with Windows 11.
Now, the older drivers did work, and I had no problem personally. Because I do play a lot of games there. But I have to say that it’s nice to see that you know these are officially Nvidia drivers for Windows 11 now.
In this article, I’ll show you how to do Nvidia Optimization On Windows 11 for best performance and Install Nvidia Geforce on Windows 11.
Also, you’ll find a complete Windows 11 system optimization guide. I’d highly highly recommend you follow. It shows you a ton of steps to take that’ll result in lower latency, better fps, etc., for games. And every other task that you do on your Windows 11 installation.
Windows 11 Slow Startup? Most Effective Fixes Slow Boot
What will happen if I do not update the Nvidia Geforce Driver?
Suppose you don’t have an updated Graphics driver. You will face some severe issues or black screen issues if you are doing some editing and all that. Then, you will not see high-quality pictures on your screen.
Suppose you have an updated graphics driver. Then, your system will work smoothly. And if you’re a gamer, it is highly recommended to update this driver.
How To Install Nvidia Nvidia Geforce On Windows 11
Let’s get into it. First of all, we’ll be downloading and installing the Nvidia drivers on our Windows 11 installation over here.
Step 1, Visit the Nvidia Geforce Official Site
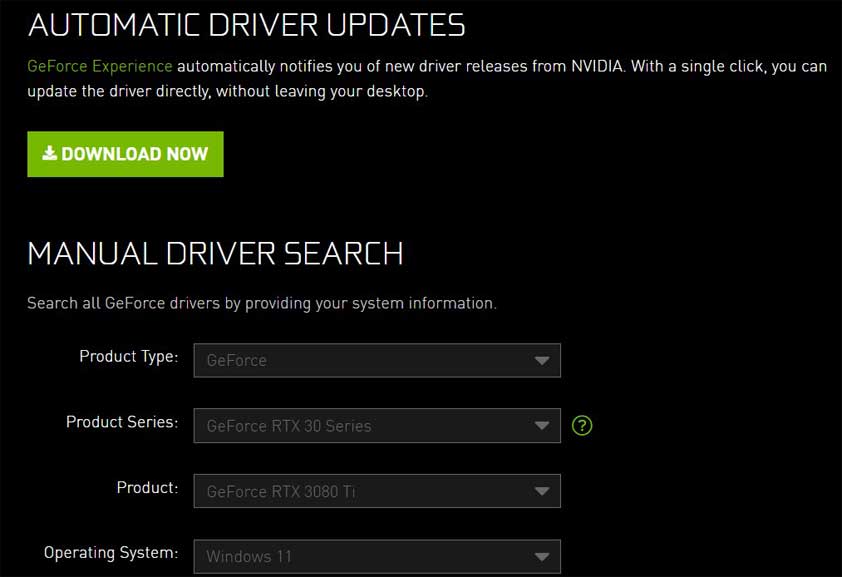
1. First, Click on this link (Nvidia Geforce Download). This link will take you to Nvidia’s official website. Here, you can see two options. 1) AUTOMATIC DRIVER UPDATES 2) MANUAL DRIVER SEARCH.
First, We will download and install Nvidia Geforce on Windows 11 manually.
Step 2, Select Your Nvidia Type And Version
What you’ll do is, You need to select your Product-type graphics card. So, in my case, Geforce.
Next is the Product Series, Which is the GeForce RTX 30 Series.
Next is the Product: GeForce RTX 3080 Ti.
Next is the Operating System: Windows 11. That I’m currently running for the operating system. If you don’t have Windows 11, Check how you can install Windows 11 on a PC.
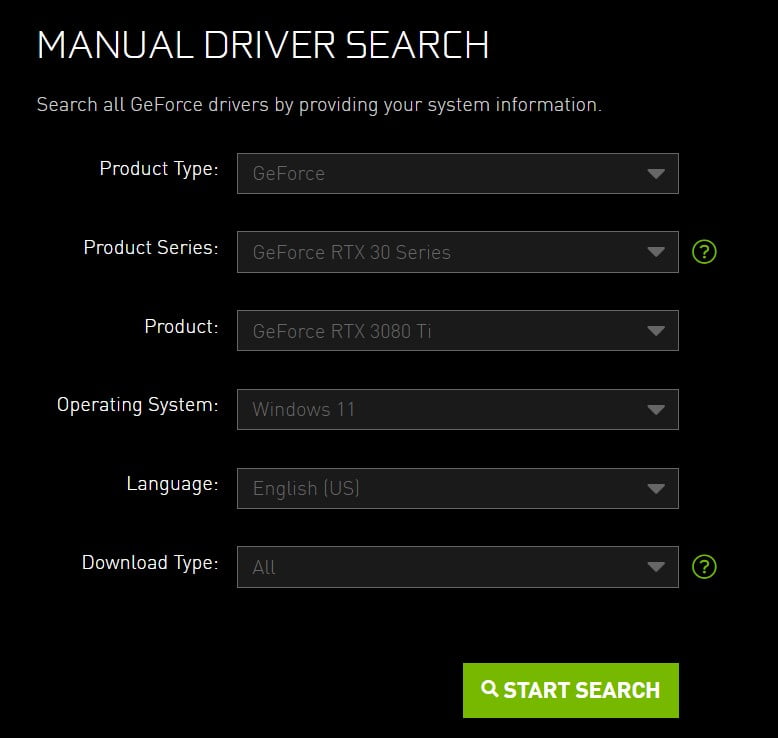
Select Your Language
Next Download Type: 1)All, 2) Game Ready Driver, and 3)Studio Driver. You need to Select All.
Step 3, Download the Nvidia Driver
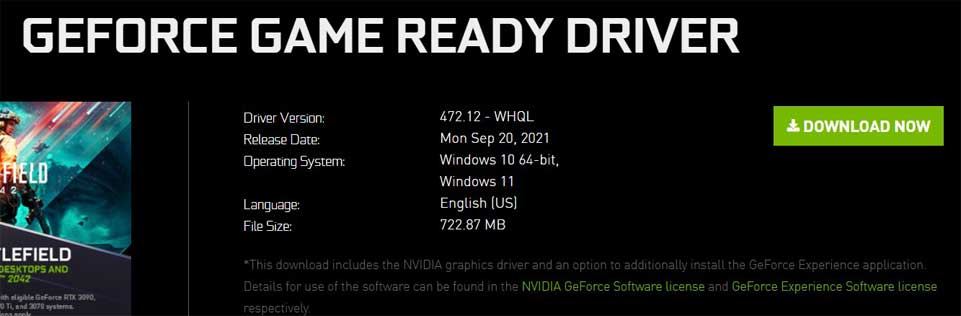
Then, all you have to do is click on search. And you’ll see a list of drivers down here. You need to look for the latest version that says the game-ready driver rather than the studio driver. Then click on the first result (GEFORCE GAME READY DRIVER – WHQL Driver Version: 472.12 – Release Date: Mon Sep 20, 2021).
The download should immediately start after clicking download. Once again, click on download. There we go, a 700-megabyte file. And, of course, this will only get bigger in the future, as far as I would think.
Step 4, Install Nvidia On Windows 11
So, you only have to wait for this download to finish. Once you finished. Click on it to open. Then, follow through with the installation as you would usually do. I’ll wait for it to unpack after the installation completes.
You can download the latest version and install Nvidia Geforce on Windows 11. The next thing is Nvidia Optimization On Windows 11.
How To Do Nvidia Optimization On Windows 11 (Nvidia Control Panel Settings For Windows 11)
You should be able to open up the Nvidia control panel by right-clicking your desktop. And then click on the Nvidia Control Panel.
1. Nvidia 3D Settings Optimization

When the Nvidia control panel opens up, you’ll see something like the 3d settings tab on the first page. Simply ensure you have it set to “Use the advanced 3d image settings” over here.
How to Clear Shader Cache for Better Gaming Performance?
Then click the “Take me there” link, which will take you to the managed 3D settings submenu over here. All you want to do is go through the settings here. And make sure they closely match my settings.
2. Nvidia Global Settings
I will go ahead and adjust them to better what you should try. Match to become: I’ve run through all of the settings here and adjusted it to be something more like what yours should be.

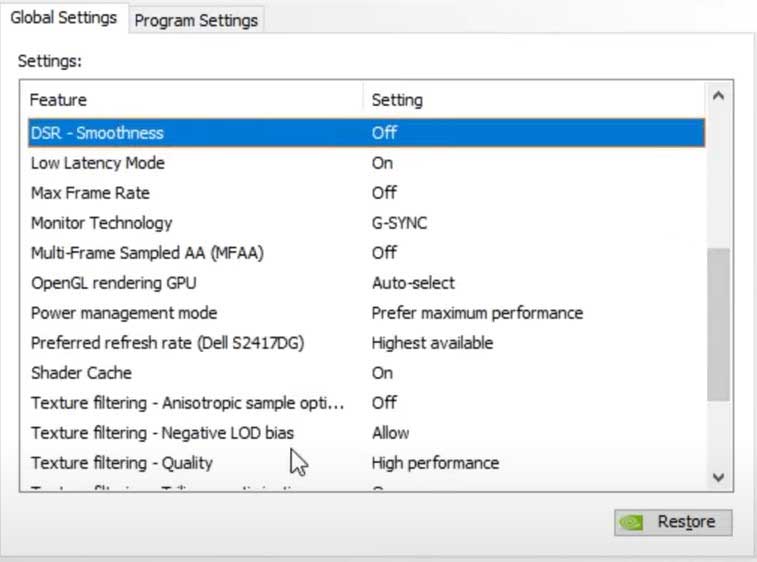

Of course, you may have more or fewer options than me, depending on what kind of graphics card you have.
Suppose you have more options than I don’t. Use common sense or follow Nvidia’s suggestions. You usually have the Nvidia icon next to them. Otherwise, if you’re missing specific options, don’t worry about it. Skip over them.
3. Program Settings For Nvidia Control Panel

Added to the program settings page over here. Should I start with the same settings as the global settings tab? Of course, if you’d like, you can drop into specific games here, such as Modern Warfare. And adjust them to better match the global settings we have above.
4. Nvidia Resolution/FPS Setting On Windows 11
Let’s move on to the next tab.
1. We’re going to head across to Display> Change resolution. This page is significant, especially if you have a high refresh rate screen.
My primary monitor over here is G-sync capable. It’s 144 hertz.
You need to make sure that it’s set to the maximum or advertised resolution for every one of your screens. Refresh rate or fps rate that you bought your monitor for.

Suppose you bought a 144hz monitor. Could you set it to 144hz? And if you bought a 2k 144 monitor, set it to 2k 144. you want to set it to whatever you bought your monitor as. Sometimes, at least from what I’ve seen. Though incredibly rare, it’ll offer resolutions and refresh rates that the Display doesn’t necessarily support.
If, for some reason. You choose the resolution or fps rate that isn’t supported. As soon as you click on apply. you’ll notice that your screen goes black. Don’t worry, don’t click anything. Wait around 15 seconds, and it should automatically revert.
Why is that? Simply click apply, and you’ll see a pop-up on your screen. Saying would you like to keep the settings?
You’ll either click yes or no. if you don’t click anything. It’ll simply revert, which is the same as pressing no. It’s that simple.
5. Nvidia Color Settings
At the very bottom. I’d highly recommend clicking Use Nvidia color settings.
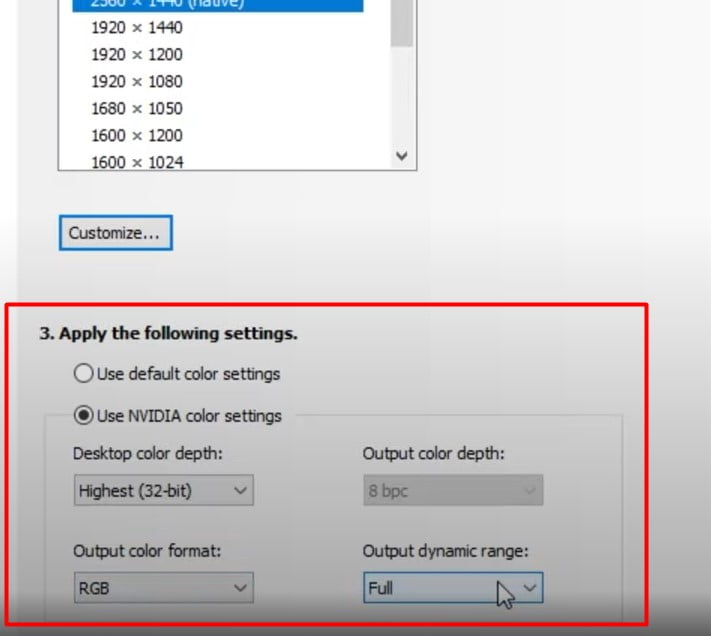
- I am choosing color depth: Highest.
- The best color format, which for me is only RGB
- And an output dynamic range of preferably Full.
Look at the very bottom: “Output dynamic range allows the user to select the dynamic range (16 to 235 or 0 to 255 for 8bpc) of the output, which can preserve shadow and highlight details in the image being viewed.”
Having the output dynamic range set to Full rather than limited is better. Unless your screen looks terrible. Anyways, once you’ve adjusted your screens to have the highest refresh rate, that’s advertised for the monitor and, of course, the highest resolution. Click Apply, and your monitors will readjust.
6. Adjust Desktop Size And Position On Nvidia Control Panel On Windows 11
1. I’d highly recommend setting it to No scaling for all your screens. If, for some reason, you do need to scale. Choose Fullscreen or aspect ratio above.

2. Then, Perform scaling on the Display if it’s available.
Such as the one over here, rather than the GPU, offloads any extra work that the GPU has to do, giving you higher fps and just giving it to the screen to process itself as it can probably do that most modern screens can scale. It’s that simple.
7. Nvidia G-Sync Settings (If available)
Go to the Setup g-sync tab if you have a g-sync monitor.
- I’d recommend enabling the G-sync, G-sync compatible.
- Enabling the “For windowed and full-screen mode.”
Go to Click on Apply once again.
How To Update Nvidia Graphics Drivers On Windows 11
If you have already installed the Nvidia GeForce experience, Then you have a GeForce experience settings widget. So, this is a simple tool that will give you an automatic update of the latest drivers. Suppose you don’t have the tool.
Go to Nvidia’s official site and download the tool. I assume you have successfully installed it already, but it was a long time ago—no need to update the Nvidia Graphics driver.
1. Go to Start and search for Nvidia GeForce experience. Click on the best result.
2. Click on the Drivers tab. (Now you can see a banner like Microsoft Windows 11 game-ready driver download).
3. Press Check for updates. Press Download. Wait for the latest drivers to be downloaded.
4. Select if you want an express or custom installation.