Speed Up Windows 11 Performance Gaming Optimization Guide: Suppose you have a slow computer or suffer lag in any of your programs, games, or software development programs. I will show you more than a dozen tips to speed up the Windows 11 performance on your system.
I’ll be showing you how to optimize Windows 11 for the highest performance possible when playing games. Now, of course, this is currently the preview of Windows 10. it’s not fully released, but this post will be very accurate for years to come. This post will cover tons of ground.
So, if you get confused, do make sure to return to this post if you feel like you need to take a break at any point. Anyways, let’s quickly jump into it.
How To Speed Up Windows 11 | Optimize Windows 11 for Gaming! (2023)
Before we get to optimizing anything properly, there are a couple of things that we should do. The number one most important thing is making sure that windows are the most up-to-date that they could possibly be. Because I’m running Windows 11 insider build. There are going to be updated very often.
Also, Update is continually optimized for any kind of program. Especially for operating services. It will speed up Windows 11 as well.
So this is something you’re going to do pretty often, especially if you’re an early adopter of Windows 11. otherwise, it’s still worth checking for Windows updates at any stage in the future.
1. Click on the Start > Settings icon. And then head across to Windows update at the very bottom. Now click on the “Check for updates” button and wait for it to finish. If any updates are found, make sure to install them and then restart your computer. And return to this post.
1. Optimize Windows 11 Settings
So first, you need to change some settings from your Windows settings to speed Up Windows 11.
1. Press Windows + I key. This is a shortcut key for opening Windows 11 settings or Windows 10 settings.
Personalization Settings
2. Go into Personalization. Scroll down, and here you will see an option like Device usage. Okay, so just click on it.
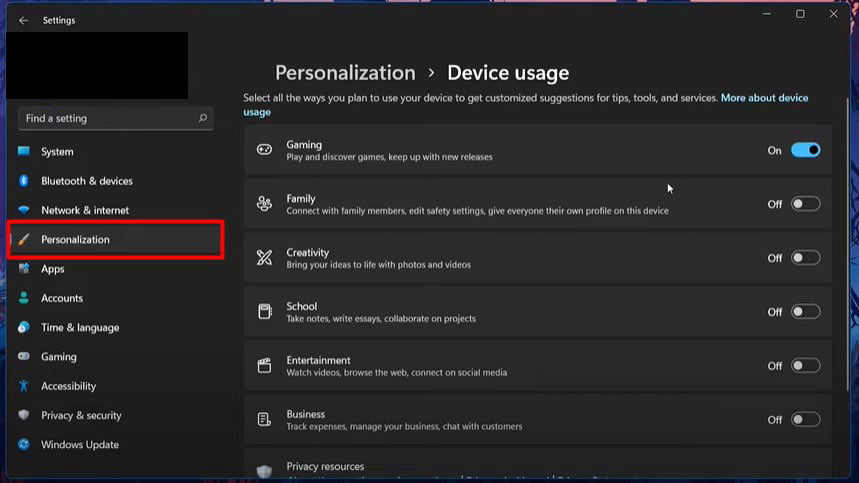
3. Here, you can see some options like Gaming, Family, Creativity, and others. It basically depends upon how you use your system and what you are using your system. I’m using it for gaming. So I need to Turn-on the Gaming option. And it will optimize my pc for gaming purposes.
If you are using Family, Creativity, School, Entertainment, Businesses, all these things are here. You just need to turn on this setting according to your need. So I just turned this on for gaming.
Turn Off Startup Apps Settings
1. The next step is Apps. Click on the Apps option on the left sidebar. Then scroll down and click on Startup. Here, you can see a list of apps that are started on the system startup. These apps just start whenever you turn on your system.
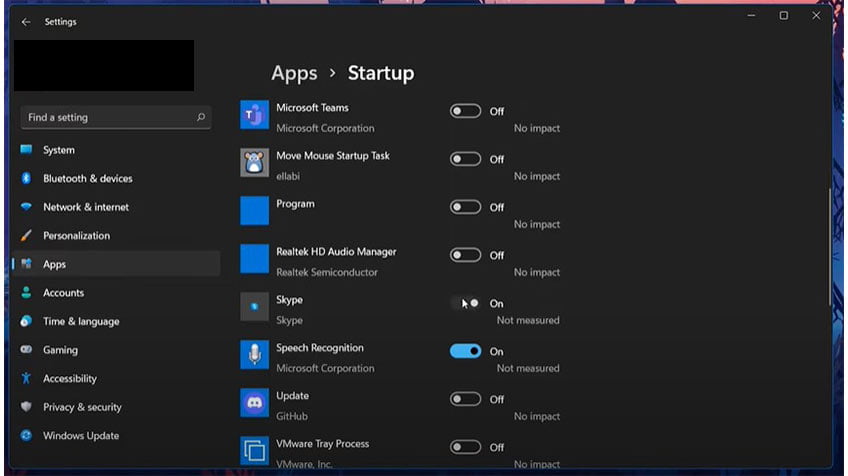
2. So, I don’t want to open these apps when I turn on my system. So, You need to Turn off all of them, and it will definitely boost your system performance and speed up Windows 11.
Turn Off Offline Maps Settings
Go back to the App settings. And here, you can see Offline maps. Just turn off all these things if you are not using maps.
Read More: How To Turn On Or Turn Off Animation Effects On Windows 11
Change Privacy and Security Settings
1. So here is the main thing you can see: Find the device. I’m not using this feature. So if it is on, then turn it off.
2. Go back one step back. Click on General. in general, you will see – “Let app show me personalized ads by using advertising id” No, I don’t want to see any kind of ad in my system. Just turn it all off here.
Check if other options are on or not. If on, then turn them off.
3. Go back and scroll down a little bit. You can see the option Location. In your case, if it is anything on here, just turn it all off. Okay, and clear this location’s history.
Turn On Storage Scene Settings
Go into the System. So in the system, you will see an option for Storage. Click on it. This will be game-changing for you if you are working on speed up Windows 11 system. In this storage, You can see an option Storage sense. You need to Turn-On this option. So what does it do? It will automatically free up space by deleting temporary files.
Disable Unwanted Services
You need to stop unwanted services which you are not using. But they are running in the background.
1. So, what you need to do is just press Windows plus + R keys. It will open Run.
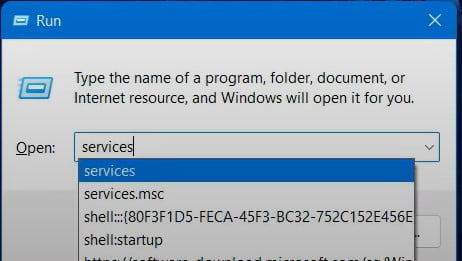
2. Now, You need to type services.MSC.
Okay, it will open services. And here I will tell you seven services which you need to stop right now.
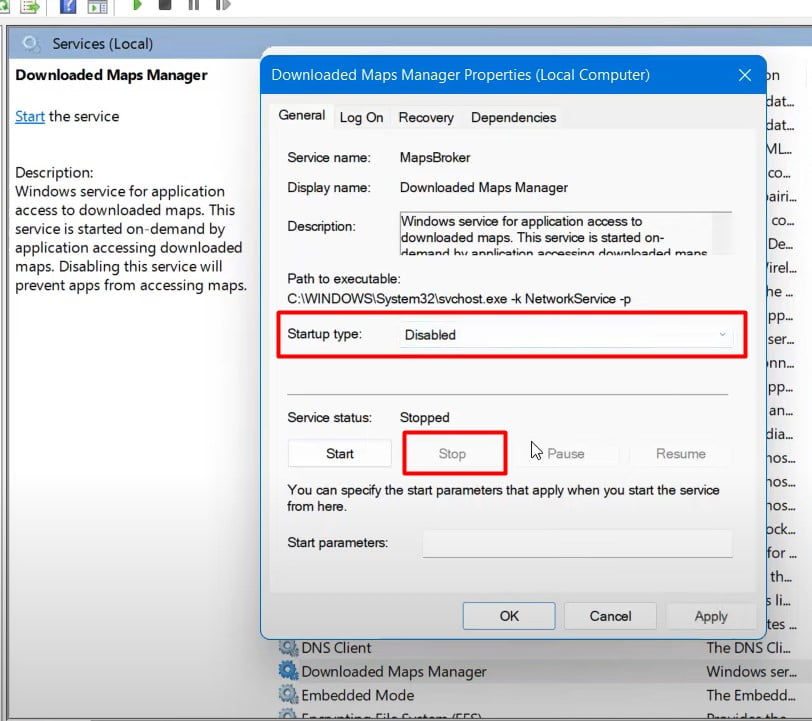
3. First is the Download map manager— Press D on your keyboard. You will see here something like download map manager. In my case currently, it is not running because we already stopped from settings. If it is running in your case, just double-click on it. Click on Stop, and Select startup type disable. Next, Click on Apply and Okay.
4. Next is “IP Helper”— If you’re not using ipv6, then you can turn it off. Most people are using ipv4. Press I, and you can see the IP Helper. Just double-click on it. Click on Stop it > Select Starter Type: Disable. Click on Apply, then Okay. It is not going to harm your internet. So don’t worry about it.
5. Next is the Print spooler—This is for printer users. If you are using a printer, then don’t stop it or don’t disable it. But I’m not using a printer. So I’m going to stop it. You can see a service called print spooler. Just double-click on it. Stop it. Disable startup type. Then apply.
Read More: Customize Windows 11 Taskbar | [Change Position, Taskbar Size, Align Icon]
6. Next service is the Touch Keyboard—So if you are not using a touch keyboard, then you can turn that off—just press T. You can see the service Touch keyboard and handwriting panel services, so double-click on them. You can just click on select start type disable. Next, Apply. Next time you restart your system. it will not continue this service.
7. Next is the Fax service—Just press f., and if you are not using fax, then you can disable it.
8. Stop the Geolocation service — if you are not using a map. Geolocation is not mandatory for you. Suppose you are not using any kind of radar system. So you need to disable it. Believe me, this is going to boost your system performance for all time.
9. Next is to stop Windows Biometric service— So if you are not using biometric things, like scanning your thumb or the windows hello feature, you need to disable it.
Now the following process is going to be very important. It will help you optimize gaming performance, optimize for Video Editing, and Software development, and it will Speed Up Windows 11 as well.
Read More: How to Rollback Windows 11 To Windows 10 [Downgrade Windows 11]
2. Clean Local Disk C Drive In Windows 11
I’m going to explain to you how to clean your “Local disk C drive” to speed up Windows 11 performance. Windows 11 makes it very easy to clean your C drive. It’s essential to clean up.
IMPORTANT: Before starting disk clean-up, you should check your download and video file. If you have any important documents or anything. Please move those files to your PC’s other drive. So, open the download file and check properly if anything essential for you to copy those from here and paste them into another drive except C drive. The same will do for the video file also.
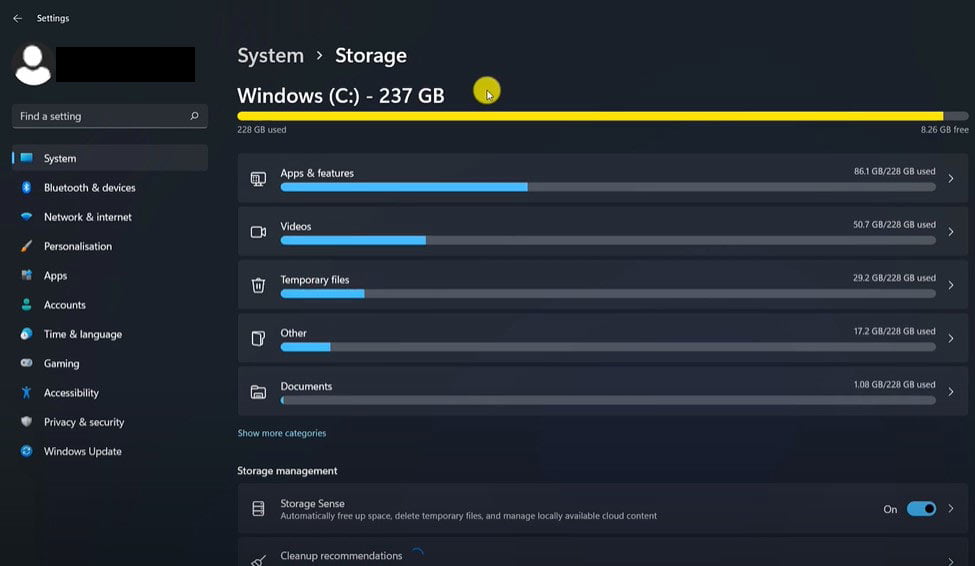
Now let’s start step number one. Let’s go to the Taskbar > Right-click on the Start icon and open your Settings. Select System menu > choose Storage option from here and now wait 20 seconds for loading. Here you can see some arranged categories of how our C drive’s storage is used.
Clean Up Temporary Files
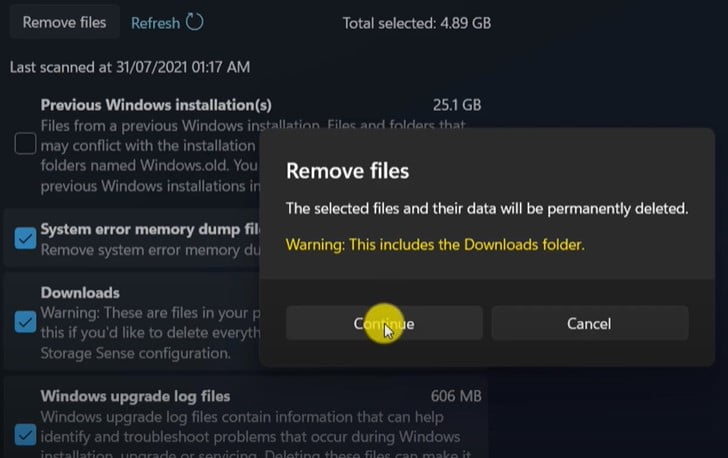
1. To clean up our C drive, Choose the Temporary files from the categories as you are now a Windows 11 user. You can see the (Previous Windows Installation(s)) previous Windows or Windows 10 option. So if you are pretty sure you will never go back to your previous version, you can select it or not (it’s up to you). I am going to unselect this option because I need to write some posts on Windows 10.
2. Next, Select other options (like Download, memory dump files, and log files). Now click on the Remove Files button. In case it’s asking for permission, please click on Continue. Now, wait for some time to clean up the Windows updates.
3. Now, go back one step and wait for loading storage. It is the magic step to optimize Windows 11 for gaming and speed up Windows 11 for other jobs.
Uninstall Unwanted Apps From Windows 11
Click on App & Feature categories. Now it will open. You will see lots of apps that you are not using, but still, they are in your system. It’s just a matter of clicking the uninstall button and following the instructions.
1. Click on three dots on the right side of the app’s name > Select Uninstall option. So I’m leaving the rest to you.
Disk Cleanup Recommendations
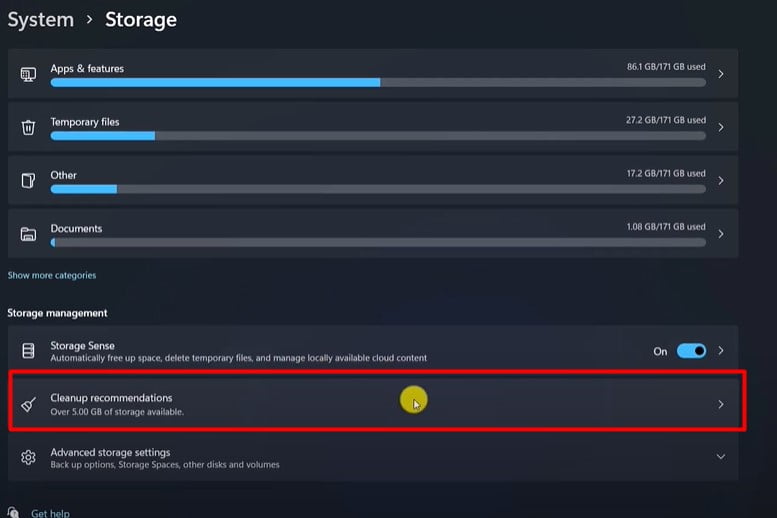
1. Go one step back. Open the Cleanup recommendations option. Now open the large or unused files option. You can select all of them now and click on cleanup. One or some files may be unclean, so ignore them and clean the rest.
2. Now click on the Unused Apps option. Disk cleanup suggests some unused apps. So select them which are really unusable for you and click on Clean up. Click on Continue for permission.
Clean Up Temp files
1. Go back to your desktop first. Now go to your Start button and right-click on it. Now you will see this hidden menu. Choose to Run from here. Now enter %temp% and click on Ok.
2. Now, you can see all these files and folders. These files are not important, and they are automatically created and downloaded from the internet only for a temporary purpose.
3. So you need to select all of them and Press the Shift+delete keys on your keyboard > Click on Yes to continue. Some files may be undeletable, so ignore them and delete the rest.
4. Now let’s delete all of the files from the recycle bin as well.
Let’s look at your C drive. That’s all you can do to clean up your C drive to speed up Windows 11. I hope you are all experiencing a performance boost on Windows 11. Free up space and more enhanced system responsiveness.
3. Optimize Windows Startup/BootTimes
1. Need to open up the Task Manager by pressing Ctrl+Shift and Esc. Then inside it, head across to the Startup tab at the very top. Check how to fix Windows 11 slow startup or boot time.
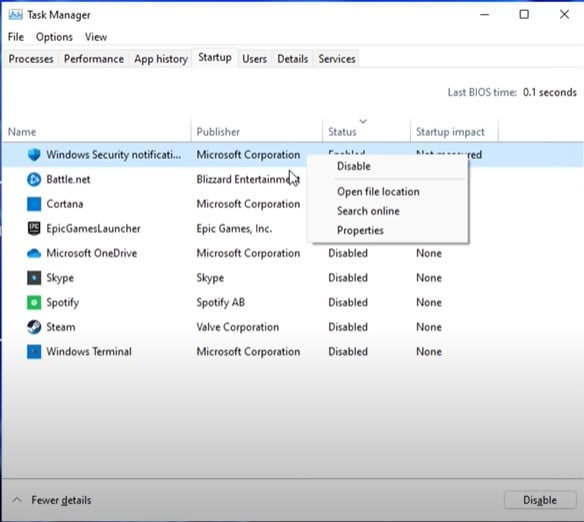
Initially, everything was turned on. Meaning when we power up our computer, every single bit of software on this list is started up before we can properly use our computer. This can cause a seriously slow computer at startup and, of course, increase the time required to start up fully.
2. It’s a good idea to right-click on the software you don’t want, starting with your computer, and then click on disable. It is one of the crucial steps to optimize and speed up Windows 11.
4. Optimizing Windows 11 Power Plan
Let’s get to optimizing our Windows power plan to speed up Windows 11 performance.
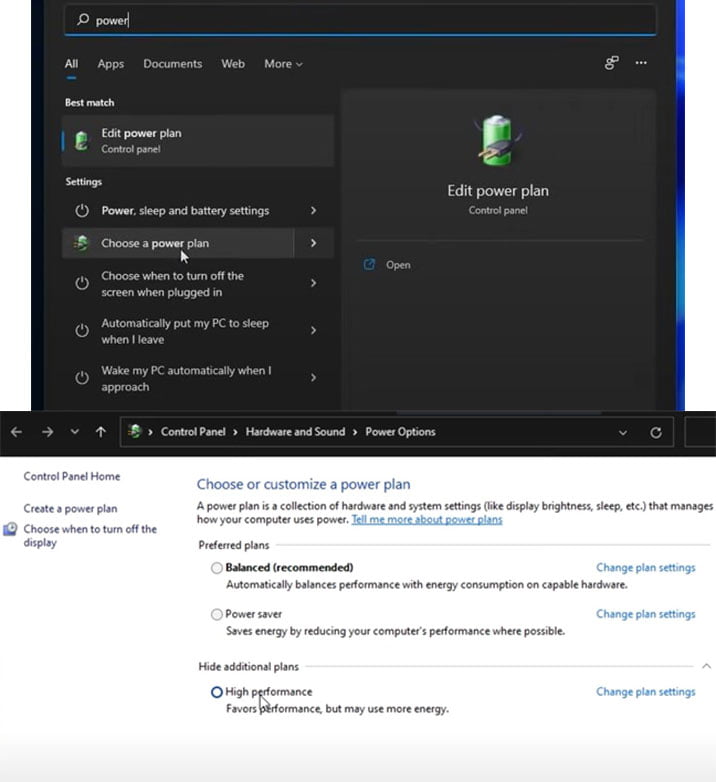
1. Simply hit Start and then type in power. We’ll be opening up an Edit power plan or Choose a power plan.
2. Click on “Change settings that are currently unavailable.” you’ll be able to customize the options here. You’ll see Balance and Power saver, and under additional plans, you’ll likely see High Performance. Selecting High Performance uses more electricity.
Suppose you’re using a desktop. This isn’t really something you need to worry about, especially if you care about performance.
If you’re on a laptop. You may want to keep it Balanced or even Power Saver. But whenever you’re playing games. It would help if you changed it to High performance.
3. If I tell you that there’s something better than High performance that you can add here that’s hidden away in Windows.
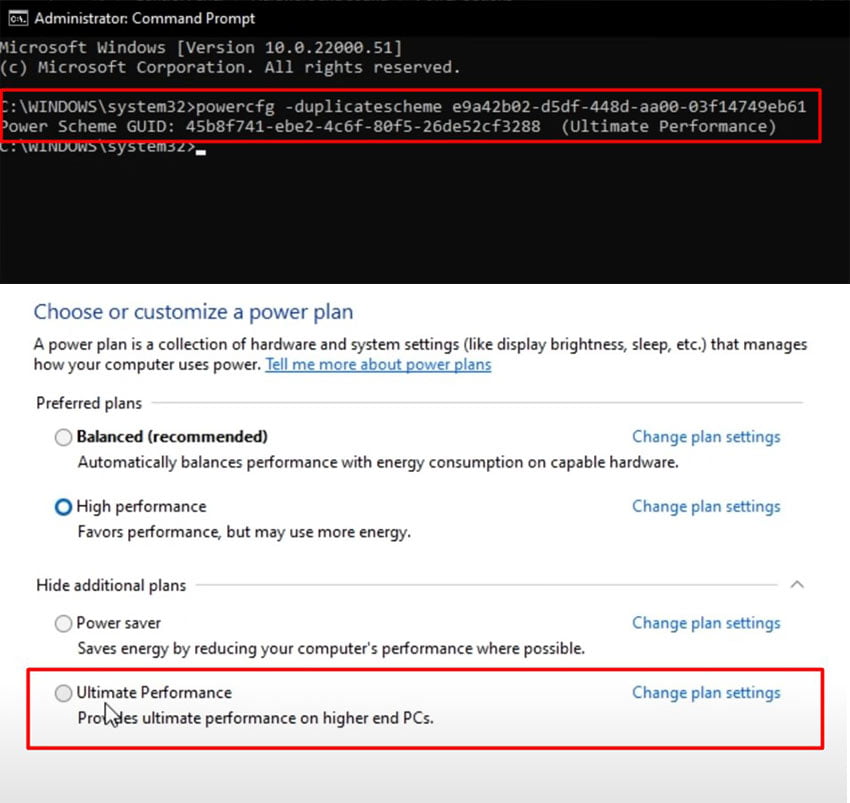
Just open the command prompt in administrator mode. Then copy and paste the below comment. Hit Enter.
powercfg -duplicatescheme e9a42b02-d5df-448d-aa00-03f14749eb614. After it is completed, go to the power settings and refresh the window. It will add an extra feature called “Ultimate performance” in power settings.
5. Select this for the best possible performance. It will really help you to speed up Windows 11 performance. You can also customize it. Click on the Change plan settings and change the turn-off display or anything as you wish.
5. Defragmenting & Optimizing/Trimming
Especially if you’re only using hard disks on your computer, it is defragging.
1. Click on Start and then type in defrag. We’ll be opening up defragment and optimizing drives.
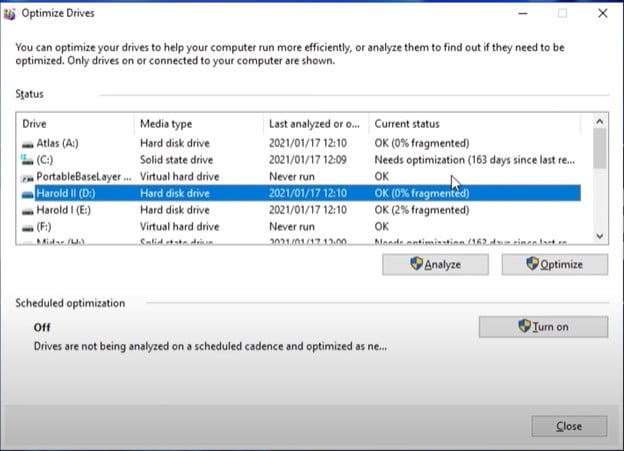
Inside here, you’ll see all of your hard drives listed and, of course, your SSD’s if you’re someone like me with lots of drives in your computer. You’ll likely see something similar to this picture.
2. Simply click on any one of the Drivers > click on Optimize. Wait for it to finish. And then you should be done after you’ve cycled through all of the different hard drives and SSDs on your computer.
6. Disable Virtual Based Security (VBS) On Windows 11 to Boost Game Performance
The biggest thing that people are going to ask is how to Disable VBS or virtualized-based security. This is the feature that can basically detriment gaming performance. so I’m going to show you how to turn this off the VBS.
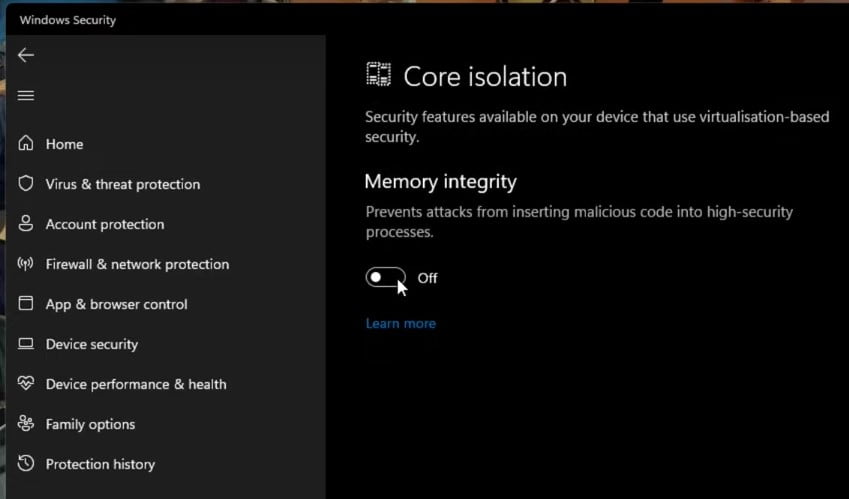
1. Go to Search > Search for “VBS”.
2. Through the option here for Device security. Click and open it.
3. Click on the Constellation details link.
4. Then just untick the option where it says Memory integrity. Once you’ve done that reboot your system and you’ve turned it off. It will Speed Up Windows 11 as well as Boost Windows 11 Performance.
Speed Up Windows 11 Performance For Gaming Optimization Guide
Optimize Windows 11 Pack
This step is going to be very important. You need to download this optimization folder from this link (Click here). This is just registry optimization. So this is going to be game-changing for your system.
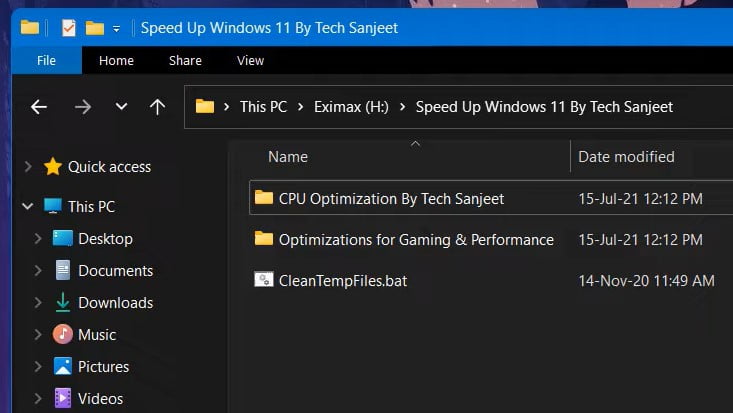
- After downloading, you need to just open the CPU optimization folder and just double-click on it, and click Yes and Yes, and OK.
- So you need to follow the same steps for all files. This is optimization for gaming.
- You can see the file CleanTempFiles.bat. This will clean all kinds of temp files. This is a simple command. So you need to double-click on it, and it will clean all types of cache from your system.
Update GPU Drivers (Nvidia/AMD)
You need to update drivers manually. Go to both the Nvidia and AMD websites, where you can go ahead and download the latest driver available.
Click on the Nvidia link. It will take you across to nvidia.com. GeForce drivers are on this page. Simply make sure to click download now right under automatic driver updates. This will download GeForce Experience, which you can then open up, install and follow through with the on-screen instructions.
You’ll notice an update button somewhere within the software. Simply just click that, and your drivers will be updated to the latest version available. It is a groundbreaking step to speed up Windows 11 as well as optimize for gaming.
Windows 11 Gaming Optimizations Settings
1. Open Windows 11 Settings.
2. On the gaming section on the left-hand side. You’ll see three options.
1. Xbox game bar
- Click on the Xbox Game bar. You need to turn off the Xbox controller option unless you actively use it.
Now, Go one step back.
2. Captures
- Click on the Captures option.
- Make sure the Record What Happened option is turned off. This basically Windows shadow player, and if you’re using something like shadowplay or AMD’s equivalent, then this should definitely be off as well.
After doing this, simply head back to the gaming tab.
3. Game Mode
Open the game mode option. But we’ll make sure that this is turned on for the best performance possible. This has slowly been getting better and better with Windows as it progresses. So having it on nowadays will give you better fps than having it off.
Turn Off Third-party Overlays (Discord, etc.)
Something that is all around good for you is disabling third-party overlays such as the discord overlay, etc. Usually, it’s as simple as opening up the settings going across to user preferences or something like appearance, and then simply turning off the third-party overlay.
You will no longer be able to see the overlay of your games. However, it usually leads to a large input latency reduction and often fps increase.
You have to improve FPS in basically any game or even productivity task you execute. These optimizations method can help in many spots, not only gaming for a couple of additional FPS, higher stability, and higher strength. It will speed up Windows 11 PC.
FAQ
Would Windows 11 be Stable?
We can’t say that right now. The problem that Windows faces is it has to work effectively on every kind of hardware. This is why they tested on every type of pc, and even after that, we always face issues.
Although Microsoft claims that this is the best Windows made yet, and they’ve worked a lot on stability, we still can’t say anything until it’s released to the public.
Can I roll back to Windows 10 from Windows 11, if I don’t like Windows 11?
Yes, You can easily roll back to Windows 10 from Windows 11. But you have 10 days’ time to roll back along with your files and data. Because windows stored old data for 10 days.
You can see our previous post, how to roll back to Windows 10 step-by-step. But after 10 days you have to keep back up your data before you roll back to Windows 10.
