
Guide to Add Discord and How Mute Discord on OBS: OBS stands for open broadcaster software. It is a free, open-source live video production software that can live stream and record video and audio. Obs is supported by a large community of developers from around the world.
In this post, I’m going to teach you how to add Discord to OBS and how to mute Discord on OBS streams. The reason I wanted to do this is because I didn’t want my voice chats to be heard in my stream. And I didn’t want them to be publicly broadcasted.
Method 1, How To Mute DIscord On OBS
I am opening OBS for testing purposes. If you can open Discord and Spotify, basically, what you need to do is, you need to set up in OBS a second channel. Please do this step carefully.
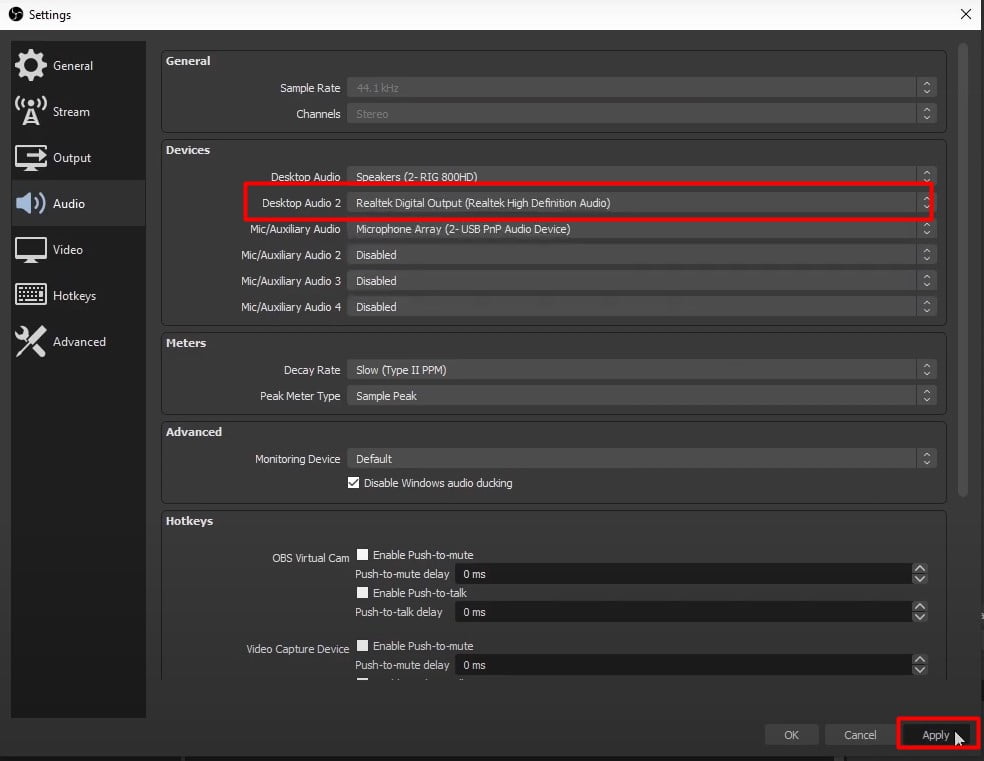
1. Open OBS > Go to File > Settings. Go to the “Audio” option. I am creating it for better understanding.
2. Change the Desktop Audio 2 setting. You will have to choose an output that has nothing plugged into it. So, for me, it’s “Realtek digital output.” And then click on Apply.
3. Now, In the picture. You can see here I have three different outputs.
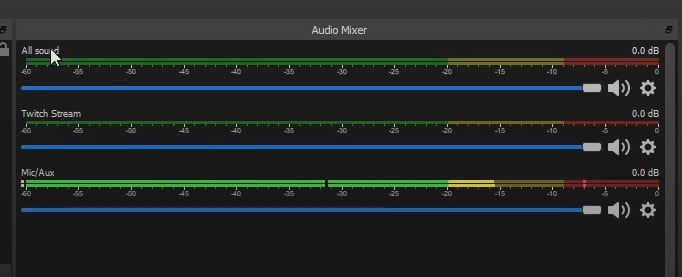
4. I’m going to rename these first two because it would just be a lot easier to understand.
Click on the Settings icon next to the volume slider. Select Rename.
- The first one is renamed to All sound.
- The second one is renamed Twitch Stream.
- Mic
So,” All sound” – is basically everything that comes through the main device for sound.
“Twitch Stream” – is basically going to be anything that I have allocated to the “Realtek digital output,” and that will only provide outputs of sounds that I select in the next step.
5. Open Windows Sounds settings. Scroll down under Advanced sound options. Select “App volume and device preferences”.
6. You can see a list of sound-related apps. These apps are here because they’re running. If no apps are running beforehand, they won’t appear here.
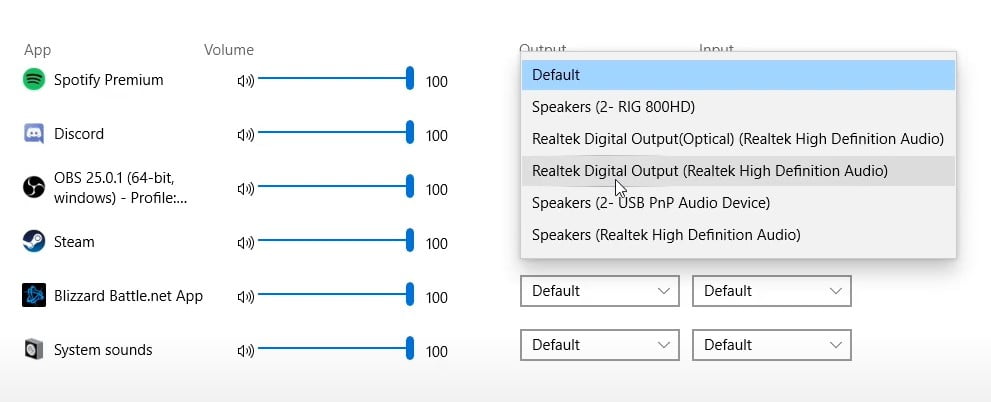
The current application I want to send to the stream is Spotify. In order to do that, I will change the Spotify output setting default to Realtek digital output. And I’m going to leave Discord as normal. Because I still want my other voices to come through to me.
So, What we’re doing here, We actually sort of excluding programs to the stream instead of actually meeting them technically.
7. Open OBS. Next, open up Discord and play any video on the Discord channel for checking. You’ll notice that the discord audio is coming through the “All Sound” channel. When it is coming through all sound, it means that everything that’s coming through my headset.
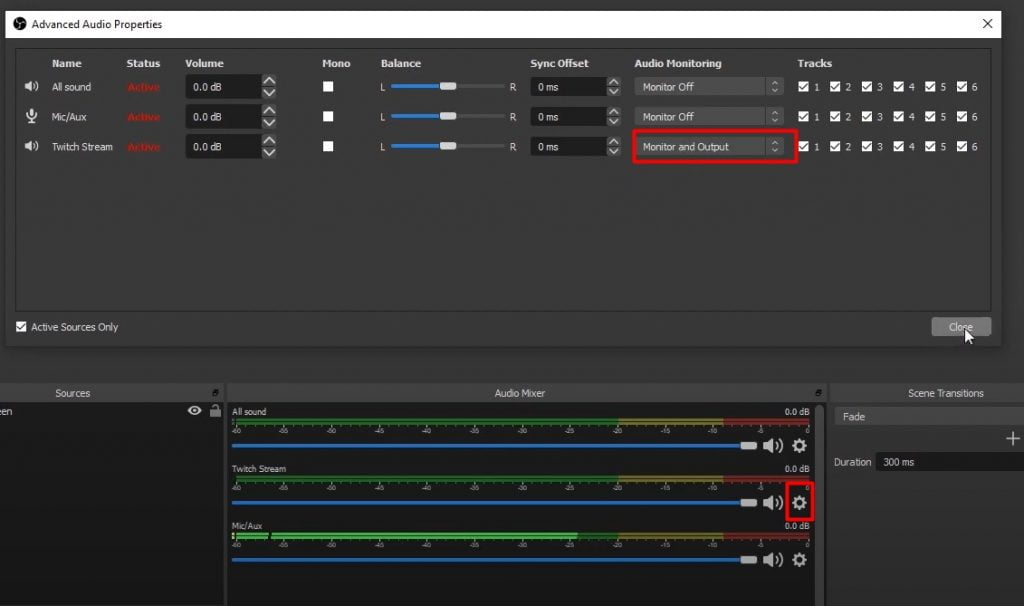
8. Next, You have to change the “Twitch Stream” setting here. Click on the Setting icon. Under “Advanced audio properties,“ change the setting from Monitor off to Monitor and output.

9. Still, anything in this list is going to be broadcast. So, we need to make sure that anything that’s in the All Sound channel is muted. I am going to Mute the “All sound” audio mix. Now, the Discord sound is gone. It’s very easy to mute Discord on obs.
Read More:
Is Mic Not Working on Discord?
Discord No Route Error? How to Fix it?
What I’m doing here is basically customizing the stream to have a selection of different outputs instead of having all the outputs. This is how we set it up to mute Discord on OBS. Your “All sound” channel is separate audio from other apps like Spotify. so that everything that’s coming through doesn’t go to the stream as well.
Read More:
How To Fix Spotify Can’t Play This Right Now Error
How To Fix Discord Screen Share No Audio Issue [Mac, Windows]
How To Mute DIscord On OBS With Voicemeeter Banana
This setup is very useful. All of your audio is still being sent to the one virtual input. Suppose all of our audio discord music is still going through one channel. This is a good idea to separate our audio output. We need to pull out Discord’s audio from the rest of our audio. (So it will be very easy to mute Discord on OBS whenever you want.) Because I believe that your discord app is still monitoring the same virtual input device that all of our audio is pointing to.
Step 1: Install VoiceMeeter Banana and Virtual Audio Cables
1. The first thing is we need to download these programs. You can get it from Google. And search for voice meeter banana.
2. Also, you can get it from here (Voicemeeter banana). Right here, you need to click install the exe file button. OK. So once it’s downloaded, go to the download folder and install and run it.
3. It will notify you to restart your system to finalize all the installations. So just click on OK. But do not restart your system right now because you need to install another program.
4. You need to download Virtual audio cables. Download the file. It is a zip file. You need to extract it into the folder. Run this setup64 as admin. Click on the Install driver button. OK. Now, you need to restart your system.
Step 2, Windows Sound Settings
1. The first step after this is to open your sound settings. Right-click on the Windows logo. Select the Settings.
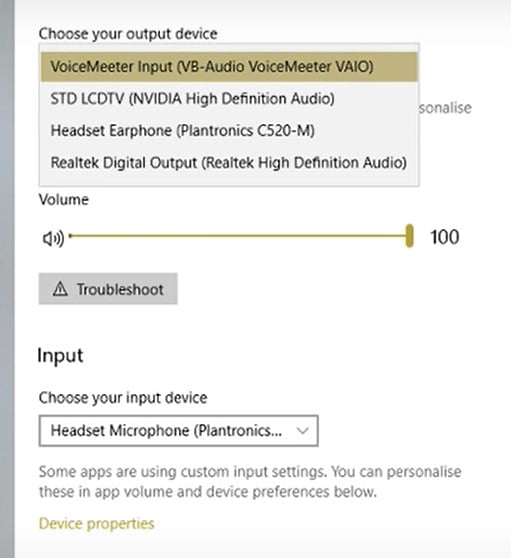
2. Next, Select the “System” option. Next, Click on the “Sound” option from the left sidebar.
3. Here, You need to choose your output device as “Voicemeeter Input (VB-audio Voicemeeter VAIO).” This is very important. This will redirect all desktop sounds to your voice meter input. So you can split them later.
4. Set the Input device as “Headset microphone.” This option is for your regular microphone.
Step 3: Change Discord Voice and Video Settings
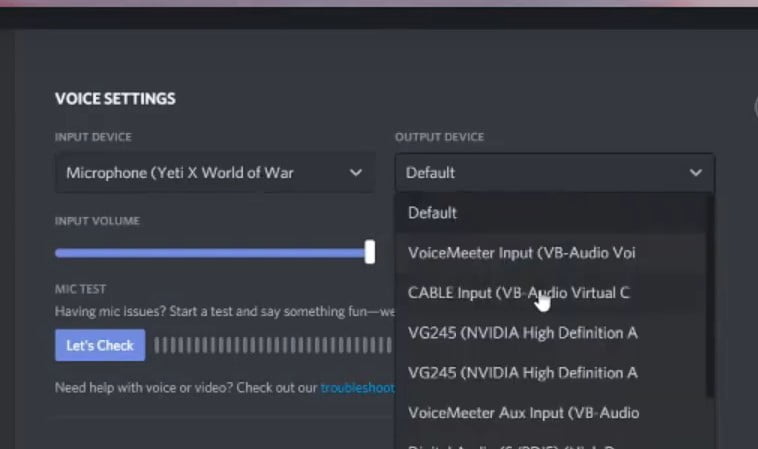
1. I am going to open up my Discord app. Now, we need to get into our Discord Voice and Video settings. Again, for the Input device option, I like to set this as my “Yeti microphone.” (Yours might be different).
I don’t like to go into VoiceMeeter too much for this, just in case something happens. People in Discord can still hear that I cannot hear them for whatever reason.
2. Now, the Output device is set to the “CABLE Input (VB-Audio Virtual C)” option.
Step 4: Set Up The VoiceMeeter Banana
- Now, You open up VoiceMeeter. And make sure you’re opening up the VoiceMeeter banana version, not the regular version.
2. So, basically, what you have to do to change the name is the channel name. You just right-click it and change it to whatever you want. I want to change the name to Yeti Microphone.
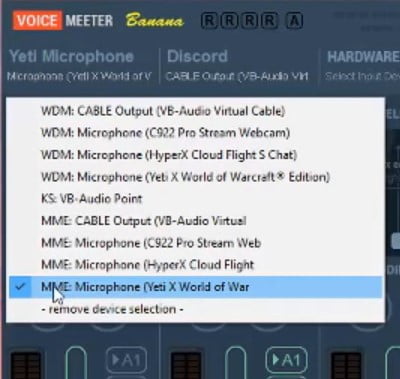
3. Now, You need to change the input device for the Yeti Microphone panel. Just click on this. But I really do not know the difference between MME and WDM.
I will select MME-Microphone (For my case).it works really great. So that is my microphone. That is where my voice is coming through. and you can see the voice pulsing meter. My voice is coming through right here.

4. Now, Go to the Discord panel. Again, right-click and rename it to Discord. This one should be selected as MME: Cable Output (VB- Audio Virtual) (For my case).
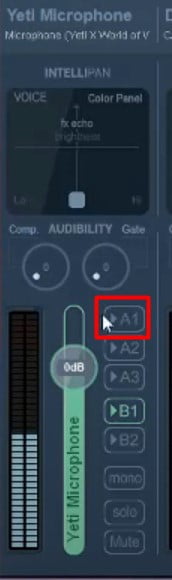
IMPORTANT NOTE: One thing that I highly recommend before you click the “Hardware Out” option. Make sure to uncheck the A1 in the Yeti microphone channel. Otherwise, you’re going to be hearing yourself talking through your headphones. Some people like it, some people don’t. I cannot stand hearing my voice, so that is unchecked for me.
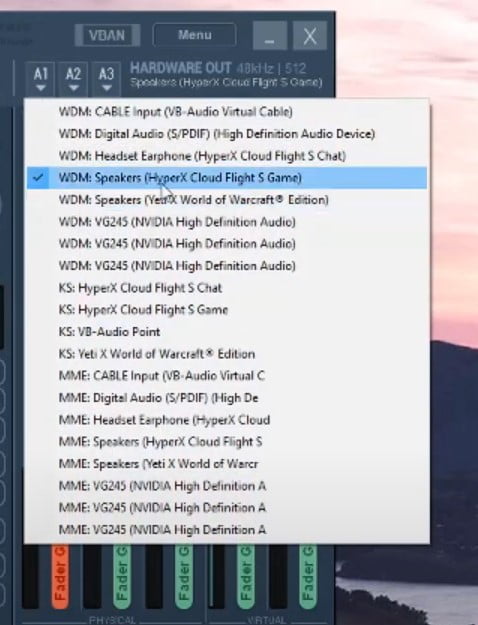
5. So now, You need to set your “Hardware Out” setting.it is going to be your headset. So mine is the WDM: Speakers (hyperx cloud flight gaming).
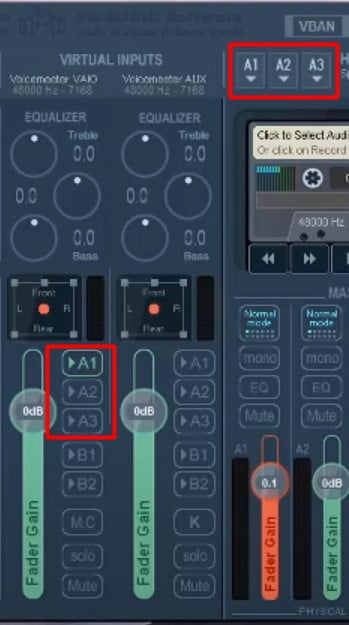
6. Once you have selected the hardware output setting, come down to the middle section. You just need to click and activate the A1 option on the Virtual Inputs panel. Make sure if Hardware Out is added A1, A2, then your VIRTUAL INPUTS are selected as A1, A2 (SEE THE PICTURE).
So everything is on the desktop. You can hear through your headset over here. The input and you want to hear the sounds from input to your headset. Now, we are one step away from mute Discord on OBS.
Step 5, OBS Settings
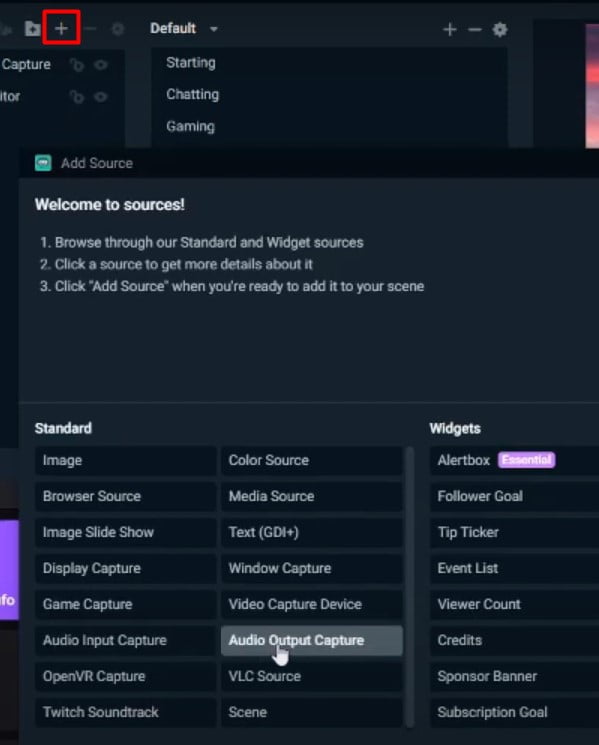
- This step is to open your stream labs OBS or OBS directly. Open your OBS Settings. Click on the Plus [+] icon. Next, Click on “Audio Output Capture” and click on “Add Source”. Now, add Discord to OBS.
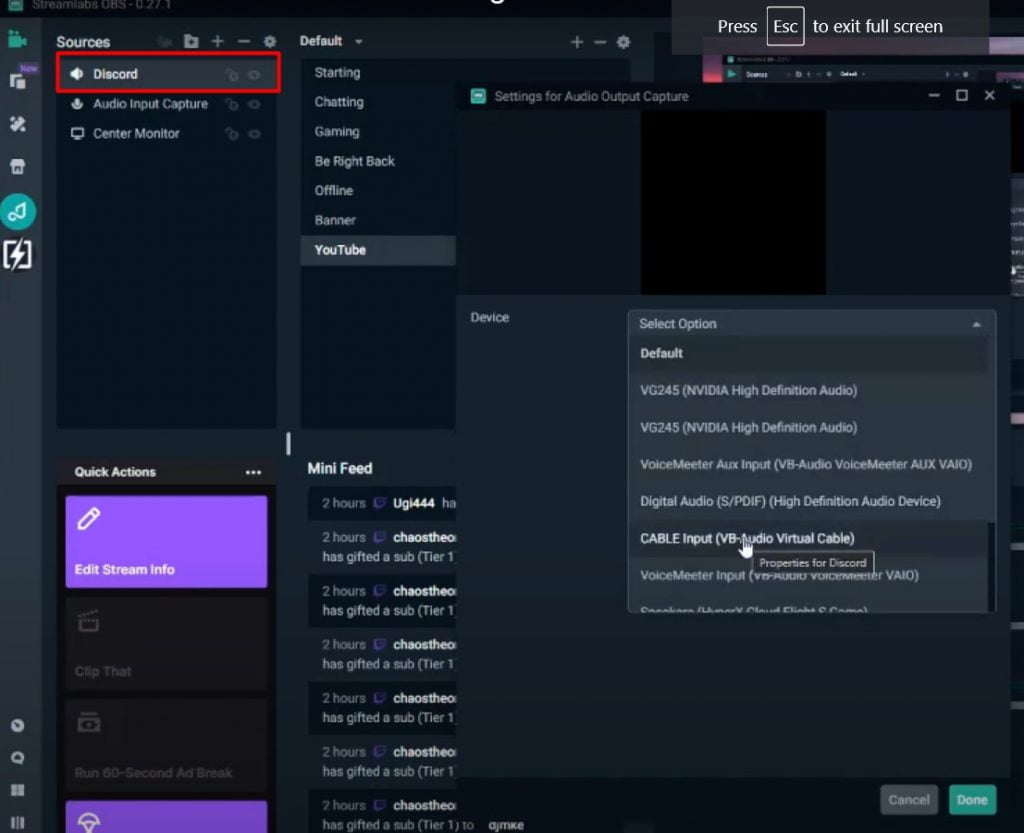
2. Once Discord is added. Double-click on Discord. Add audio device as “Cable Input (VB-Audio Virtual Cable).” Click on Add to confirm. You can mute Discord on OBS anytime you want on your stream. Just click on the Speaker icon next to the Discord.
Read More:
How To Unban Someone On Discord
How To Add Discord Audio To OBS Stream
After mute Discord on OBS, Now, I am going to show you how to get Discord audio Streamlabs OBS LIVE Streams.
- Open the Discord app. Go to User Settings, Next, select “Voice & Video” settings.
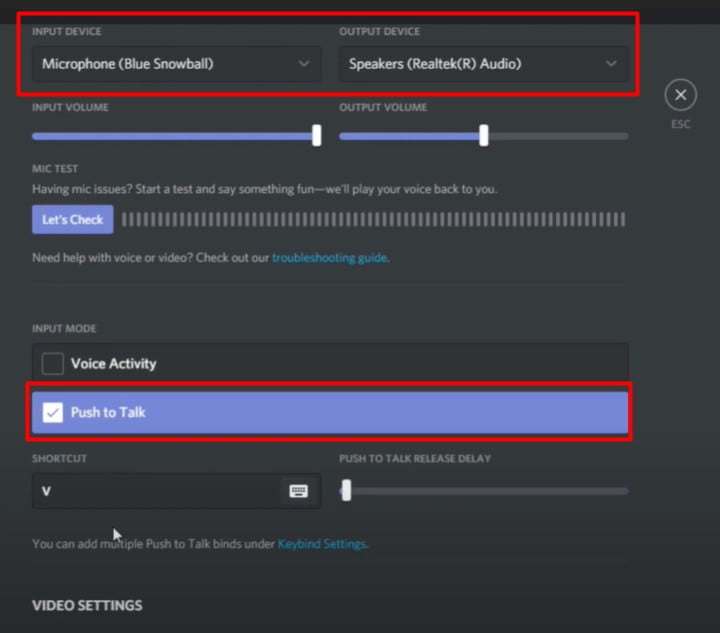
2. Here, On the Input Device, I will select whatever microphone I am using. For me, it’s my “Blue Snowball.”
3. For Output Device: I will select where we want our chat audio to go. For me, that’s my headset, which is “Speakers (Realtek Audio).”
4. The next setting is Input Mode: You need to change it from “Voice Activity” to “Push to Talk.” This option allows you to separate your comments and voice chat.
5. Now click on the “X” icon to save the settings.
6. Next, Open your Streamlabs OBS. Go to Settings. Select the Audio option.
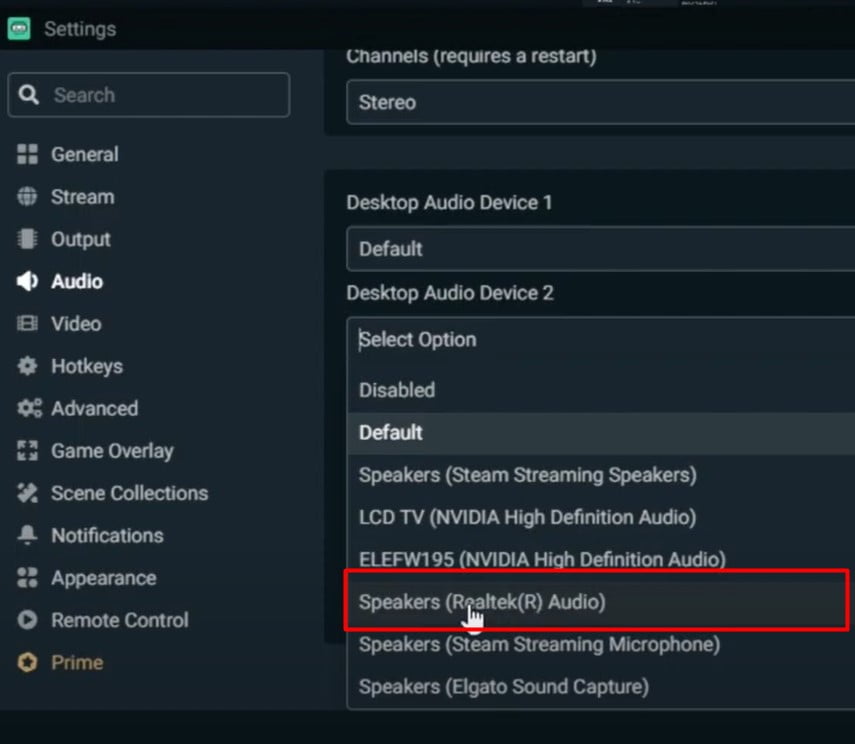
7. Now change the Desktop Audio Device 2 option to whatever your speakers are. For my case, that’s, again, my headset, “Speakers (Realtek Audio).” That’s what I set on our Discord.
Now, the reason behind this is that this gives you an ability with your audio If you need to record both your game and party chat audio. Then leave your device on, so for my case, it’s “Speakers Realtek Audio,” my headset.
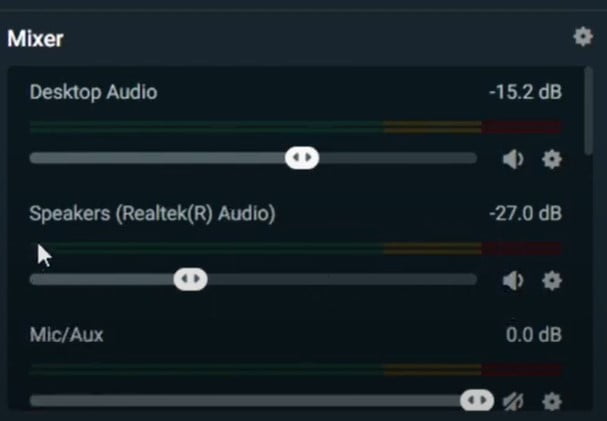
8. Also, you can mute your Discord and desktop audio; click on the speaker icon if you need to mute Discord on OBS.
Frequently Asked Questions About Discord On OBS
Why is he not seeing his capture device?
1. If you are using Windows syst m. Go to your camera privacy settings in Windows. 2. Next, You need to allow obs to access your camera. 3. once you’re done, then. Go back to your OBS settings. Open the “Video Capture Device” setting. Then, set your Device setting as “AV to USB 2.0.”
1. On the M C., Go to security and privacy under system preferences.
2. On the left-hand side, you can see the came a. and also scroll down a little b t. You can see the screen recording. Make sure that OBS is inside of those two sections.
3. Click the checkbox to check. This is the way obs can access your capture device.
How to record Discord’s audio through OBS?
The most exquisite method of routing audio through to recording software is VB-Audio VoiceMeeter. This also has a more specific software, Bana a. Download and install it, route the entirety of your outgoing and incoming audio through it, and select the right settings in OBS afterward. If you have any queries about setting it up, let me know, and I will guide you through it.
How do I mute Discord on OBS Streamlabs?
You can use the mute feature in two ways:
Mute the Specific User:
You need to right-click on the user’s profile picture in the voice channel and click to tick “mute.”
Mute the whole Stream:
You can see the speaker icon, and you need to slide/click that.
Don’t worry; It won’t mute while your streaming is active; it mutes all users and Discord sounds, which are especially helpful. This says that you won’t need to stress over sounds from messages you get on the channel.
How do I capture Discord in OBS?
This is a very straightforward way,
1st, Open the OBS Studio.
2nd, Open the Discord.
3rd, Go Back to the OBS Studio
4th, Now, Click on the “Start Recording” option.
5th, Go back to Discord and Boom.
How do I split discord and game audio in OBS?
Have split audio lines either through actual devices or things like a virtual audio cab, e.g., one device set to the discord /game and the other to a second audio device. Ensure the OBS setting records both audio lines.
Can’t I hear anything?
Change Advance settings to Desktop 2 or stream channel to “Monitor and Output” – Now Restart your OBS app and open it in Administrator mode.