
The more power we moderate, the more productive our devices become, and the more extended our power lasts, and that is something to be thankful for. Sometimes you feel that Windows 10 power settings are not working at all. With cautious attention is paid to applications that are in the frontal area as well as cycles to the background apps that have an impact on power usage.
You will get the most effective Windows 10 Power settings tips added to steps such as considering what happens when you close your PC cover can add smarter energy use for each one of us.
Turning off Wi-Fi or changing the brightness of your screen when conceivable can spare a great deal of background processing. Even diminishing energy utilization on your PC can have substantial advantages, for example, lessening your electric bill.
What’s more, since Windows 10 boots so proficiently, you won’t encounter any stack time while you sit tight for an application to load. That is a major change from the days when you could press the power button and afterward go to the kitchen to get some tea while trusting that your PC will boot.
How to Turn On the Battery Saver in Windows 10
The Battery Saver application in Windows 10 allows you to manage how your device or computer uses power. Windows 10 turns on Battery Saver mode automatically when battery power is left at 20%;
yet, you can change it manually if you need. You can likewise change the setting your PC or gadget is using power on the run—that is something latest with Windows 10 Creators Update.
You are able to see the power capacity status effectively by tapping the Power tool in the system plate on the far right side of the taskbar. In the event that your PC is plugged in already, the power status shows 100%.
If your PC is running on the battery, the status of the battery, the approximate number of times remaining, and the Battery Settings option show up.
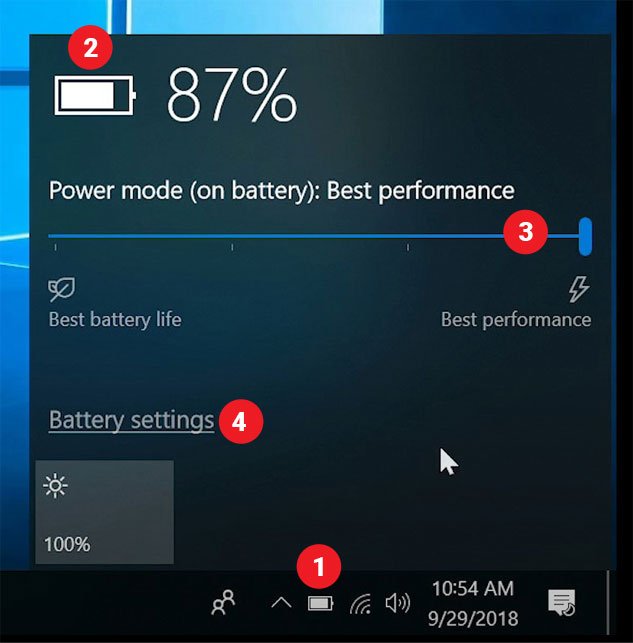
1) Click on the Battery icon in the taskbar. (if the icon is not showing fix the problem here).
2) Now you have to Audit the battery status.
3) Regulate the slider controller to reflect whether you would want to save the battery power or get the best performance.
4) If you want to change or see the current setting click on the “Battery Setting” option.
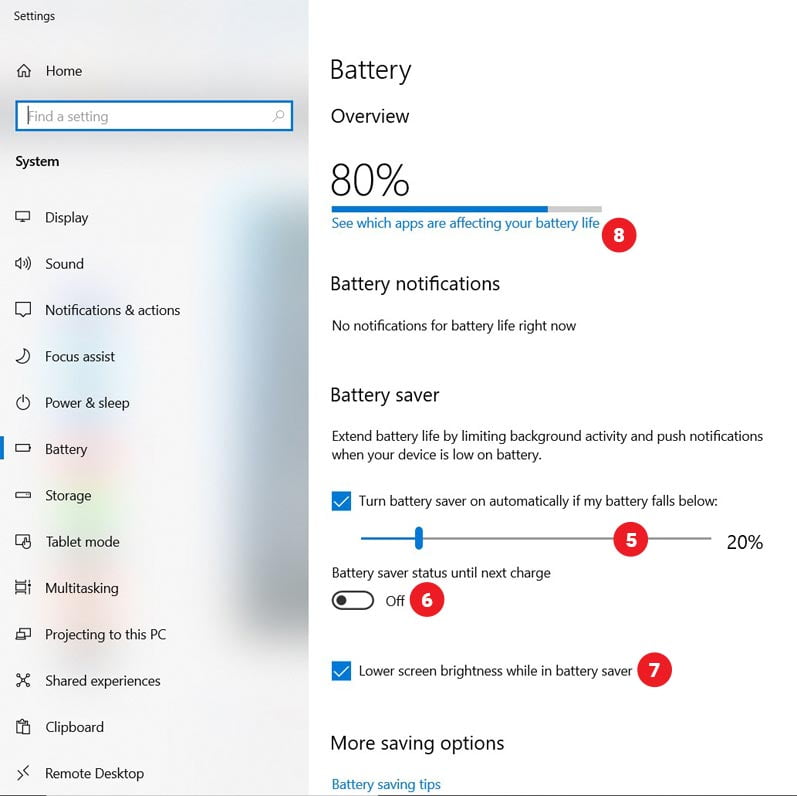
5) If you need to set how much percentage will the battery saver go into effect, then move the Battery Saver slider.
6) Switch to Turn on the “Battery Saver Status Until Next Charge” option setting if you need to keep your PC in Battery Saver mode whenever it is charged.
7) “Lower Screen Brightness While in the Battery Saver” setting is enabled by default. Uncheck this checkbox option if you need to turn off the Battery Saver setting that shows a lower level of screen brightness.
8) Click on the “See which apps are affecting your battery life” option to check how your different applications are using your battery power.
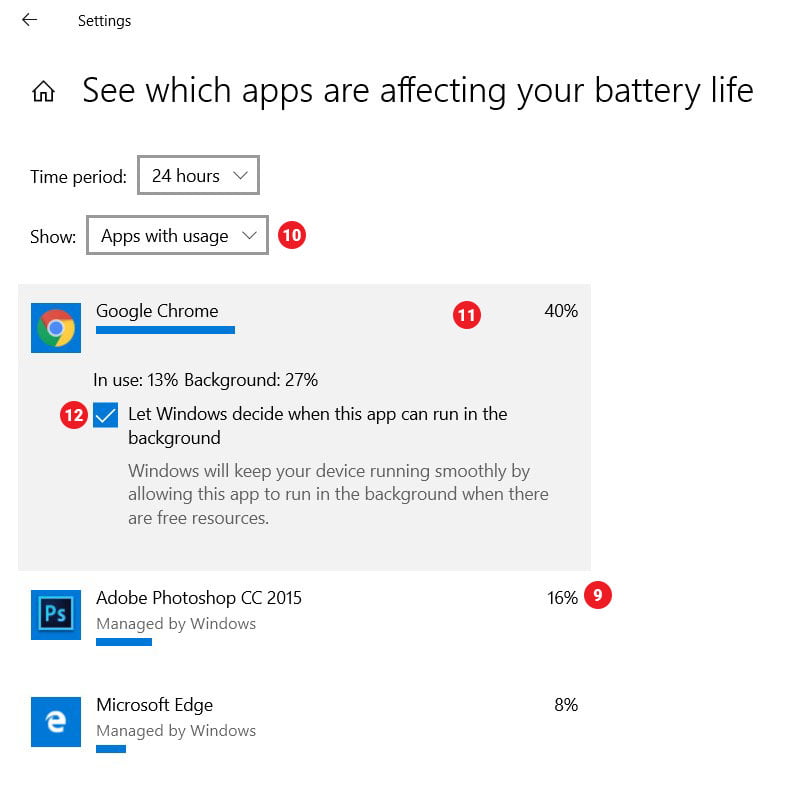
9) See the percentage at the right of the app list. How much battery life your applications are using.
10) Sort out whether you need to see “All apps” or “Always allowed apps” that have been running within a period of time you set out.
11) Click on the app if you need to change.
12) Uncheck to disable the “Let Windows Decide When This App Can Run in the Background” option If you need to manually regulate the utilization of battery power.
Read More about windows 10:
How to Set Up Dual Boot Windows 10 System
How to Make windows 10 look like windows 7
How to Use Windows 10 Start Menu
Are Windows 10 Power Settings Not Working?
You are able to deal with the way your PC uses power by selecting the power settings you need to set for Windows 10.
The power plan balances usage with execution, and you are able to change that balance varying while you work. Making some changes is as easy as clicking and pointing.
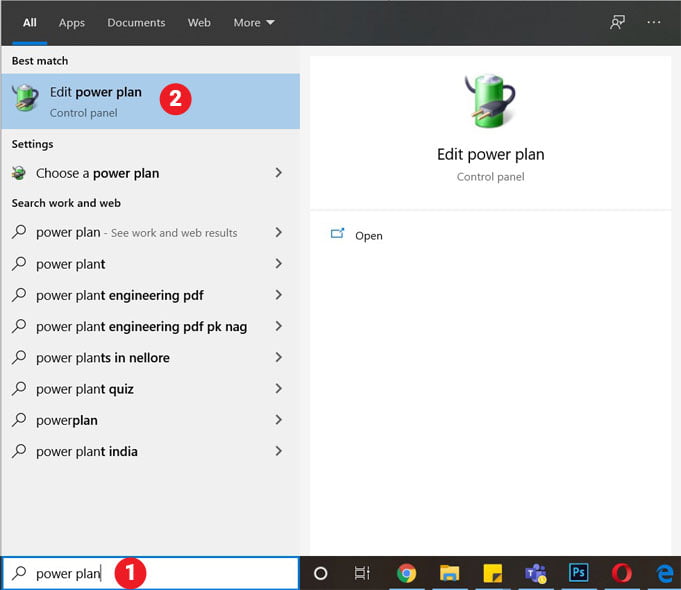
1) Select the search box at the bottom corner of the window and type this simple text “power plan”.
2) Select the Edit Power Plan option from the search result. The main Power setting will appear.
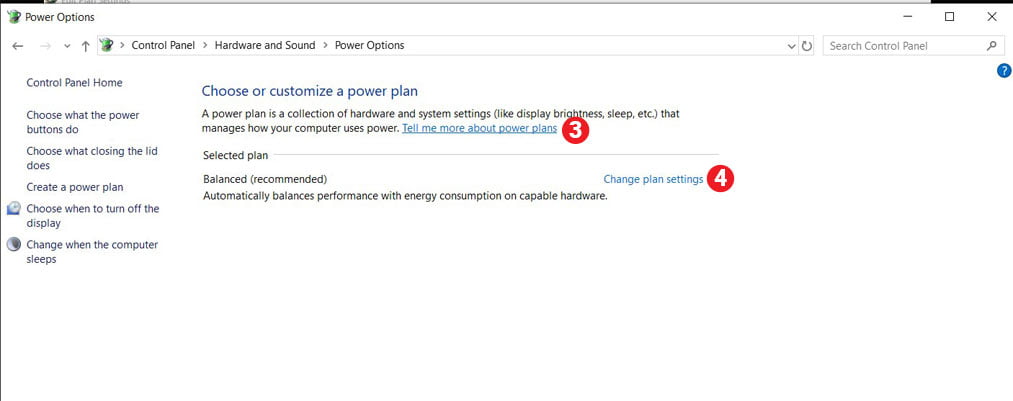
3) Click on the “Tell Me More About Power Plans” option to get familiar with what goes into a power plan.
4) Select the Change Plan Settings option to change the power settings of your present setting.
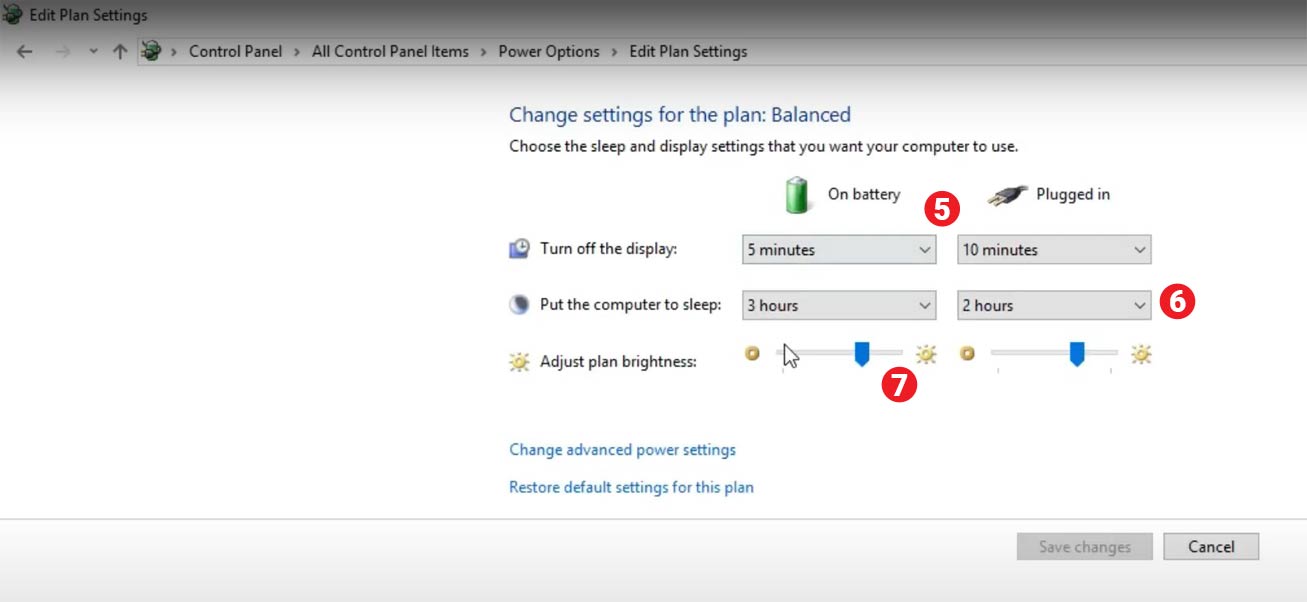
5) Select when you need Windows 10 to turn off the display when your PC isn’t being used. You are able to select different settings for plugged-in mode or battery power.
6) Choose the “Put the computer to sleep” option if you need the PC to sleep mode after a time of non-use.
7) Change the slider to the intensity of brightness if you need it for plugged-in mode or battery mode.
Once you are done with your settings click the ‘Save Changes” option to get the effect.
Also, If you want to go for more advanced settings click on the “Change Advanced power settings” option and a pop-up window will open. Here you can see various windows 10 power settings options, for example, Hard Disk, Desktop background setting, Wireless Adapter settings, etc.
- Elden Ring: Savegame Manager Guide (Import, Download, Backup, Restore)

- Is LSFG’s Frame Gen Worth Buying for Any Game & GPU? Games Emulators (Old/New)

- What Role Does Automated Testing Play in Software Engineering?

- How to Lower Your Ping Using a VPN?
- How To Remove Activate Windows 11 Watermark Permanently?


Screen So Bright, Windows 10 Power Settings gives you the Control
A simple method to change the brightness on the fly in Windows 10 is to tap the power option on the system board and find the Brightness slider in the bottom-left corner of the pop-up window. Changing the tool slider through brightness settings in increments of 25 percent; for instance, If you change the apparatus when the setting is 100% brightness, the setting decreases to 25%, and afterward, with each change, it increments to half and 75% prior to getting back to 100%.
Wait, Let’s Reverse The Power Setting
If you want to change the power settings and, at that point, think again and need to undo your changes, you can simply click on the “Restore Default Settings for This Plan” option that shows up in a similar window where you can change the arrangement settings. Windows 10 comes back to its default settings.