
Split Screen on Macbook: Many Mac users keep bunches of applications open on their Macs, which can frequently make concentrating on the job that needs to be done somewhat hazardous.
Fortunately, their Macs feature a flawless implicit component that permits you to run applications in split-screen, which is staggeringly helpful for considering, for example.
Split Screen Usage
Appointing two diverse applications to tiles on the side by side of the screen can incredibly improve your center since it removes every single other interruption. Nowadays, after the end of the post, you will gain much knowledge use of Split Screen on Macbook
1. DIVIDER DRAGGING

Dispense more screen space to one specific application by clicking and holding on the divider in the mid-screen, at that point dragging as you need; it left or right.
2. Applications ON TILED
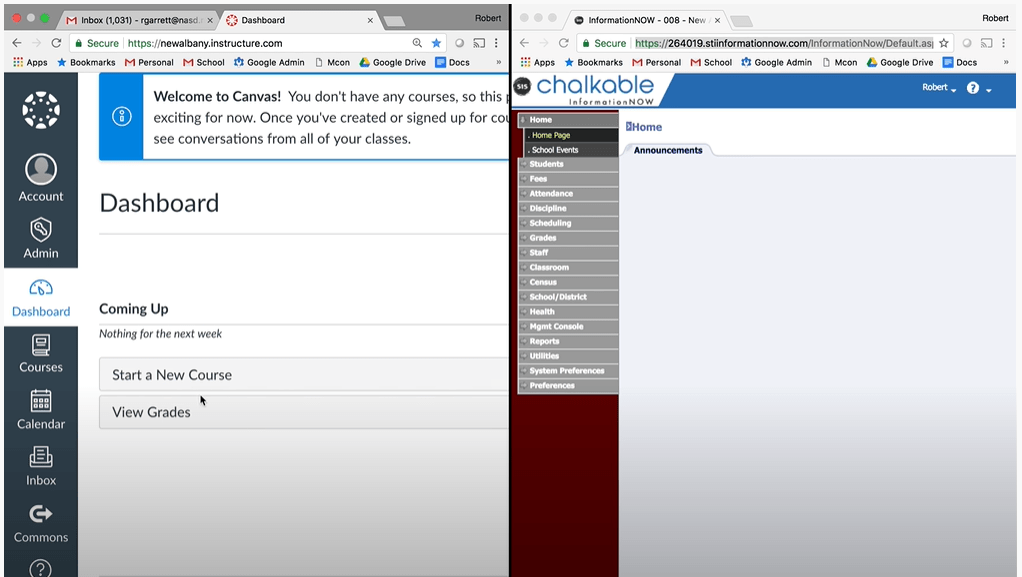
At the point when you tile the window to the right side and left of the screen, equivalent noticeable quality is given to everyone while obstructing out everything else from your PC.
Also Read: Do You Need AppleCare+?
How to Set up a split-screen
To include dragging applications to various sides of the screen on Mac used Setting up split-screen. However, the procedure has been made significantly more clear in macOS Catalina…
1. Select the first app

To utilize the split-screen mode, you should first guarantee that both of the applications that you might want to see are open and have a nearness or existence on your Desktop.
Also Read: Let’s Play Apple Music On Mac
2. Make an application Tile
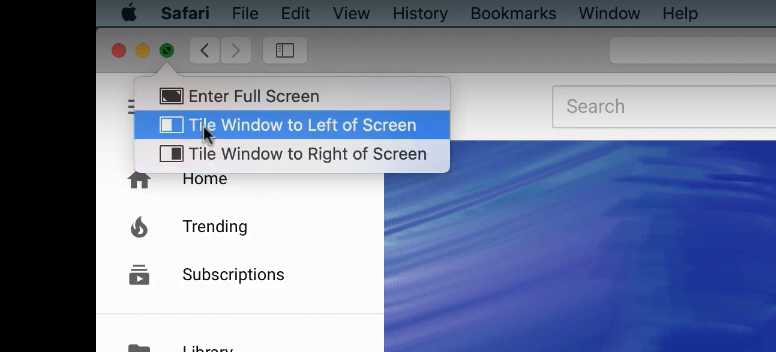
Drift your cursor over the green hover in the upper left corner of one of the application windows, and afterward, decide to tile it to the left side or right of the screen.
3. Select the second application
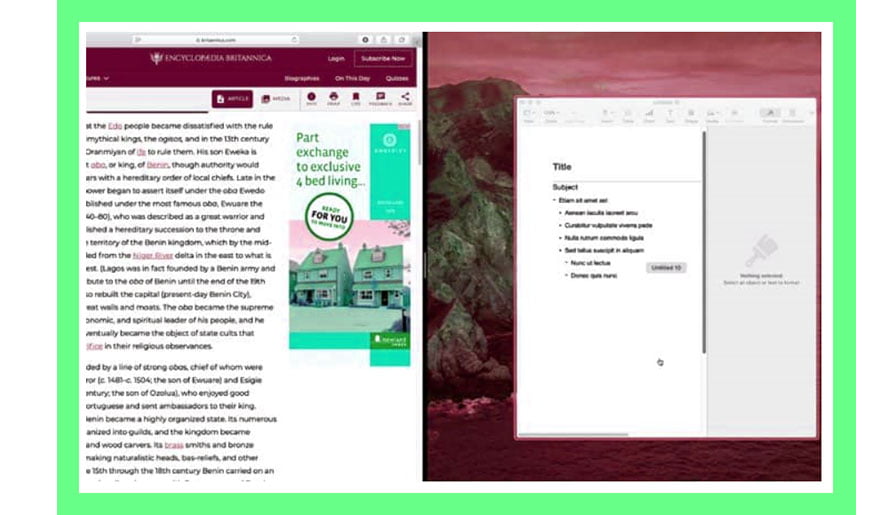
The first application will be inclined to one portion of the screen, and the other will be noticeable in the subsequent half. Snap-on the other application, and everything’ fill the other half.
Also Read: How To Check Mac Storage And Clean Up
Step-by-step instructions to exit Split Screen on Macbook
To Exit the split-screen and return to your normal desktop, slide your cursor up to the head of the screen until the green symbol returns. Snap to lessen the size of your window. The window you’re in will return to its pre-split screen view.
The rest window will show on a full-screen view. Explore the subsequent window by tapping the application, utilizing Mission Control to show every item of your windows (presented below), or swiping to control it on your trackpad. To leave the full-screen mode, again utilize the green icon to resize your window.
Menu Bar TOOLS
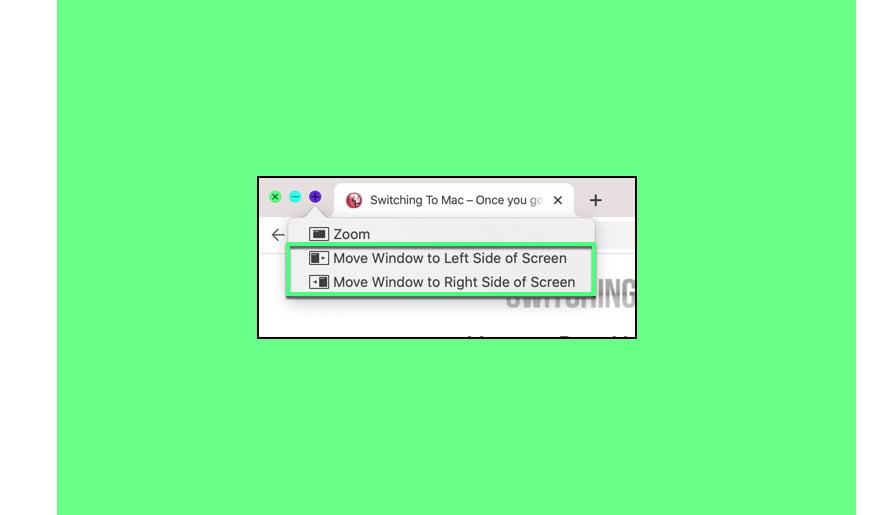
On the off chance that you hold Option (or Alt) and snap the green symbol in a window’s upper left side, you get three new features:
1) Zoom,
2) Move the Window to the Left Side of the Screen,
3) Move Window to Right Side of Screen.
The Dock and Menu Bar hides after entering Full Screen; Zoom keeps these set up. The distinction between tiling a window and moving it is comparative — tiling conceals the Menu Bar and Dock while moving doesn’t.
Moving additionally doesn’t enter Split View — there’s no moveable dark bar when you simply move a window to either side of the screen. You don’t have to match a second application, either.
Also Read: How To Check Activity Monitor On Mac
Snappy things about Mission Control

Do you have a few windows open on the double and need something more exhaustive to see them all? You can get this by using Mission Control. Get the details here.
This mode shows all your open windows in a strip-like view that lets you rapidly bounce, starting with one and then onto the other. Mission Control lets you make different virtual work areas (or “spaces”), each with its applications and windows open. These are also shown on the strip, allowing you to move effectively from one work area to another.
You can get to Mission Control from multiple points of view. However, one of the least demanding is to drag a window up to the top edge of your screen, which should enter Mission Control mode naturally.
On the other hand, Apple keyboards normally incorporate a Mission Control button (F3), or if you have a trackpad, you can swipe upwards with either three or four fingers (contingent upon your trackpad settings).
You can also enter Mission Control while in Split View, which is a simple method of exchanging windows as essential. Mission Control also causes you to change to Split View when two fullscreen applications are open.
Simply enact Mission Control and afterward drag your application window on the head of another window or application symbol. This ought to promptly initiate Split View.
A few features won’t deal with macOS Mojave.
Are you still utilizing macOS Mojave? For the most part, Split View remains the equivalent, yet there are a few outstanding contrasts. First, you can’t utilize the window snapping features that are worked in with MacOS Catalina. But, utilizing an application like Magnet or Cinch can accomplish the same results.
Second, you won’t get Zoom; move the Window to the Left Side of the Screen and Move the Window to the Right Side of the Screen devices if you hold the Option while tapping the green icon. This is another component presented in Catalina.
If you’re considering moving up to Catalina but haven’t made the jump, dread not — we have all the information you need to introduce macOS Catalina in a different guide.
Set Up Split Screen on Macbook using Third-party Apps.

If you’re not energetic about Split View, there are options for setting up Split Screen on a Macbook.
One of our top choices is Cinch(Click here for the latest version). It makes hot zones on the four corners of your Mac and two hot zones on the left and left-right. You drag a window into one of these zones, and it fits properly.
If you drag it into a corner, it will consequently snap to one-fourth of the size of your screen. If you drag the window to the side of your Mac, it will snap to a large portion of the screen.
A few clients may locate this simpler, more intuitive, or more valuable to viewing different windows without delay. If you are intrigued, Cinch works admirably, remaining current with the most recent macOS.
A free preliminary is accessible to test drive, while the full form is just $7. Visit and Download the official webpage or directly from the App Store.
If you like the information or if we made any mistake on the guide of Split Screen on Macbook.Please let us know.