
TROUBLESHOOT WIFI CONNECTED BUT NO INTERNET ACCESS On Windows 11/Windows 10: This is the most well-known issue that we occasionally comprehend your “Wifi connected but no internet access”. It might be a wifi or LAN connection. You are associated with the network. However, the Internet doesn’t work, and you get a problem like this.
A yellow triangle regularly shows on your Wi-Fi symbol. What’s more, obviously, you will not have the option to open any site pages on your browser.
No Internet, or you may get various types of errors on your browsers if you attempt to get to the Internet. Furthermore, this might be adding this error like there is a significant issue with the proxy server or the address is wrong.
This post will show you various techniques to fix the “Wifi connected but no internet access” issue on your Windows 11/Windows 10/Android PC.
Why is “Internet Connected but No Internet Access” happening?
You need to isolate your thinking. There are two networks affecting everything. The first is your Local Area Network (LAN), and that is the entirety of your gadgets in your home or business. The second is the Wide Area Network (WAN), which is everything outside your home or business.
Suppose you consider these two a large Venn Diagram, the little spot where they intersect with your router. Your router takes the entirety of the data demands from your LAN and “routes” them over the WAN association with your ISP (e.g., your ISP = “Internet Service Provider”).
It then takes the entirety of the information returned. It parses it out to the legitimate gadget (for example, my page demands are gotten back to my computer and my brother’s Netflix streaming goes to her tablet…).
Without getting excessively specialized _ and I’m not a techie _ any time at least three or more gadgets are attempting to communicate.
With one another carefully, they need a type of “handshake” sign to show that they are available, signed on, and prepared to convey.
Once in a while, a random signal, a transient voltage, or something to that effect _ can be misconstrued by one of the two gadgets and disarrange their connection. This can occur even with wired connections —, for example, the link from your CPU to your printer.
I’m expecting the inquiry to be about a home or office WiFi network that interfaces different gadgets in that space to a wireless router, making a personal home network, which is, in turn, associated via an outside cable link (given by an ISP) that gets to the Internet.
If something happens to the Internet connection, the different gadgets may, in any case, be connected with the home wireless network and communicate with one another fine and dandy, yet WiFi Connected But No Internet Access.
Having a LAN connection is just the initial step. Your wireless association is just to your router. However, you need to ensure that your router is making the WAN association with your ISP.
You can investigate your router’s status page (the manual should give an IP address to get to the setup.)
In that router setup, find the option called “status” and then verify that your switch is really being allocated an IP address from your ISP. That is the initial step.
Eventually, you’ll have to contact your ISP if that connection isn’t occurring.
What are the few reasons behind “WiFi Connected But No Internet Access”?
It implies that the device has effectively connected with the WiFi network and the subnet that the network is utilizing, however, for reasons unknown it can’t arrive at specific sites on the Internet that it uses to test Internet networks. There can be a few reasons behind this:
1) The gadget doesn’t have a legitimate gateway address in its IP setup. The gadget can connect with different gadgets on the equivalent subnet, yet without a gateway address on the subnet. It doesn’t have the foggiest idea where to send bundles. So they can be sent to the Internet. Ordinarily, the gateway address will be the local address of a router associated with the subnet.
2) The nearby subnet has no route to the Internet. Usually, this is on the grounds that there is no functioning ISP connection.
3) The gadget doesn’t have a substantial DNS address. Practically all Internet associations have started utilizing a book-based URL. This requires a DNS query to get the relevant IP address. If a DNS isn’t available, the gadget can’t affirm it approaches the Internet.
4) A firewall setting, potentially in the router, obstructs specific parcels from arriving on the Internet.
Best Methods To Fix WiFi Connected But No Internet Access
There are various potential reasons why you might be having this issue. It works very well, maybe because of issues with a service provider or with your Wi-Fi router. And, it could likewise be because of issues with the network setup on your PC., so here I will attempt to cover every one of these prospects. Also, ideally, we will have your Wi-Fi working appropriately again.
WiFi Connected But No Internet Access Windows 11
Solution #1, Turn On Network-Related Services
1. So click on the search icon. Type Run, and open the Run app. Then, in the Run text box, type Services.MSC, click on. Okay,
2. Then from the list of services. Here we need to manage some services.
- We need to find out about the Wi-Fi Direct service. Right-click on it and Start it.
- Then find out about the Radio Management Service. Make sure it is running. Okay.
- Next, Scroll down, find a Network connection service, and Start that service.
Solution #2, Reset DNS On Windows 11
- First, click on Search > type task manager, and open Task Manager.
2. Click on the file, Select “Run new task”, then click on the browse button, Open C drive and navigate to this folder: C:\Windows\System32\cmd.exe.
Okay, check the checkbox where it says “Create this task with administrative privileges” and click on Okay, now.
- You need to execute these commands in sequence.
1st, So the first command is:
netsh winsock reset2nd, The next one is:
netsh winsock reset catalog
netsh int ip reset resetlog.txt
4th. Okay, so please maximize this window. so you can see properly. The next one is:
ipconfig /release
ipconfig/renew
ipconfig /flushdns
So now type exit to exit the command prompt.
WiFi Connected But No Internet Access Windows 10
Solution #1: Check With the Service Provider and Router
So, prior to changing any settings on your PC is advisable to initially check and check whether this WiFi Connected But No Internet Access issue is coming from your internet service supplier or your Wi-Fi router, particularly if you are utilizing a private Internet membership clearly.
Suppose you are associated with a public service like a campus network or city network. At that point, you will not have the option to play out this test. In this case, you ought to continue with different solutions in the post.
Yet, if you are utilizing a home Wi-Fi router or some modem, at that point, you can do a quick check whether this is an issue with the service provider or with your router hardware. To check for issues with the service provider.
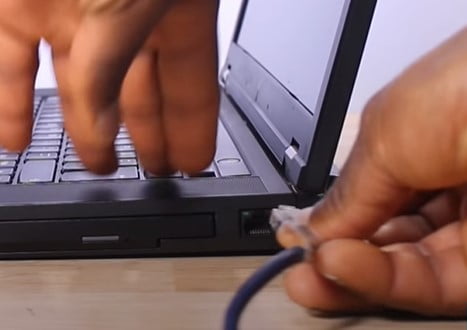
You could attempt to connect directly to your computer instead of going through the modem or router. In that case, you should unplug the CAT 5 RJ45 cable if you are utilizing a mobile line that goes into your WLAN port on the Wi-Fi router from the wall and plug it directly into your PC’s port.
And then hang tight for you to set it up if the yellow triangle perseveres. And, you are as yet incapable of riding the web. Then there is a high possibility that this issue is coming from your service provider. In this case, you could send a message or call to help correct the issue.
But, if the yellow triangle disappeared. Afterward, you can browse when this cable is directly associated with your PC. At that point, the next thing to check is your Wi-Fi router.
A fast method to check this is to connect another wireless gadget, like another PC or another smartphone, to your Wi-Fi. Also, check whether this other gadget can get to the web connection. Assuming it can’t, there is a high possibility that the current setup or settings on your router are blocking the Wi-Fi connection for wireless gadgets.
If that is the case, you need to check the settings of your router. Suppose you don’t know how to do this. Then you may have to look for the help of a specialist in any case. Some other wireless devices can connect and access the web from your router.
At that point, there are chances that this “WiFi Connected But No Internet Access” issue is coming from your PC in which case you ought to apply at least one of the following fixes.
Solution #2: Change Advanced DNS Settings
I don’t actually see precisely what I have done that resolved the WiFi Connected But No Internet Access issue because I scarcely know anything about PCs.
1st, Open the Network and Sharing Center option from the Network & Internet (Control Panel) setting.
2nd, Next, Click on the Change Adapter Settings option.
3rd, Need to right-click on your network connection and then select the Properties.
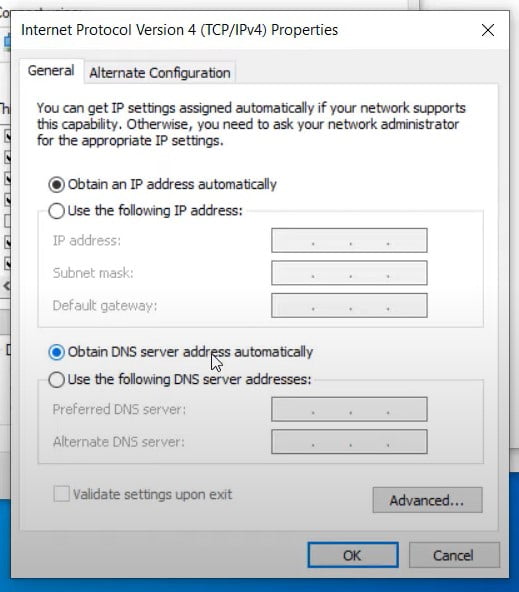
4th, Select the “Internet Protocol 4“, and then choose the Properties option.
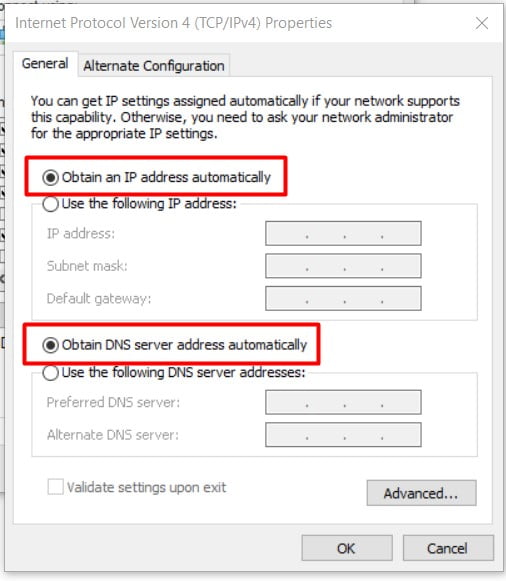
5th, You have to select two options.
- Obtain an IP Address Automatically.
- Obtain DNS Server Address Automatically.
6th, Click on the Advanced . . . button.
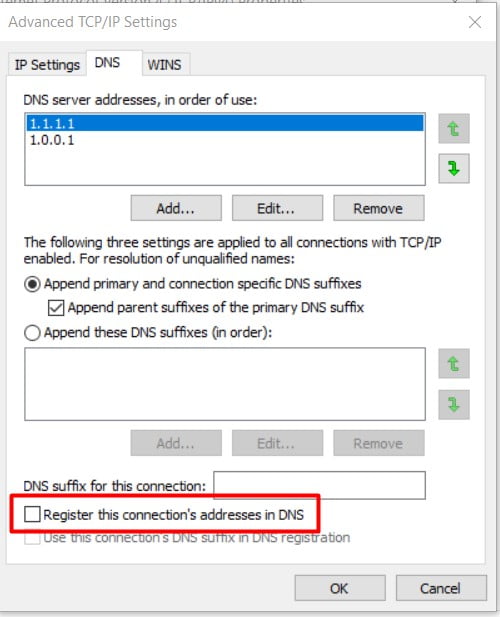
7th, You can see a new pop-up box. Select the DNS tab and Uncheck the “Register This Connection’s Address in DNS” option.
I’m writing what I have done in the expectation, and it can assist you with taking care of your internet Internet or WiFi Connected But No Internet Access issue.
Solution #3: Uncheck the Manual Proxy Server
This step is only for if you have already set your Proxy Server manually. You can perform this action to resolve wifi connected no internet issue on Windows 11/Windows 10.
1st, So the first thing to do is go to the Start and Search for the control panel. Open the control panel and look for Internet options.
2nd, Now, go to the Connections tab. And then click on LAN settings.
3rd, Now if you see this Proxy server is checked, then and Uncheck it. If it is set to a manual proxy server, then you have to uncheck and use the automatic proxy server.
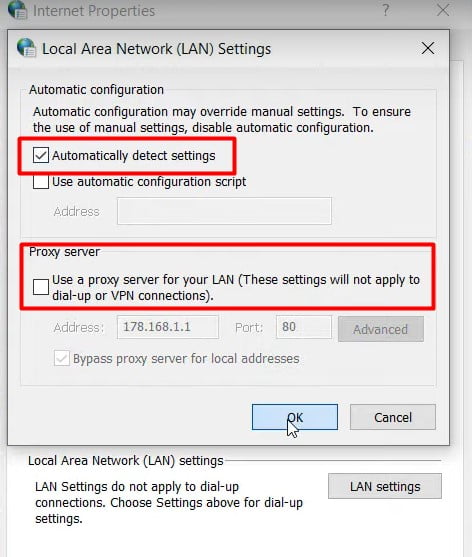
4th, Select the Automatically detect settings checkbox.
5th, Then Click on the OK button.
6th, Now, you need to right-click on this Network icon (In the Taskbar corner). And click on the “Open Network and Internet settings” option.
7th, A new window will open. Scroll down to the Network and Sharing Center. Click on it.
8th, You will get your Wi-Fi our LAN name here; just click on it, then go to Properties.
9th, A new Pop-up will open. Now double-click on the Internet Protocol version for TCP/IPv4 for just double click on it.
10th, check if there is any Manual DNS or IP selected, and if IP and DNS are set to Manual, then you have to Select Automatic Settings, Then click on OK and again OK. Close this box.
Now you need to check if the WiFi Connected But No Internet Access Problem is resolved or not. If it is working fine, then good. If it is not working, then follow the next method.
Read More: “This Site Can’t Be Reached or err_connection_reset” Error?
Solution #4: Reset your TCP/IP and Winsock stack
After restarting you should attempt to connect back to your wireless network. And, check whether the internet connection currently works appropriately again. If not, the following solution is to reset your TCP/IP. This is the API that decides how the network software gets to arrange the network.
WiFi adapter sees the available network, anyway won’t acknowledge TCP/IP address. Trying to reset Winsock and IP stack may resolve the WiFi Connected But No Internet Access issue on Windows 11/10.
Note: This step is one of the best potential solutions that should possibly be attempted if you have a decent working knowledge of the Windows OS network settings and services.
So, in some way or another, this API gets undermined by the malfunction or some other malware. At that point, it could likewise prompt this connection issue. Then resetting it back to the default setting can be the answer for Reset your TCP/IP and Winsock stack.
1st, Go to the Taskbar in the Search box, type the word Command prompt, right-click on the Command prompt, and then click on Run as administrator. Click on Yes to continue.
2nd, In the command prompt, run the following commands in the listed order and then verify whether that fixes your connection issue:
- Type netsh winsock reset and press Enter.
- Type netsh int ip reset and press Enter.
- Type ipconfig /release and press Enter.
- Type ipconfig /renew and press Enter.
- Type ipconfig /flushdns and press Enter.
3rd, Afterward, You need to restart your computer.
Read More: [Modern Setup Host] How To Get Rid of High Disk Usage Issue In Windows 10
If you are experiencing any issue identified with the DNS server. At that point, and ideally, toward the finish of this progression, your issue will be settled.
There’s a probability that the DNS server that your PC is utilizing has a WiFi Connected But No Internet Access issue. To check if this is the offender. It would be best if you took a stab at utilizing google’s public DNS. Which is a free elective domain name system or DNS service offered to internet users all throughout the world.
What you have to do is:
1st, Now, open the Start menu and open the Control panel.
2nd, Open Network, and the Internet. Click on Network and Sharing Center.
3rd, Then click on Change adapter settings.
4th, Now in Network connections. Right-click on your Network icon. And Select Properties.
5th, A new Pop-up setting will open. Select ipv4 or Internet Protocol version 4. and click on the Properties button.

6th, Now in DNS config. click on manual DNS.and enter these DNS addresses in the first DNS Enter 8.8.8.8
For the second DNS 8.8. 4.4. below Save the settings. but don’t close the network connection window.
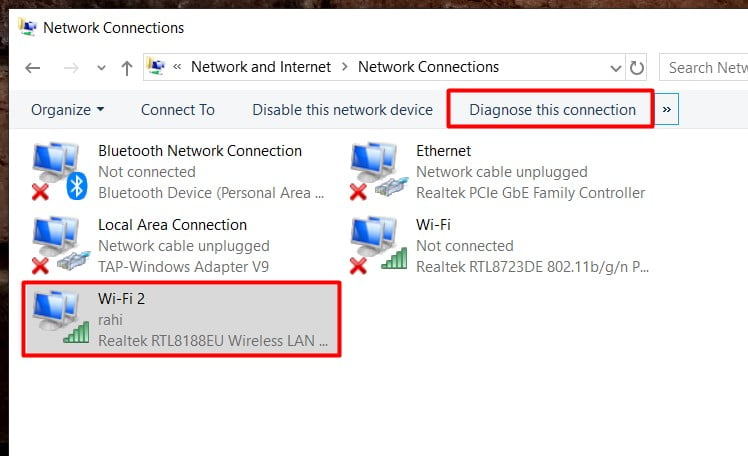
7th, Now you should find an option on top to Diagnose this connection. So, select the network icon. Click on the Diagnose button. Wait till it completes. Your issue should be fixed by now. You are good too.
Solution #6: Network Troubleshooter
For this method, you can use a network troubleshooter while you are on this network,
1st, Right Click on the Windows logo. Then Choose Settings, and click on the Network and Internet.
2nd, In Internet Settings, then click on Network troubleshooting.
It might identify the issue with your network, Wi-Fi network, or LAN network. What’s more, if there is an issue discovered, you can utilize the network troubleshooter to fix that issue. You will get that issue listed on the network troubleshooter.
3rd, you are going to click on Next and Next and Apply the fix.
This troubleshooter hardly works away on prior versions of Windows. However, Windows 10 has progressed with troubleshooting, and it can fix your issue, and it can fix the WiFi Connected But No Internet Access issue found with your PC.
Solution #7: Reset Your Network
Presently, if the network troubleshooter doesn’t work, sometimes certain uses of malware could modify the setup of your drivers or Network adapter. And keep them from getting to the Internet. In such circumstances, resetting your network adapters could be a potential solution for this WiFi Connected But No Internet Access issue on Windows 11 or Windows 10.
1st, You can go to Settings and next to Network and Internet.
2nd, Then scroll down on this page. Then click on the Network Reset link and next click on Reset Button.
It will reset each network profile related to your Windows 10/Windows 11 PC. So you can reset all the network profiles and network details.
After that, it will restart your windows. So reset your networks and restart your Windows 10. Also, after the restart, you need to connect to your Internet or Wi-Fi. It could be Wi-Fi or LAN just connected, and if you are utilizing Wi-Fi, Next select your Wi-Fi network and connect, and you need to enter your password again.
Since we have rejected the network profile you can put your Wi-Fi password again. And after that, you need to check if the Wi-Fi is working or not.
In most cases, it should resolve the WiFi Connected But No Internet Access issue, but if it is still not working, then follow the next method.
Solution #8: Uninstall and Reinstall Network Driver
We will find out about a typical Network troubleshooting strategy. What’s more, it’s reinstalling your Network card now if your Network card is now installed.
1st, You can undoubtedly reinstall it by just clicking on your Start menu button. And we will type in the Device Manager. Let’s select the Device Manager to open it.
2nd, Then we will expand the Network Adapters. Also, it would help if you made a note of the Network Adapter you have. Here, most importantly, is the Model number.
Also, suppose I’m having issues connecting with the Internet to the adapter. Some of the time, windows can corrupt an installation of a network adapter. On the other hand, maybe something’s holding it up.
3rd, If I right-click on it and click on the Uninstall. I can, in reality, eliminate this thing immediately.
It would appear that you have a second network connection driver that you need to eliminate too. So I will feel free to remove that too. You usually don’t have a second one except if it’s a two-port adapter.
4th, Now that, We’ve Uninstalled all drivers. We can either Reboot the PC. And let it Reinstall, which a few groups picked to do.
Or, We can, in reality, right-click on our PC name up at the top. Also, click check for hardware changes. Windows will quite reinstall those devices.
NOTE: This isn’t an assurance it will fix your system’s WiFi Connected But No Internet Access issue. But this is an extraordinary default approach to sort of refresh the driver for your Windows networking card. Also, Assuming you have a web internet working after that. Or then again, perhaps you do have a wireless connection working in your wired as getting rowdy. If you do, it’s consistently a smart thought to attempt to update the driver software also.
Update Driver Using Third-Party Program
Installing drivers is hard stuff to do for everyone; most Windows users never update their drivers. So that the performance decreases from time to time. Here is an application that can install and update all drivers of your system with one click. The application name is the driver.
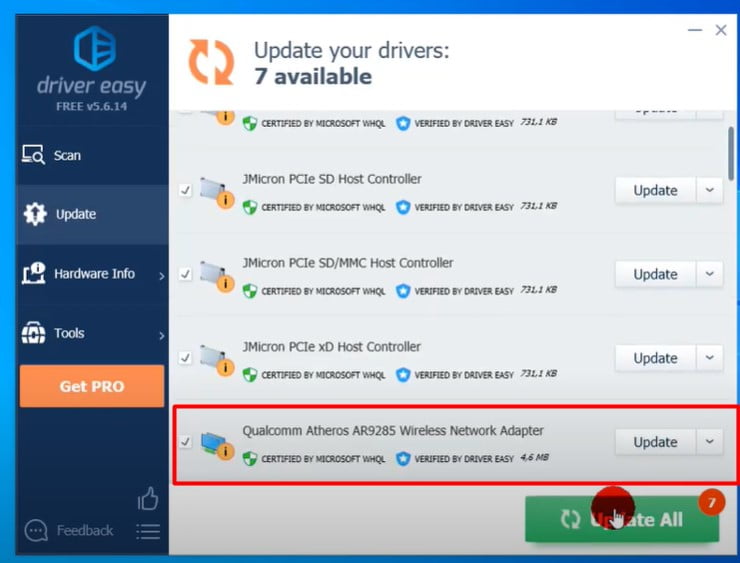
Driver Easy This is an amazing program that scans your drivers for what you have been updating, what is updated, and what is not. You just press scan now, and you will see which drivers you have missing.
There is a paid and free version. Now I’ll scan my computer to check if everything is updated. And if I have all of my drivers. You can choose which driver to update. And which not to update. It depends on your taste. And what is important for you? Also, you can use this software to fix wifi connected but no internet issue on windows 11.
Read More: Reboot and Select Proper Boot Device Error | How to Troubleshoot?
Solution #9: Optimize Network Using Regedit.exe
We’re going to do this step to fix it. Also, maybe it’ll look awful. However, well we’re going to help you through the settings bit-by-bit instructions to improve network settings in your Windows 10 registry. And this can be utilized for gaming or some other reason. that you need to advance your network settings. And this will give you the best-improved speeds for your network and your web speeds.
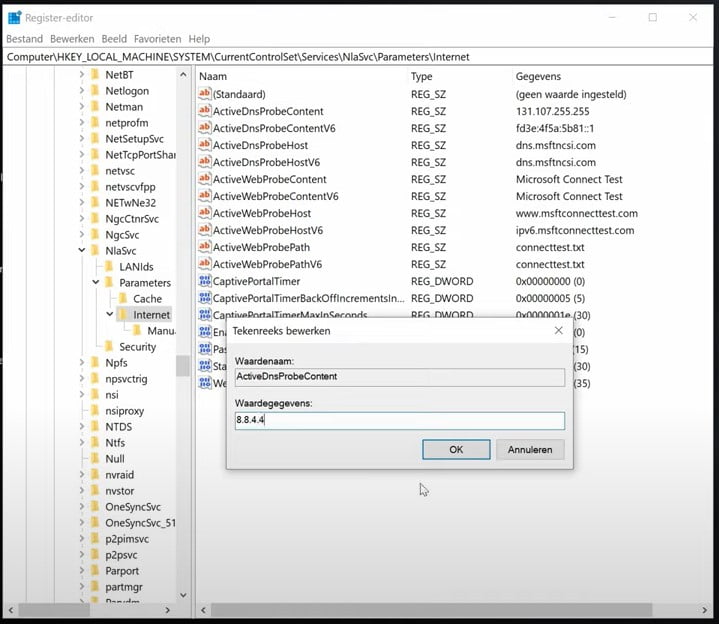
1st, Change a few registry values with regedit.exe and run it as an administrator. You go to the search bar you type in regedit.exe. Right mouse click and select Run as administrator.
2nd, Go need to go to the following folder directory:
HKEY_LOCAL_MACHINE\SYSTEM\CurrentControlSet\Services\NlaSvc\Parameters\Internet.
This is the folder here is where the Sets happen. You need to set some values in here.
Before I do this, The principal thing we will do is make a backup of the registry. Since we need to ensure we have a backup. So, consistently make a backup. You would prefer not to back up like this.
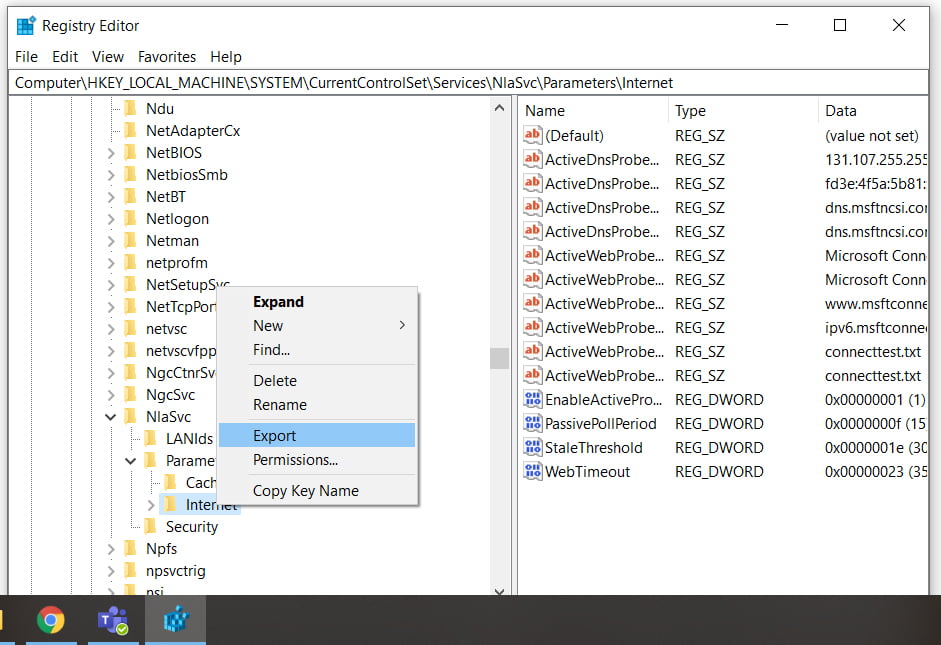
You need to select the internet folder there > Afterward click on Export. Save this to a location where you need to make a backup.
So, I’m going to put this in my C root directory. And literally, go into there. That should make a backup of my complete registry on this computer.
3rd, After completing the backing up. It would be best if you changed some Name parameter values that are mentioned below. Please go through this accordingly:
Change these values:
ActiveDnsProbeContent”=8.8.4.4
ActiveDnsProbeContentV6=2001:4860:4860::8844
ActiveDnsProbeHost”=dns.google
ActiveDnsProbeHostV6=dns.google
ActiveWebProbeHostV6=www.msftconnecttest.com
EnableActiveProbing=1
Read More: Ethernet Doesn’t Have a Valid IP Configuration Issue
WiFi connected but no internet access on Android Phone.
The issue is that your Wi-Fi is connected to your Android smartphone, tablet, or Android TV. However, if you don’t have internet access, you can follow these steps in this segment. I will show you some steps on my Android mobile. But you can follow these steps and attempt to sort out these issues. You can source for the setting on your Android tablets and TV.
Method 1,
1st, You can just go to Wi-Fi from Setting. And then select your Wi-Fi. And then click on the forgot network button. When clicking on forget network button. Your Wi-Fi will be automatically disconnected.
2nd, when you come back to the wifi setting. Put the Password correctly and then try to connect it. It should resolve the WiFi Connected But No Internet Access problem.
And you can see it connected. You have excellent signal strength, and the Wi-Fi is connected.
Method 2,
1st, Just tap on the Wi-Fi icon, and you can see the wifi list screen. You can even get this open from the setting.
2nd, Just tap your Wi-Fi network name.
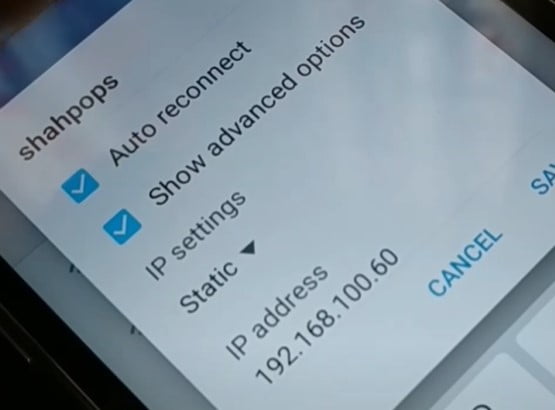
3rd, Somewhere you’re going to see the Manage Network Setting. or you might have some different options. Sometimes, you might get the Show Advanced option directly.
4th, So check this advance option. And then you’re gonna see it expand a few more options. So, the different devices have different ways.
5th, Then you’re gonna see IP Sitting. Tap on this dropdown. You can have two different options: DHCP and Static.
6th, You need to choose the Static.
NOTE: So that is what you’re gonna do because. In the beginning, when you tap the Wi-Fi network. You might have all different ways it will display the option on a different smartphone. anyway access the advanced option and Choose the Static option.
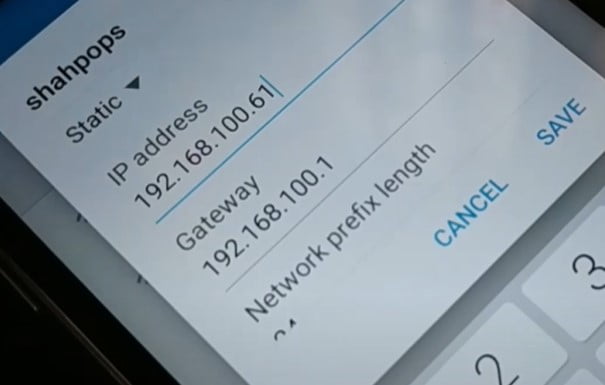
7th, You need to change your Static IP address like:
192.68.100.60 to 192.68.100.61 right over there.
NOTE: So you can put any value from 1 to 254.
The default gateway should be 192.168.100.1.
Network Prefix length: you can put 24 over here;
DNS should be 192.168.100.1. And everything should be as it is. You don’t have to make any changes.
8th, Then you need to Save it. Connect it, and you can see Wi-Fi connected.
Once again, it still does not work. Again, you have to access the Show Advanced option. Check this box advance option. You’re going to choose the Static again. And change the following settings:
IP address: 192.68.1.61.
The default Gateway should be 192.168.1.1.
DNS should be 192.168.1.1.
Everything should be as it is. And try to connect it. If these two methods do not work still shows WiFi Connected But No Internet Access. You can proceed to the next method.
Method3,
Open your phone dial pad or numeric pad where you dial a phone number. So you just open it. And then, you will type *#0011#, and you can see some service mode options. On the different devices, there will be a different shortcut code. You can dial to access a service mode.
1st, On the top, you’re gonna see option More. So click on this More.
2nd, Then you will tap to Wi-Fi. Click on this Wi-Fi.
3rd, When you tap on Wi-Fi. You’re going to see this space somewhere in this device. I do not have the option. You’re going to see the option add up.
4th, Here, you have a ping test on top of a ping test. You’ll have the option to turn it off.
5th, you just have to turn it off and then restart your smartphone. if you don’t have the option. You can skip this step.
Method 4,
The next thing that you can do in order to fix the issue.
1st, The next step is to go to Settings. In settings, you need to find Backup and Reset. In some phones, directly at the bottom, you can see the Factory reset.
2nd, Click on the option Backup and Reset.
3rd, I’m just trying to access the Factory data reset. So, for some of your phones in a setting, you’re gonna see Factory data reset. It doesn’t matter what brand or whichever device you are using.
4th, Then you’re gonna click on Factory data reset.
5th, You need to read all this properly. So you’re going to delete lots of information from your phone. So be careful and just read it before you continue.
6th, And then finally at the bottom. We have the option to Reset the device. Click on Reset device in order to reset your device.
7th, For The final confirmation, click on delete all. So it will delete all the information from your phone.
After completing the Reset process, you can just log into your phone again. You can turn on your phone. And then, you can try connecting to the Wi-Fi. It should be working fine without the WiFi Connected But No Internet Access problem.
Some Troubleshooting The WiFi On Windows 11/Windows 10
This post will assist you with fixing each WiFi issue with your PC, which incorporates but is not limited to –
- The network icon turned red or the Globe icon with a forbidden sign.
- Unable to connect to WiFi.
- Connected to the Internet but no internet access.
- WiFi is stuck on connecting.
- No Wi-Fi network was detected.
- Checking network requirements.
- WiFi keeps disconnecting.
- Can’t connect to this network.
“WiFi Connected But No Internet Access” FAQ
My PC connects with my smartphone’s hotspot, yet shows no internet access. What could be causing the problem?
Happened a ton to me as well. It’s simply that your connection is too delayed even to consider causing the PC to acknowledge it has a working internet connection. Simply give some an ideal opportunity to your Computer and hotspot … around 15 minutes. It will be acknowledged sometime.
Solutions:
Quicker connection through phone.
Notwithstanding notification on the web, browse something on pc. Commonly it has a connection, and it stacks the site despite what it shows on the notification.
Connect the new data connection to your phone again by turning it off.
Jio dongle appears connected but has no internet access; how would it be a good idea for me to respond?
Login to the MyJio application and check the status of the recharge plan.
If everything is alright and the internet isn’t working.
Do the accompanying troubleshooting steps –
Be certain the gadget is on and the battery is charged.
Open the back front of your Jio-fi and re-embed your dynamic Jio sim in the sim space.
Be certain your associated gadget ought to be in the 10-meter region of Jio-fi.
Be certain the network bar marker is showing green/blue on a jio-fi gadget; if showing red, your gadget is out of the network.
Check if your wifi is connected; otherwise, eliminate the associated wifi gadget from your PC or phone and interface again utilizing a password. Your Jio-fi password is the posterior of the battery of the Jio-fi gadget. (password is Case sensitive)*.
For what reason do our TV shows connect but no Internet?
It is on the grounds that your data pack or internet data isn’t working, yet your router is associated with your television.
The router can, in any case, show association if it isn’t getting web information
internet > Router>TV
In an Android phone, for what reason is my WiFi connected but no internet access?
Follow these steps:
Need to turn off the static IP choice – try to tap the screen to get the “save” alternative for this.
Your gadget ought to configure a connection.
Need to turn off the WiFi.
Need to turn on the static IP choice (you have to find “Show Advanced Settings”)
Need to Turn on WiFi
Sharing a hotspot with my friend. WiFi is connected, but no internet access.
Need to turn off the hotspot.
Open VPN and erase all that isn’t yours/configure explicitly.
Disable /Remove all your “VPN” applications.
Restart the mobile and review from #2; if everything is great, now turn on the hotspot.