
You turn on your PC and you see the “Reboot and Select Proper Boot Device” error screen. you press any key and again the same problem. OK, we should fix this issue. Dreaded reboot and select proper boot device error for the most part when you see this is demonstrative of some sort of hard drive issue. it very well might be a total hard drive failure right down to simply a loose cable.
In this post, I’m going to show you a portion of the things that you can do to troubleshoot this problem and conceivably fix this “reboot and select proper boot device” error in Windows 10. if you are experiencing this issue.
What is The meaning of Reboot and Select Proper Boot Device?
The Reboot is the activity of shutting down your PC and restarting it once more. It permits you to do this in one activity rather than 2 (1st to close down the system and 2nd to restart).
The Boot Device represents the hard drive (or in some CD or flash drive) that holds your operating system. You can have more than one operating system on a hard drive or two (if on one drive they would be uninterested segments). So permitting you to pick your boot drive is saying which hard drive (CD, flash drive, and so on) you need the PC to boot the OS from.
“Insert Boot Media in selected Boot device and press a key or Reboot and Select proper Boot device”? What does it mean?
- It happened twice or threefold!
- It happens when your pc can’t detect the OS
- Check your OS, if it is a corrupted one
- The Hard Drive on which it is located has been not plugged in well (Try plugging it in, works more often than not)
- The computer doesn’t recollect where the OS was, Because, you made some changes in the setting (Recheck the Drive, By visit in the BIOS)
When I will boot the PC. this is the problem that I would get. also, when you notice this error. This means that some kind of problem with the hard drive. It may very well be something physically incorrect. which means anything from a detached cable.
Yet, it very well may be a lot more regrettable and could imply that the hard drive has fizzled on a physical level. also, should be replaced. or on the other hand, it tends to be a logical failure implying that there is some kind of bug there that is blocking the operating system from booting somehow or another.
Solution #1,Press Ctrl + Alt + Del Key
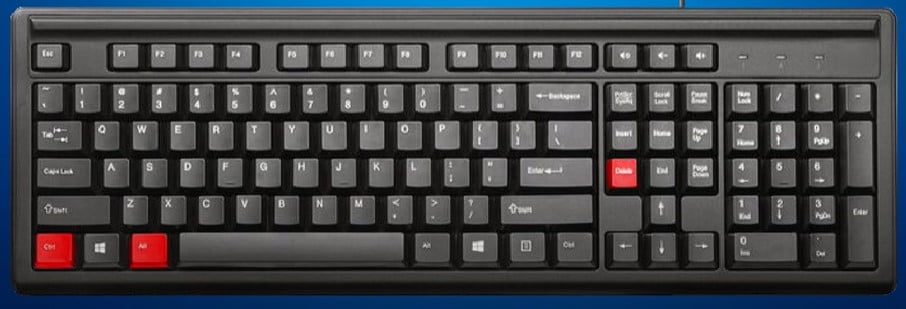
The primary thing you can attempt is to turn on your system and press hold the Ctrl + Alt and Delete keys on your keyboard at the same time. if that doesn’t assist with load windows. the most probable explanation, for your pc isn’t booting is that the boot drive priority order is wrong. you should go to the BIOS to change the boot settings.
Solution #2, Change Your Bios Default Settings
Turn on the computer and continue to press the BIOS arrangement key for your PC. This is frequently the Delete key. however, it can likewise be the f1, f2, f10 or Escape key on certain PCs. you can see the key referenced when your System starts booting.
You can likewise Google search the BIOS key for the model number of your PC. When you are in the BIOS. attempt first to load enhanced Default Settings. Save and exit setup. If it doesn’t boot properly(still getting the Reboot and Select Proper Boot Device error). please go o to the next solution.
System BIOS Boot Keys for All Laptops & Desktop PCs
Dell Laptop & Desktop:
F12 (Boot Menu) F2 (System Bios)
HP:
HP Desktop
Esc, F9 (Boot Menu)
F10, Esc (System Bios)
HP Laptop
Esc (Boot menu)
F10 (System Bios)
HP Generic
Esc, F9 (Boot menu)
ESC, F10, F1 (System Bios)
HP Notebook
ESC (BOOT menu)
Esc, F10 (System Bios)
Acer
Esc, F12, F9 (Boot Menu)
F2 (System Bios)
ALT + F2 (Boot Device Options)
F12 (Boot Device Options)
ALT + F10 (Acer eRecovery)
Asus
Asus Desktop
F8 (Boot Menu)
F9 (System Bios)
Asus Laptop
Esc (Boot Menu)
F2 Delete or Delete (System Bios)
Asus notebook
Esc or F8 (Boot Menu)
F2 or Delete (System Bios)
Solution #3, Check Boot Drive Priority Order
How to fix the issue giving you a “no boot device error or reboot and select proper boot device” or any type of error like that? That is saying it’s attempting to boot up yet I can’t discover anything to boot off.
In this part, I will tell you the best way to put the PC from an alternate device or change the boot priority. we’ll be utilizing the PC ASUS gaming laptop. If we need to install a Windows version or a recovery program to enter the boot screen.
We have to connect the device that we need to boot on next. we need to press the power button. after we continue pressing the Delete button at the top. more than once. great, after that the BIOS screen will show up.
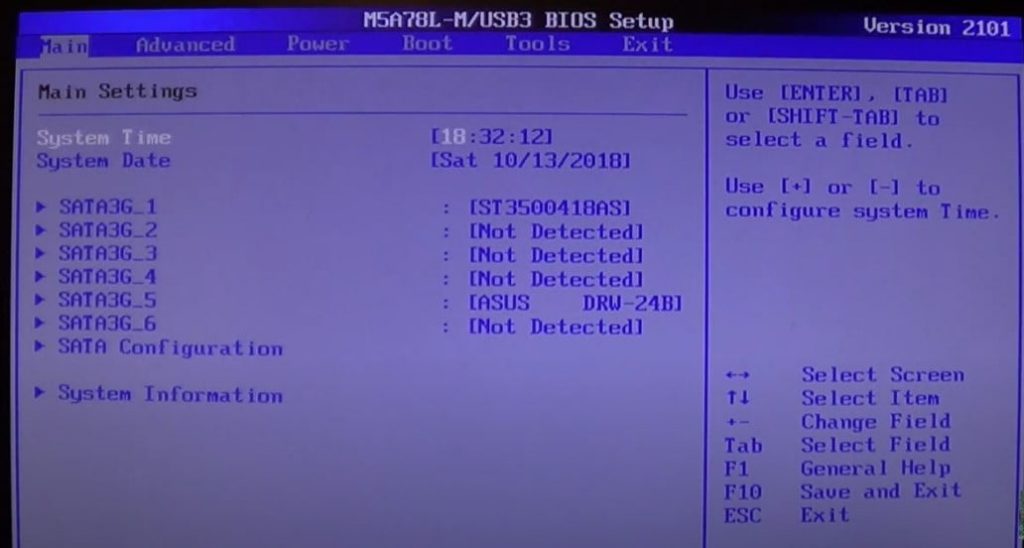
All BIOS interfaces are somewhat different, so yours may appear as though this, or it might look totally different. No problem with how it shows up, they’re all fundamentally a bunch of menus containing a wide range of settings for your PC’s hardware.
In this specific BIOS, the menu options are navigated horizontally at the highest point of the window, the hardware options are listed in the center (grey section), and the guidelines for how to move around the BIOS and make changes are listed at the footer.
In any case, what you need to do is you can’t utilize a mouse or anything in this part. for BIOS had the opportunity to utilize a keyboard. furthermore, If you look at the right-hand side. you’ll see the keys that you can use to cooperate with the BIOS.
Utilizing the guidelines given for navigating around your BIOS Interface, find the option for changing the boot order. In the model BIOS below,
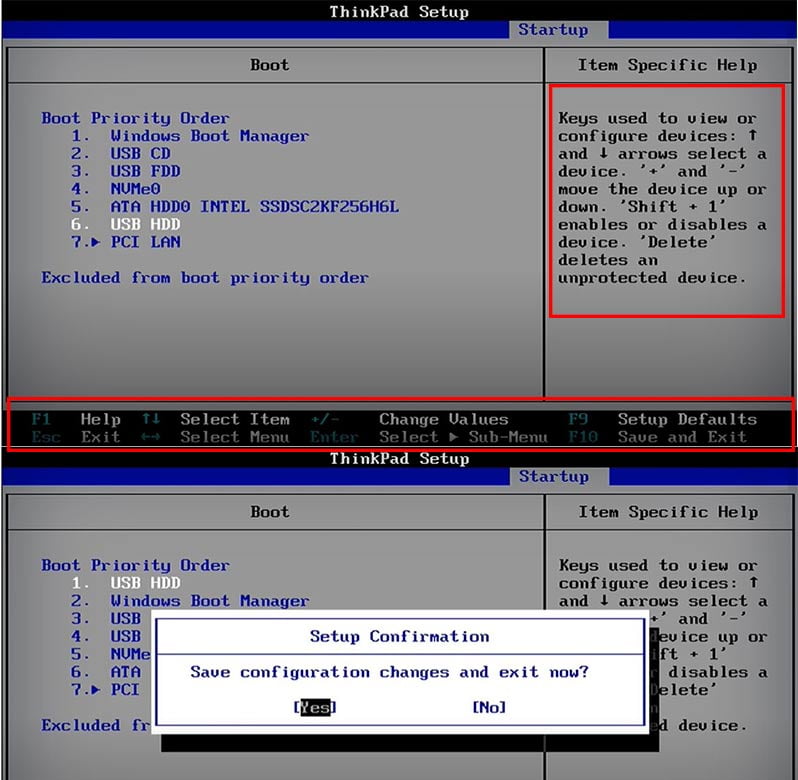
You’ll need to utilize your Air Direction arrow keys and afterward go right over for boot.
Presently, here you can see boot drive priorities. so you’ll feel free to press ENTER. whenever it’s selected. what’s more, what this does now shows you the present order that it is set up for boot.
The order of priority for accessible boot drives can be changed by following the directions on the BIOS setup utility screen.
In this model, if USB HDD is above ATA HDD0, the PC will attempt to boot from the USB HDD and afterward move on to ATA HDD0 INTEL. if no operating system is available on the principal drive.
In this form of BIOS, the Plus [+] and Minus [-] keys are utilized to move a drive up and down as per boot order.
A drive can be deleted totally from the list or added back onto the list by squeezing the Shift key joined with the 1 key.
When the favored drive is at the highest point of the boot order, press F10 to save the changes and exit the BIOS.
Go ahead and reboot the system. I hope this troubleshooting method eliminates the “Reboot and Select Proper Boot Device” error on Windows 10,8 and 7.
NOTE: Since each BIOS setup interface is unique, the particulars on where the boot order options are found vary from one PC to another. The menu configuration or option thing may be called Boot Order, Boot, Boot Options, and so on. The option may even be situated inside an overall menu like Advanced BIOS Features, Advanced Options, or Other Options.
Read More: “This Site Can’t Be Reached” Error? Best Way to Get Rid
Solution #4, Check BIOS Date & Time Setting
To get into BIOS on most Asus PCs, you press the power button and afterward, start pressing on f2. If f2 doesn’t work. a few attempts with f1. and, if neither one of the works, tries your other function keys or takes a try at googling for your particular model. Now and again Asus changes things up to what function key it uses.
it’s kind of irritating. but from my Asus and most of yours, it’s f2. So power on and keep tapping on f2 immediately. Furthermore, there’s your BIOS menu. if your BIOS doesn’t look precisely like mine. That is alright. It changes depending on the time of the PC and the end model. but, all the options we need will be there.
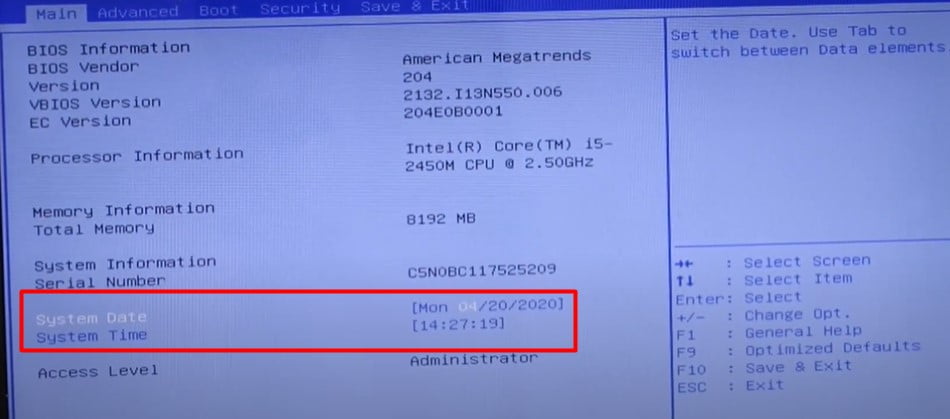
So the first thing you need to look into BIOS is the System Date and Time. which normally is on your Main tab.
If your system date and time aren’t right. correct it. Save and Exit. Let’s try to reboot your PC. if the system and date settings in BIOS aren’t right. it can cause a wide range of issues (Reboot and Select Proper Boot Device error) booting up your PC. so ensure those settings are correct.
In the event that you find that they’re always wrong and you need to do this each time you boot your PC.it could mean that your Seamos battery is turning bad and your BIOS is resetting every time when you shut your PC down.
If that is your case look at the link. The BIOS reset link. will tell you the best way to get in there and trade out and replace that CMOS battery. so you don’t need to do this every time.
Solution #5, Eject External Drive
Another thing you can try when you experience this error. is simply pulling any USB sticks from your PC and trying to reboot again. possibly it’s attempting to boot off of a USB stick. and, that is one of the first troubleshooting techniques you can utilize to try to settle the Reboot and Select Proper Boot Device error in Windows 10.
Read More: Best Way to Transfer Hard Drive to a New Computer Without Reinstalling Windows 10
Solution #6, Check The Connection Cable
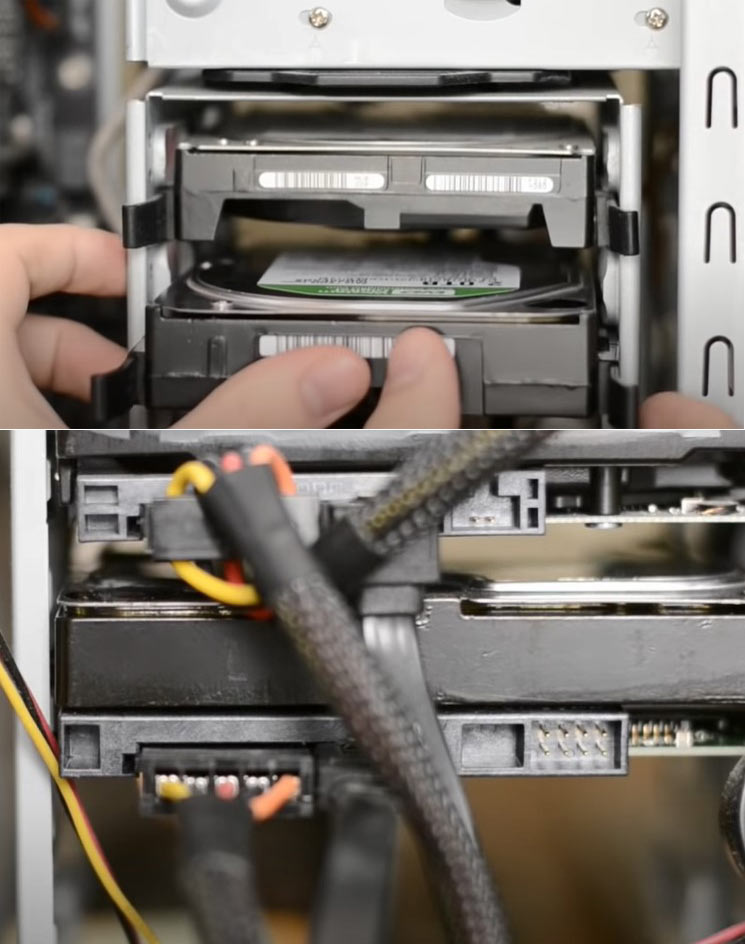
The next important thing I would do is check the hard drive cable, perhaps receipt the drive. (See the Picture). it might be generating the reboot and select proper boot device error when installing Windows 10
We’re going to slide it in until it clips. So okay. So I removed my system’s Hard Drive to show you the process, friends. Suppose we put it in there. Presently, this should grip. So there we go now, the power connectors won’t clip.
So you’re not a Harmsen shirt, man. In this case, you can apply a good measure of force, and if it doesn’t work. You can reevaluate your connections.
Internal hard disk: from where you need to move a lot of information into your USB Drive rapidly.
While you’re checking those connections, don’t forget to check the links on the motherboard itself.
It is ensuring that. It’s a safe, proper connection. and afterward, you try to do it once more. At times it’s hard to drive and get loose. Possibly you hit your PC or are to blame. So at times, it simply gets loose and gives you that error.
- How to Lower Your Ping Using a VPN?
- Data Protection and Privacy: Essential Cybersecurity Practices for Modern Marketers
- How To Use SORA OpenAI Text-To-Video Generator
- Best Free Video Editing Software For Profession [2024]
- Premiere Pro: How To Export Transparent Videos
- What is an eSIM? Our Guide To eSIM
- How To Install & Use Cascade Extension?
- Fix Opera Adblock Not Working on Youtube?
Solution #7, Disable/Enable Legacy Boot
Two or three different settings that we need to change in BIOS. The following settings will change. We have to go with your Legacy or CSM, or your UEFI settings. Presently you may need to check out a little somewhat as we did previously. However, it’s typically going to be in your boot tab.
So I’m going over to the boot option using arrow key. And, there is the UEFI option. Again, we’re searching for UEFI legacy, or CSM Legacy is kind of something very similar. However, essentially the thing we’re going to do here is we’re switching between them. So in case, you’re identical to me, and you can see UEFI.
It would be best if you changed it to legacy or CSM. And, If you can see the Legacy or CSM there. You’re changing it to UEFI.
Now the best approach to do. This will vary in various Bios systems. but, with me, I highlight the option and then press Enter. and UEFI is enabled.
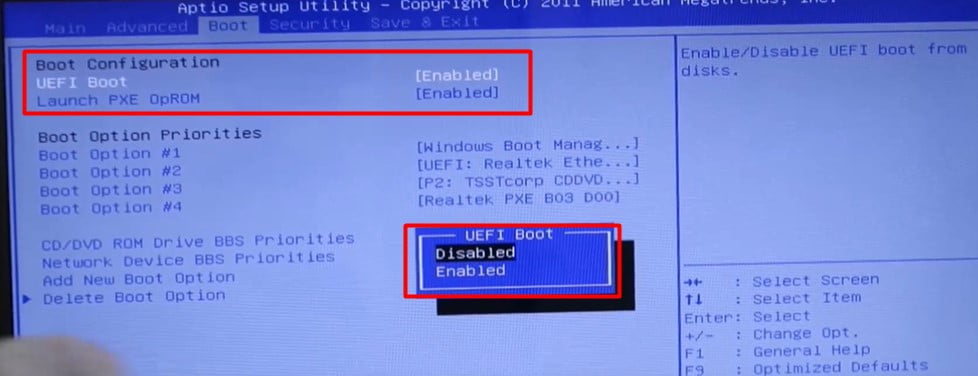
I’m going to disable it. Press Enter on it. then a pop-up will open. now choose the disable option and now the UEFI option is disabled. some of you may have drop-down menus where you select Legacy or CSM. but, anyway you need to change it. just change it.
Some of you, if you can’t change to Legacy. it very well may be on the grounds that you need to change a couple of different settings. the PCs that don’t like us changing to legacy.
so at times, you may need to go into your security tab. and, disable Secure Boot. and afterward, some of you may likewise do a second step. what’s more, enable the Legacy Boot option. so any way you need to change between those two. Save and exit Restart your PC and See. if get the problem reboot and select the proper boot device on the new pc.
Solutios #8, Use diskpart To active Partition
Initially, we have to make a bootable DVD, USB flash drive, or CD. If it’s not too much trouble, See a Proper Guide to creating Windows 10 Media Creation Tool: How to get it in detailed steps. If you have a particularly bootable USB drive or DVD /CD disk, simply disregard this step.
1st, Boot your PC via a Windows installation media accessible, which could be a USB flash drive, DVD, and CD. You need to press a key to reach the BIOS utility during the boot process.
Different PCs have a different Boot keys. However, there is consistently a Prompt this way:
Note: There are a couple of moments to make this activity. If you are not getting this screen, unfortunately, Simply Reboot the PC once more.
2nd, Subsequent to entering BIOS effectively, you must have to set a boot order, specifically setting the Removable Device (bootable USB flash drive) or CD-ROM (bootable DVD or CD disc) as the primary boot device by utilizing keys like ↓,↑, and pressing Enter.
3rd, Once it has been successfully done, Save the changes and exit from the BIOS utility setting interface, and afterward, your PC will boot from the Windows installation media.
4th, At that point, you can see the Repair your computer option.
Next, you have to click on the Troubleshoot option, next select Advanced options, then open Command Prompt.
Now the main thing, you have to type these commands. We mentioned below:
1st, Type the Command:
Diskpart
2nd, Type the command:
list disk
.it will show all disk lists.
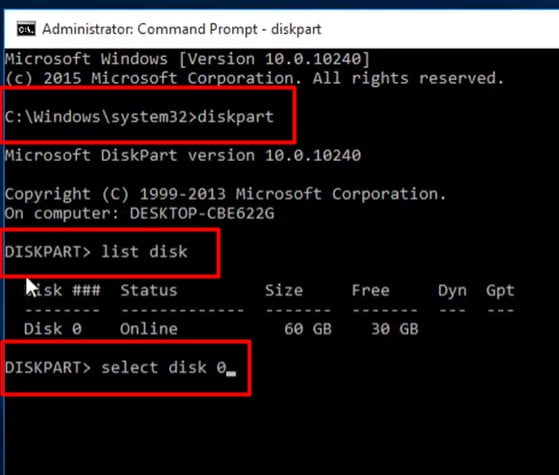
3rd, Type the Command: select disk n.For example:
select disk 1
“n” – means the number of the disk accessible in your system)
4th, Type the command:
list partition
5th, Type: select partition n . For example:
select partition 1
“n” – means the number of the partition accessible in your system)
Finally, Type:
active
(This command “active” the selected partisan)
After doing these actions, The System should perform booting on your Windows without any issue if you set the main hard disk as the primary boot drive in BIOS advance.
After a fruitful fix, if it’s not too much trouble, reboot the PC to see whether Windows can be loaded regularly.
Tip: This whole process can just help fix some predefined boot issues, Such as system files getting lost, but it can’t fix the problem 100%.But again, if it would be a solution step of Reboot and select proper boot device error.
Solution #9, Check The System Boot Configuration Data
Look over how to resolve issues ideally. You may have explicitly the error code “0XC000F” in Windows 10.
Such as, when attempting to start the PC, you got errors, for example, “BOOTMGR is missing,”
“No bootable device found” “reboot and select proper boot device” and so on.
In this way, the primary technique to fix the bootloader will work with all versions of Windows: 7, 8, and 10 (in my situation, it is Windows 10).
You have to wait for a moment, and it will open the command prompt.
You need to choose the account that is an administrator on your PC. My administrator account turns out to be named computer, and I’m going to enter my password. Alright.
So it shows up much of the time. You’re not really ready to boot into Windows 10. To get around that, the initial step we need to really do is boot your PC to the Windows 10 installation USB or CD-ROM. that you may have used to at first install Windows 10. However, there’s additionally a media creation tool. You can download it from Windows’s official site.
You’ve finished setting those changes on BIOS (We mentioned previously) except before you click install now. We are going to instead click on Repair your computer.
And afterward, this will open the Advanced Options menu. OK, so now that we’re under the Advanced Options menu, we need to choose the troubleshooting tile, which will reset your PC. Next, you need to select the command prompt on the top right here.
You have to wait for a moment, and it will open the command prompt.
You need to choose the account that is an administrator on your PC. My administrator account turns out to be named computer, and I’m going to enter my password. Alright.
Then type the command.
bootrec /fixmbrTo rewrite Windows MBR in the system partition of your hard disk. When it is over, we can see the message that the operation is completed successfully.
Utilizing this command isn’t in every case enough (for instance, if any virus is blocking the bootloader).
This is the reason you need to type the command:
bootrec /fixbootTo write another new Windows Master Boot account in the system partition. When it is finished, close the command prompt and try to boot from the disk.
Next, you need to enter:
bootrec /rebuildbcd
and then press Enter on your keyboard again.
you need to type Y on your keyboard. when prompted to add the installation to finish it successfully.
Then type the command:
Exit
and type the next command:
bcdboot C:\Windows/s E:/f ALL
(Here С is your PCs drive letter; E – is the secret Hard drive segment or partition letter which you assigned on the disk part section) and waits for the cycle to finish.
After the cycle is finished, we can see a report saying that boot records have been created successfully.
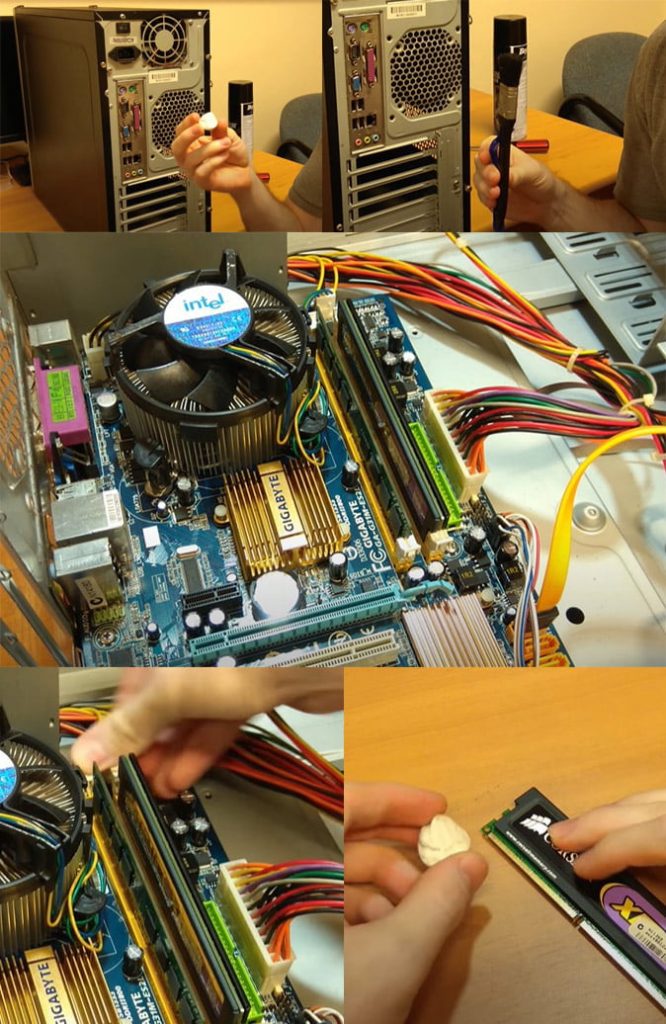
Solution #10, Clean Your RAM
This is an excessively common issue that I see on PCs. particularly those that exist in a kind of damp and kind of dusty climate. This is something I see across all various kinds of PCs, even a few laptops. and, I wouldn’t go over the thing that is engaged with cleaning the inside memory. also, it’s called RAM.
And, guaranteeing that those memory sticks are clean. what’s more, their slots are also clean and situated appropriately. so this is a typical common reason why many PCs won’t boot up or why they’ll freeze. I’ll have some graphical glitching. it might produce the reboot and select proper boot device problem.
you realize this can be caused by all kinds of things. PCs are complicated machines. but, this is presumably the most well-known reason why PCs make trouble.
So we need to switch it off. also, we’ll get directly into it. presently disclaimer clearly, do this at your own risk. if you don’t have any knowledge of what you’re doing, take it to an expert. But as a rule, it’s quite straightforward. so how about we do it? so since we’ve disconnected your PC.
We will remove the sideboard. what’s more, examine now. before you do that however you will need a few pieces and bits of erases. you will need a brush. This will clean off a portion of the dust. and mess that you find.
Simply ensure it has sensibly solid bristles. In any case, it will not be effective. try not to utilize a brush that obviously is filthy or anything like that. you’ll need an eraser. ideally, one that is not also utilized as before but just a standard square pencil eraser will get the job done.
In case you don’t know which side comes off. find where your motherboard is. this present ones on the left side. This implies the right-hand panel comes on to get inside the PC.
Not very confused. so you can see the modules here (See the Picture). These are what we call RAM or system memory. and, this is the thing that I find is presumably the most well-known reason for system issues concerning boot up or freezing or general crashing.
so the thing we will do is, we will take these out and we will give them somewhat of a clean.
So to pull off the RAM module you should simply put your finger or your thumb on these little clasps. also, do what needs to be done on the two ends and they ought to turn out to be free and they would now be able to come out.
you’ve taken out your RAM. we’re going to examine these gold pins down the side of the RAM. also, simply check whether you see any residue or signs of filth sitting on these pins. That tends to be one of the tell-tale signs of RAM issues in your PC.
I’m simply going to get my eraser. furthermore, put it down on the table here to squeeze it. so it doesn’t move around. Furthermore, I’m simply going to run this eraser all over. this gold contact simply puts a little bit of force on there. what’s more, this will easily handle all that filth sitting on these gold contacts.
It should agree with the motherboard when you set it back in sometime in the future. So remember that since, in such a case, you try to place it backward. Now reboot your pc, check the Reboot and select proper boot device error or Insert boot media in selected boot device error screen gone or not.
Solution #11, Reinstall Windows 10
In the event that this fixes your PC. You’ve recognized BIOS as the problem. if this doesn’t fix the “reboot and select proper boot device” error on your PC. Presently you need to proceed onward and analyze your hardware or your hard drive or your operating system in my Shop. I would then utilize a diagnostic program that I need to analyze the hard drive. if it’s healthy.
you don’t have that in a suit and it doesn’t have a built-in diagnostic program. so you will test for an operating system and the hard drive kind of at the same time. now if it’s not working. At that point, you have to try to reinstall Windows.
Utilize the link to make a new reinstall Windows 10.
It’ll tell you the best way to download and install media from Microsoft free of cost. you can utilize that to reinstall windows new. if you install it and it turns out great. you’ve recognized that the operating system had the issue.
Reboot and Select Proper Boot Device FAQ
Can a broken SATA cable produce the “reboot and select proper boot device” error?
Without a doubt, the entirety of the data lines should be connected with SATA to appropriately work. I would start by supplanting the cable. If you have a pivoting disk (rather than an SSD), you ought to hear and maybe feel it vibrate slightly, particularly if you eliminate it from the frame and it is as yet associated electrically.
How would I get off this “Reboot and Select Proper Boot Device” error screen after turning on my Dell Inspiron PC?
This error shows up for a few reasons.
Make sure there is anything but a DVD or CD inserted. In the event that there is one, your PC might be attempting to boot from the CD.
Check your BIOS or startup settings to verify that your CD is set for the first one and the second boot is set up to a hard drive. This permits you to utilize the CD to do installation and setup. or your hard drive is corrupted.
If those two different devices are set and you are as yet getting the error notification then you have an issue with your hard drive or its cable connection.
Although uncommon, once in a while a failed CMOS battery on the motherboard can make a PC “get dumb” and not boot accurately. Along these lines, it very well may merit replacing the battery before you give up totally.
The battery is on the motherboard, however not troublesome, but if you are not happy with doing this securely. you should find somebody who has more expertise.
I installed Linux on my PC (as dual boot), when I started the System,” Reboot and Select Proper Boot Device .. what would it be a good idea for me to do now?
Ensure the pen drive or some other external drive is not connected.
In the event that it is an issue with GRUB when firing up the PC, go to the Boot menu and choose Windows.
On the off chance that windows additionally not appearing or booting it is an issue with the UEFI partition.
Where is this issue appearing In GRUB Or in Bios?
If this issue is with GRUB. Grub not distinguishing Linux-installed drives. Reinstall Grub There are different tutorials or articles on the internet.