
FIX 100% Disk Usage in Windows 11 | CPU/RAM: Does your Windows 11 PC face the 100% disk usage problem? When you notice that the task manager shows 100% Disk Usage in Windows 11. It’s no surprise that your PC doesn’t function well. Follow the steps in this article to get your disk usage back down to a normal level.
Sluggish PC performance and slow boot times can often be attributed to 100% Disk usage in Windows 11.
How To Check Disk Usage in Windows 11?
You can press the Control + Shift + Escape button to open the task manager. Click on the Performance Tab and check the disk usage to see if it is continuously showing 100% usage.
Why 100% Disk Usage In Windows 11?
Three particular reasons cause 100% disk usage:
1) One of them is super fetch indexing or malware, and if you think that you may have malware, check out this now.
if you don’t have malware. Then, we need to assume that this is being caused by a system that is not benefiting from super fetch.
3) You may have been running many unnecessary background services, which are eating up RAM
4) It may be possible you open many browser tabs
5) You have over-aggressive antivirus software that’s sucking up all your resources
What is Super Fetch?
It’s preloading what it thinks your normal tasks are and preparing them in the RAM and the CPU on a modern machine with lots of CPU power and lots of RAM. This is probably okay.
But in some cases, it’s not because you use and access a lot of different files. Super fetch and indexing can become bogged down with way too many tasks than it was designed for. And this is often a problem.
How to Check RAM On Windows 11?
So, all you have to do is open up the search magnifying glass down in the taskbar. Type in system information > best result should come back with System Information. Go ahead and open that up.
Here, you can see how much RAM you have installed. What type of ram is it? And just other hardware and information that applies to your device.
Why Is My RAM Usage So High On Windows 11?
RAM Usage is High. The fact is that not running anything. The following reasons are:
1. Background App – background applications in Windows naturally begin running on Windows startups like Background, Groove Music, Microsoft Store, discord, etc.
2. Some services and programs start on Windows startup-like Windows Search, Windows Defender, One Drive, etc.
Solution for these problems:
1. Turn off the background App running in the background
2. Disable Startup Apps.
We explain a ton of solutions below.
How To Fix 100% Disk Usage in Windows 11
So obviously, this (100% Disk Usage in Windows 11) is a problem affecting many people. So today, we’re going to revisit the subject. And I’m going to give you the top tips, a list of tips that help the most on this subject.
Solution #1, Check Windows 11 Update
We need to check a couple of things first: you are running the latest update from Windows.
1. To do this, you want to right-click on the Start button. Go into Settings. And now, into Windows update on the left side menu.
2. You want to click the button that says “Check for updates.”
3. Wait until this is finished. And if you have any available updates. Make sure to download them, install them, and restart your PC.
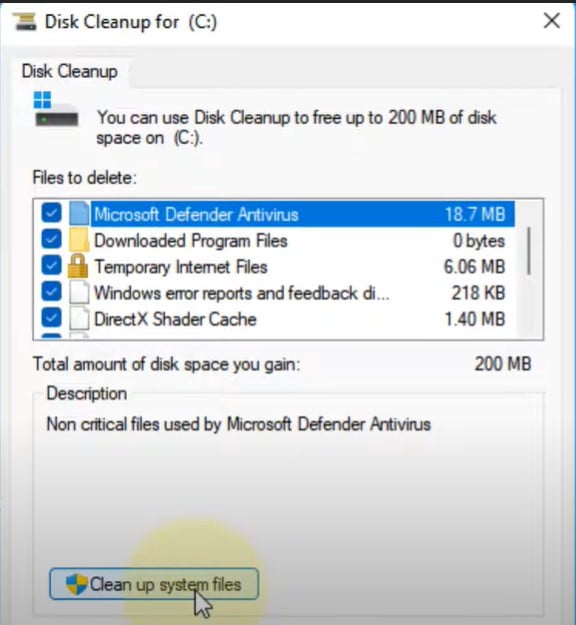
Solution #2, Remove Junk Files
We need to delete junk files on your system. so that there will be more disk available for the System’s RAM and disk.

1. So go to the Search box. Just search disk cleanup. Click on Disk Cleanup.
2. It will open a small pop-up box. Select C drive from the dropdown. Click on OK.
3. Select all those no useful files (Temporary Internet files, Windows error report.., Cache) that can be deleted without any problem. Now click on OK.
4. Once you have deleted them. Again, open the Disk Cleanup For (C) window.
5. Now, click on the Clean up system files. This time, try to delete non-useful system files that you can safely delete. Click on OK; in this way, a lot of disk space will be available for your OS.
Solution #3, Stop SysMain Services
Suppose the above method didn’t fix the 100% disk usage. You can try this method. You need to stop the SysMain services.
1. Open run. To open one, you need to press the Windows key + R keys together.
2. Type services.msc in the RUN box. Click on OK. It will open service windows.
3. You’ll have to scroll down until you find this process, which is called SysMain. Right-click on it. Select Properties.
4. Click on the Stop button to stop the services. Now Select Startup Type as Disabled.
Solution #4, Clean Boot
Suppose your issue is still there. There is one more thing that you can do, and that is Clean boot.
1. Go to Search > type MSConfig > next click on System configuration, which appears in the search result.
2. Once the System configuration is open. Then click on the Services tab.
3. Next, click to check the Hide all Microsoft services. Click on disable all.
4. Next, click on Apply and click on OK.
5. Then, You can see a small pop-up window. Click on Restart. And then see if your problem is fixed or not.
Related Post:
Nvidia Optimization On Windows 11| Install/Update Nvidia Geforce
Speed Up Windows 11 | Optimization For Gaming and Development
Solution #5, Tweaking Virtual Memory
1. Go to Windows 11 Search > Type SYSDM.CPL . Now click on the SYSDM.CPL. It will open the System Properties.
2. Now click on the Advanced Tab. Then click on Settings under the Performance section.
3. Next, click to choose “Adjust for best performance”. Click on Apply and click on OK.
4. Now click on the Advanced tab again. Now click on Change. Uncheck this option: “Automatically manage paging file size for all drives.”
5. Now, choose a Custom size. Now, the Initial size should be the recommended size, which is given here. In my case, it is 2932, so I’ll write 2932.
6. The maximum size is three times the amount of RAM. OK, so if your computer has 4GB RAM. It will be three times the amount of RAM in MB. For example:
In my case, I have 16 GB RAM. So 16 * 1024 = 16384 MB. This is the RAM in MB. Now just multiply it by 3 16384*3 = 49132 is the maximum size.
So calculate according to your RAM. You should input the final result in the maximum size number. It will assist you in maintaining 100% Disk Usage in Windows 11 problems.
Solution #6, Update Hard Drive
Suppose 100% Disk Usage in Windows 11 happens when the OS has been running for quite a while rather than on startup; then it could be a damaged hard drive.
If the hard drive is truly harmed, resetting the PC will not help. All things being equal, it may put additional pressure on the drive and accelerate the improvement to finish the disappointment of the drive.
The principal situation where resetting the P.C. would help is if the substance of the drive has been damaged because of a software error, yet physically; everything is working effectively.
Suppose the drive works irregularly. The most important priority is to make sure that everything on the drive is replicated somewhere else. After that, check with some S.M.A.R.T. tools in case the drive’s diagnostics are giving blunders.
If the drive is in any more unfortunate than good condition, the drive can’t be trusted to keep anything on it, as it can stop working and permanently eliminate its contents at any moment.
Solution #7, Stop Windows Search Services
Suppose the previous methods do not fix your issue. There’s one thing that will surely work, and that is stopping search services. OK, although this is not recommended because Windows will stop indexing your files.
But it’s OK if your computer is having a high disk usage issue and you are doing everything to fix this, and it is not working. Then, this disabling Windows search works instantly. You can later not enable the services.
1. Type Services in the search box. Now click on Services. Now, find the Windows Search Service. Now, double-click on it.
2. It will open a modal window. Click on the Stop button to stop it.
3. From the Startup type, select Disabled to not start after the reboot.
4. Click on Apply and click on OK. And that’s it. Now, your 100% Disk Usage in Windows 11 will be listened to.
Solution #8, Disk CleanUp Using Command
Suppose previous things are not working. Let’s move to another method, which is Disk Cleanup.
1. Go to Windows Search. Search for the command prompt. Right-click on it and select “Run as administrator”.
2. Once the command prompt is opened. Now, run all these commands one by one. Just copy and paste it. Press enter. These are all standard commands.
SFC /scannow
DISM /Online /Cleanup-Image /CheckHealth
DISM /Online /Cleanup-Image /ScanHealth
DISM /Online /Cleanup-Image /RestoreHealth
chkdsk.exe /f /r
If this command asks for a restart, please restart to continue this step.
Solution #9, Edit NDU Registry
This step will fix 100% Disk Usage in Windows 11 or RAM usage. So, let’s begin.

1. You’ll have to open RUN. So press the Windows key + R keys together.
2. Now type “Regedit”. Click on OK. It will open the Registry Editor.
3. Now, you need to navigate to the following folder:
Computer\HKEY_LOCAL_MACHINE\SYSTEM\ControlSet001\Services\Ndu4. Select the NDU folder. On the right-hand side, right-click on Start and then left-click on Modify.
5. You’ll see the value data over here, which is 2. Now, you’ll have to remove it and then type in 4, and then hit OK.
6. After this, you can close this window, and then you’ll have to restart your PC.
Solution #10, Optimize Google Chrome Settings
If you face 100% high disk usage while using Google Chrome. You can change its settings to solve the issue.
1. First, open Google Chrome’s menu and then click on Settings.
2. Now, go to the privacy and security section. Then click on Cookies and other site data. Scroll down, and you will find the “Preload pages for faster browsing and searching” option.
3. Use the toggle switch to disable it. You might face a slow browsing experience after disabling it, so if it is not fixing the 100% Disk Usage in Windows 11, turn it back ON.
Solution #11, Update G-Drivers
Now, into your graphic cards, both Nvidia and AMD have released optimized drivers for Windows 11. you can do this by using one of your GPU manufacturer’s software, like Nvidia Geforce Experience. Update your GPU drivers from both AMD and Nvidia. Now, with all of the updates out of the way.
Check how you can Optimize Nvidia Geforce Driver Settings Update/Install.
Solution #12, Display Settings
Let’s go into the display settings once you are in the Settings. On the right tab, select System. and now go to Display.
1. I will recommend that you set the Scale to 100% if it’s not set by default.
2. Into the resolution, check that you have the maximal resolution that your monitor can do.
3. If your monitor is capable of using HDR. Make sure to activate it because we know how to make some improvements in Windows 11 about this.
4. Now, you want to click on Advanced Display. Here, you want to choose the highest refresh rate that your monitor can do: In my case, it’s 144Hz.
Once you are done with the fix on 100% Disk Usage in Windows 11, let’s go to the below method on how to fix high RAM usage in Windows 11.
How To Fix High Memory/RAM Usage In Windows 11
Solution #1: Disable Some Startup Apps
You should try this method. This is a very effective method.
- First, right-click on the Start button and select Task Manager.
- Select the Startup tab. If you notice, you have a lot of programs in here. You can actually disable most of them generally unless it’s an antivirus. You can usually turn them off.
- Right-click on the app and Disable them.
So you’re not actually removing the program or disabling it. All you’re doing is preventing it from starting up every time your computer starts up, which slows down your computer.
Solution #2: Uninstall Unused Apps
Talking about unused applications.
1. if you go back into the Search menu and search for Apps and Features.
2. Go ahead and actually check. And see if you have programs in here that you don’t need anymore.
3. So you can see there are a lot of apps in here. Go ahead and actually go through them. See if you can uninstall them. Suppose you’re not using them anymore. That’s always a good way to clean up some system resources. It is the best way to fix 100% Disk Usage in Windows 11.
100% Disk Usage in Windows 11 Dell
Experiencing 100% disk usage on a Dell computer running Windows 11 can be frustrating, but there are several steps you can take to address this issue:
- Check Task Manager:
- Press
Ctrl + Shift + EscorCtrl + Alt + Deleteand select Task Manager. - In Task Manager, click on the “Disk” column to sort processes by disk usage. Identify which process or application is causing the high disk usage.
- Update Drivers:
- Outdated or incompatible drivers can lead to disk usage spikes. Visit Dell’s official website to download and install the latest drivers for your specific Dell model.
- Disable Superfetch:
- Superfetch is a Windows service that can sometimes cause high disk usage. To disable it, press
Win + X, select “Windows Terminal (Admin),” and type the following command:net.exe stop sysmain - Then, disable Superfetch permanently by running:
sc.exe config sysmain start=disabled
- Check for Malware:
- Malware can consume system resources. Run a full system scan using Windows Defender or a reputable antivirus program.
- Disable Windows Search Indexing:
- Windows Search Indexing can contribute to high disk usage. To disable it, press
Win + S, type “Indexing Options,” and select it. - Click “Modify” and uncheck all locations to prevent indexing.
- Check for Background Services:
- Some background services can cause high disk usage. Review and disable unnecessary startup services. Press
Win + R, type “msconfig,” go to the “Services” tab, and uncheck unwanted services.
- Check for Disk Errors:
- Use the built-in Windows tool, CHKDSK, to check for and repair disk errors. Open Command Prompt as an administrator and run:
chkdsk /f /r
- Upgrade Hardware:
- If your Dell computer has a traditional hard drive (HDD), consider upgrading to a solid-state drive (SSD). SSDs are faster and can significantly reduce disk usage.
- Monitor and Manage Startup Programs:
- Disable unnecessary startup programs that run when your computer boots. Press
Ctrl + Shift + Escto open Task Manager, go to the “Startup” tab, and disable unnecessary programs.
- Reset Windows:
- If all else fails, you can reset Windows 11 to its default settings. Go to Settings > System > Recovery and choose the “Reset this PC” option.
Before making any changes, ensure you have a backup of your important data. If the issue persists, consider seeking professional assistance or contacting Dell’s support for further guidance.