
What is the Mac Time Machine? : Apple’s “Time Machine” is an authentic example of how the Mac should work. It takes some time-consuming dreary tasks – performing standard backups of your significant documents – and just makes it work naturally so that you can simply connect your backup drive and forget about it.
What is the Mac Time Machine? How To Back up with Mac Time Machine?
Time Machine has a few limitations, however. It naturally backs up documents each hour during the day and afterward spares day by day and week after week backups going further back in time.
In any case, it doesn’t permit you to make your own timetable for backing up your documents –, for example, a regular day’s end backup for significant work projects. What’s more, while Time Machine can assist with reestablishing your Mac in the event that anything turns out badly,
it doesn’t permit you ‘boot’ your Mac from your Time Machine backup drive in the event that your Mac’s own internal drive develops an issue.
Let’s learn about What is the Mac Time Machine? Also, How To Back up with Mac Time Machine
Time Machine Prefs
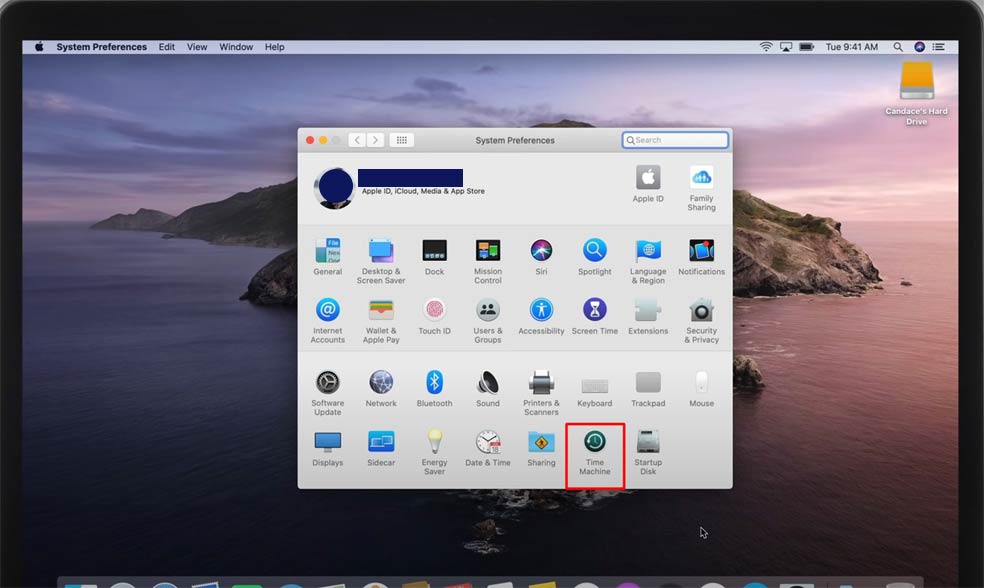
Be sure you have a backup before you start deleting files. Time Machine is a simple method to keep a backup of your Mac and attached drives. Open System Preferences and Snap Time Machine.
Select a Backup Drive Using Mac Time Machine

Use a Mac OS Extended (Journaled) formatted USB or Thunderbolt hard drive or SSD, an Apple AirPort Time Capsule, or a NAS unit with Time Machine compatibility. Click Select Backup Disk. (Select the option at bottom of the window “Show Time Machine in menu bar”).
Check Available Space
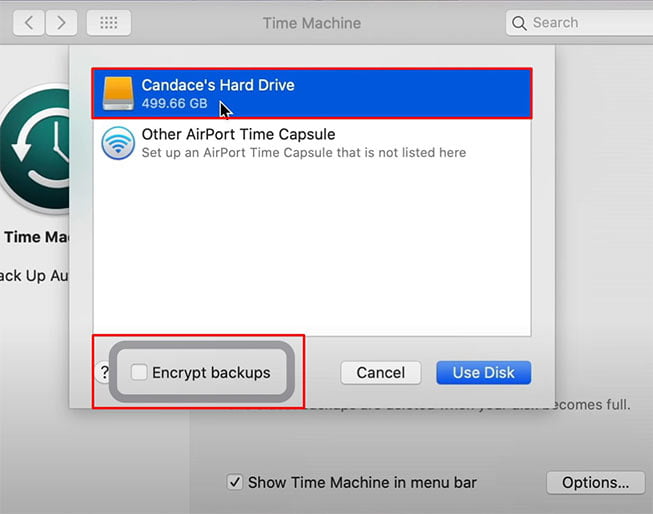
Eligible drives are listed showing free space. Mac Time Machine can share a drive with other files (no need to partition it)(this option represents what is the Mac Time Machine). Aim to select a drive bigger than all the space you’re backing up. Click Set Up.
Start Backing Up with Time Machine
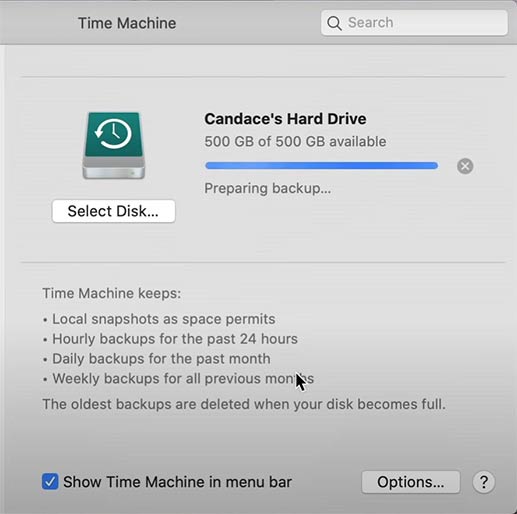
Tick Back Up Automatically. Your first backup will start in the background. This will take time but future updates will be quicker. Tick ‘Show Time Machine in the menu bar to add an icon in the menu bar.
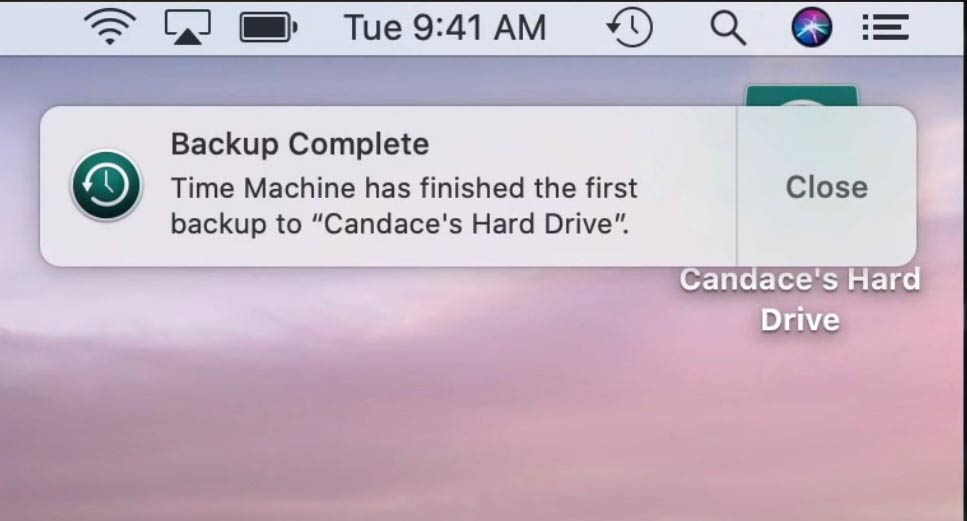
Once Back up is completed you will get the backup drive file on the desktop as well as get a successful notification from Mac.
Restore files from Mac Time Machine Backup
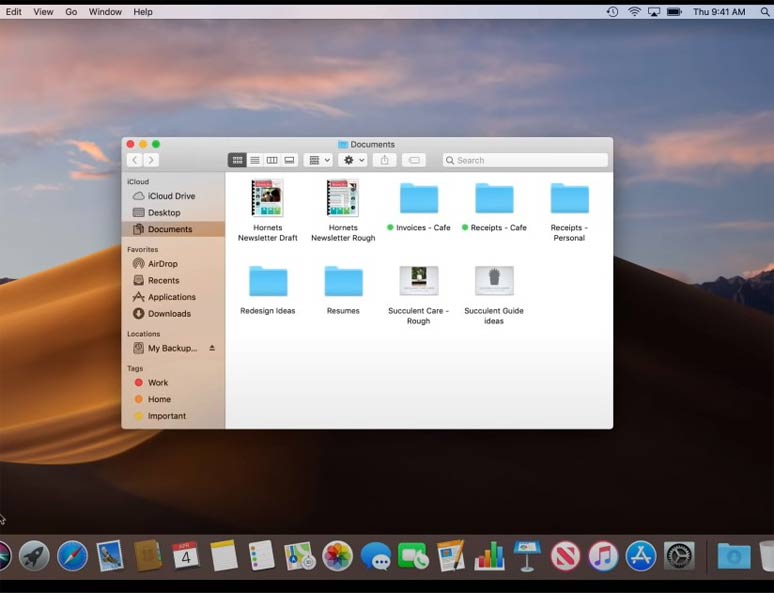
For Example, we are going to restore a file from your documents folder. First Open the Document Folder that held the missing file.
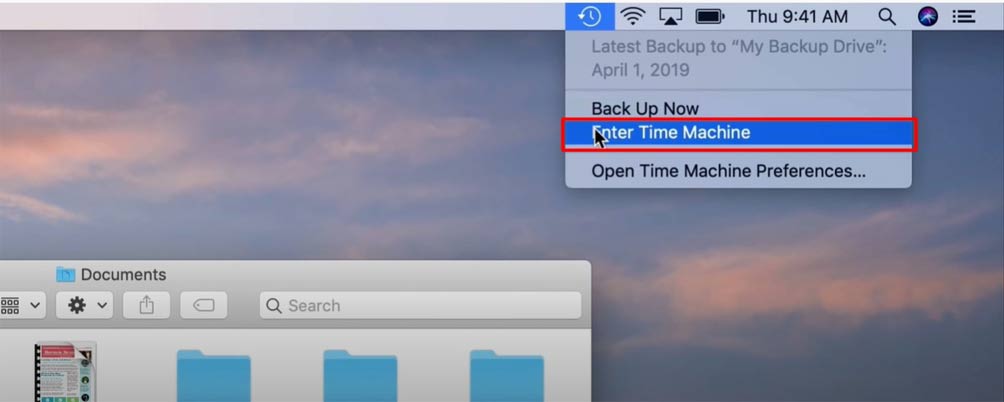
Select Time Machine from the top bar of your desktop. and Select the “Enter Time Machine” option from the menu.
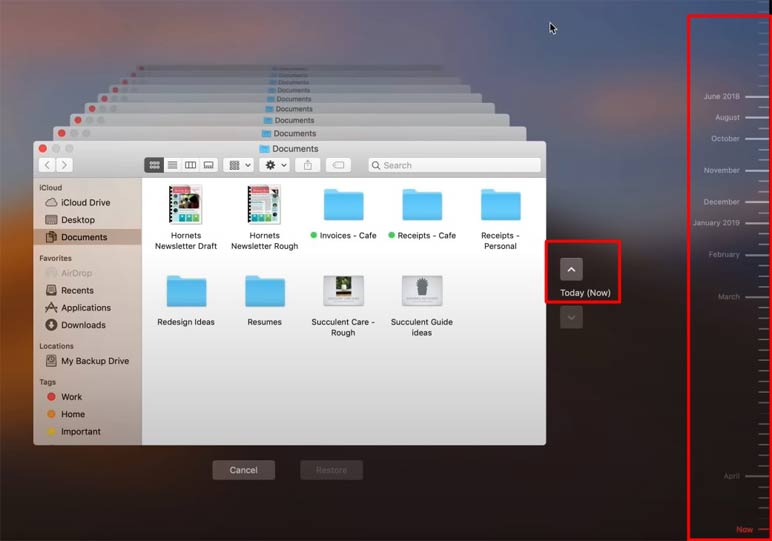
In the future, select a file in Finder (if you’ve deleted it, select the folder it was in). On the Time Machine menu, click Enter Time Machine. Use the arrows to pick a dated version, then click Restore.
HOW To Reinstall Macintosh HD from Time Machine?
Restart from Recovery
Shut down your Mac. With your Time Machine backup drive connected, start up and immediately hold ç+R until macOS Recovery shows the macOS utility window. If Recovery fails, see bit.ly/macos_recovery.
Choose your backup
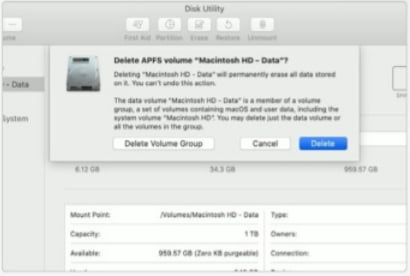
Select Restore From Time Machine Backup. When prompted, select the Time Machine backup drive as the Restore Source, then confirm the backup you want to use. Next, confirm the destination to restore to, usually Macintosh HD.
Also Read:
How To Check Activity Monitor On Mac 💻
Restore your data
The destination drive is erased and replaced with your backup, which may take up to several hours. Since this restores everything, it’s not a way to save space but may fix problems that have arisen on the drive. (Go through this information, it really helps you know what is the Mac Time Machine. How can I use a Mac time machine to Make Backup and restore)
Checking daily Time Machine Backups
When Time Machine runs backups each hour, it uses a mechanism to schedule them at a convenient moment, and you can monitor its performance, any errors, and more using the free utility T2M2 from bit.ly/mac349t2m2.
However, TimeMachineEditor works differently to allow you to make backups at the time interval of your choice. The result is that its records in the log, which T2M2 relies on to perform its analysis, are too different for that to work properly.
As you can’t use that analysis, the only alternative is to do so manually. Using Console for this is pointless, as it can only show entries as they happen, or analyze prepared log archives.
Instead, try Consolation 3 from the same webpage, which comes with default settings to view Time Machine entries in the log.
Set it to show all log entries from Time Machine over the previous day, for example, and you can read the full account of the previous overnight backup to check for errors.
How do I make more space for Time Machine backups?
If you want to keep the oldest versions as well as new ones, you may eventually need more room. You’ll need a single bigger drive (you can’t add one on). Connect it, but don’t attempt to switch to it in Time Machine’s System Preferences: instead, read bit.ly/apple-trtmbu.
Files that I need to retrieve aren’t in Mac Time Machine – why is that?
In System Prefs > Time Machine, ensure Back Up Automatically is ticked. Click Options: drives or folders listed here won’t be backed up (click the ‘–’ sign to delist them). Tick ‘Notify after old backups are deleted’ to be warned when your backup drive gets full and old versions are removed.
Can I back up my Mac with Time Machine over the network?
Yes, you can back up to network-attached storage, as long as your NAS device explicitly supports Time Machine. You can even back up to a folder on another Mac. The destination drive will need to be in Mac OS Extended (Journaled) format. See bit.ly/apple-budwtm for details of these options.
After Upgrading to macOS Catalina, they can’t be accessed from older versions of macOS. How can I prevent that?
Time Machine backups have changed in Catalina, and Apple warns that all backups made by, and converted for, 10.15 won’t work with previous versions of macOS, even Mojave.
This is partly because, in Catalina, backups contain three volumes instead of the single boot volume: one for the writeable Data volume, another for the read-only System volume unless you decide not to back that up,
and a third for Recovery, normally invisible as it’s not mounted. In addition, Catalina uses different methods to determine what it should back up.
These include using snapshots when backing up an APFS volume, with the option of using macOS’s internal database of changes made to the file system, on both APFS and those still in older Mac Extended format.
Those are put in new database files in the backup, which won’t work with older versions of Time Machine. To retain your existing backups unaltered, before upgrading to macOS Catalina, make good backups in case you need to revert to them.
Turn Time Machine off, and then archive your existing backups. After the upgrade is complete, turn Time Machine back on, and make a new backup set, ideally to a different volume or disk.
Please give us feedback, How helpful this article about What is the Mac Time Machine and How To Back up with Time Machine?