
You’ve got this excellent video all set up in Premiere Pro, but you are trying to a transparent background, huh?
Don’t sweat it! I’ve got you protected with a quick guide on the way to export your video, but I have no history of the use of alpha layers or alpha matte.
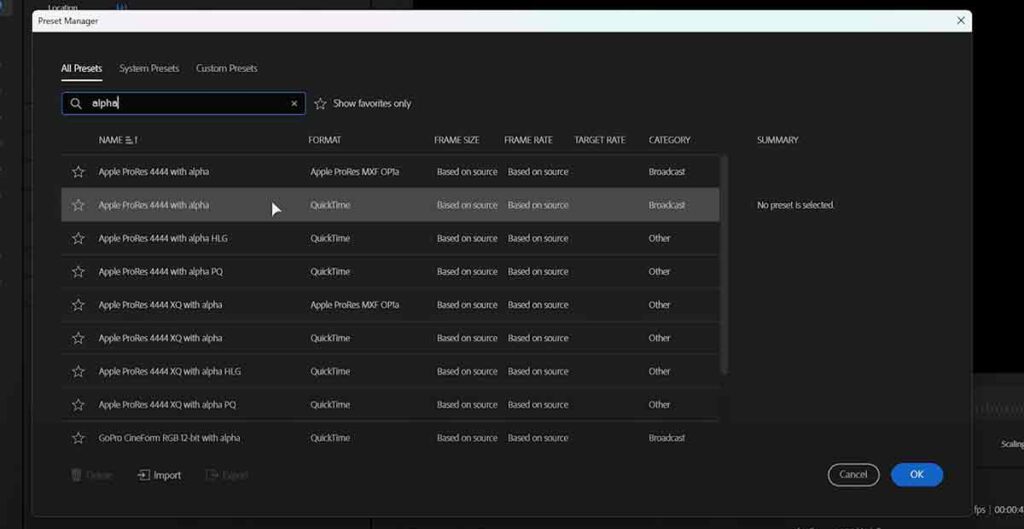
How To Export videos without background in Premiere Pro?
Got it! Let’s make those videos stand out with no background. Here’s how you do it in Premiere Pro:
- Kick out the background: First up, get rid of anything under the layer you want to keep. Just the cool stuff stays!
- Export settings: Hit File > Export > Media. Choose QuickTime format and pick the Apple ProRes 4444 With Alpha codec. This one’s got the magic ‘alpha’ powers.
- Check the alpha box: Make sure you tick the plus alpha option. This tells Premiere, “Hey, keep the transparency when you save this!”
- Save and test: Hit export, then check your video over another image or clip. If you see only what you want without the boxy background, you nailed it!
And that’s it! You’ve got a video that’s ready to blend into any scene like a chameleon.
How To Use SORA OpenAI Text-To-Video Generator
How TO Fix HUGE file sizes?
Alright, let’s tackle those big ol’ video files when you’re exporting with transparency in Premiere Pro.
- Choose the right format: Go for formats like H.264. They’re like the compact cars of video formats – small but good quality.
- Bitrate is key: Lower the bitrate when you export. Think of bitrate like the amount of paint on a brush; less paint means a lighter stroke.
- Two’s company: Export your video and its alpha channel as two separate files. It’s like splitting your shopping into two bags so it’s easier to carry.
- Use Alpha Mattes: These are special files that act like a map for transparency. They tell your main video where to be see-through.
- Keep it simple: If your video’s going in a small corner of the screen, don’t export it super big. Smaller size, smaller file.
- Quality check: Make sure your video still looks good. It’s like checking your reflection before you leave the house.
And voila! You’ve got a smaller file that’s ready to go wherever you need it to, without taking up all the space.
Best Free Video Editing Software For Profession
Using Alpha Matte/Compositing for Smaller Video Files
If you want to reduce file size without compromising quality, consider using Alpha Matte/Compositing. Here’s how:
Steps:
Render Initial Video:
- Render your video in your preferred format (e.g., 1080p).
- Name it (e.g., foreground) and render it. This results in a smaller file size, like 3 MB.
Export with Alpha Channel:
- Export the same video again, keeping settings the same.
- In the video section, enable ‘Render Alpha Channel’ only.
- Name it something like ‘Alpha’ for identification.
Benefit of Alpha Channel:
- Instead of a 300 MB file, the Alpha Channel version is only 5 MB, offering significant savings.
- The foreground video remains unchanged, containing most of the video data.
- The Alpha Channel video appears white, with visible sections, creating transparency.
Compiling these videos later, you maintain quality while reducing overall file size. This method is beneficial for videos with transparent backgrounds or overlays. This approach simplifies rendering and post-production, ensuring efficiency without sacrificing visual integrity.
How To Use Alpha Mattes in Premiere Pro?
If you’re diving into video editing and want to add a touch of professionalism to your projects, using alpha mattes in Premiere Pro can elevate your work. Here’s a simple guide to get you started:
How to Use Alpha Mattes:
Prepare Your Assets:
- Gather your foreground video (the main footage) and the alpha matte (which determines transparency)
Add Assets to Timeline:
- Place both the foreground and alpha matte on separate layers in your Premiere Pro timeline.
Adjust Layers:
- Ensure the foreground layer is positioned above the alpha matte layer.
Fix Audio (if necessary):
- Unlink and delete any duplicate audio to avoid playing it twice.
Apply Track Matte Key Effect:
- Select the foreground video layer and navigate to the Effects panel.
- Search for “Matte” and add the Track Matte Key effect to your foreground video.
Select the Alpha Channel:
- In the Track Matte Key effect settings, choose the corresponding video layer that contains your alpha channel information.
Change Composite Settings:
- Modify the composite settings from “Composite Using Alpha” to “Composite Using Matte Luma.”
Preview Your Work:
- Scroll through your video to see the effects of the alpha matte. You should notice transparent areas revealing the content underneath, creating smooth transitions and overlays.
By following these steps, you can seamlessly integrate alpha mattes into your Premiere Pro projects, adding depth and creativity to your videos. Experiment with different effects and overlays to achieve the desired visual impact.
Verdict – Which is better? Videos with Alpha or Alpha Mattes
So, what’s the scoop on alpha videos versus alpha mattes? Well, imagine you’ve got a video that’s a hefty 300MB. Now, with an alpha matte, you can shrink that down to just 6MB. That’s a massive save on your computer’s storage!
Sure, it might seem like a bit more work for your graphics card, but honestly, with today’s tech, it’s pretty much the same effort. The real win is the space you save, especially if you’re not using super-fast SSDs.
And that’s the lowdown. Hope this helps you out! Thanks for tuning in, and I’ll catch you in the next one. Later!