
Frame generation is the buzz, and guess what? It’s not just for fancy RTX 40-series graphics cards anymore. AMD’s FSR 3 (FidelityFX Super Resolution) is here to level the playing field.
Here’s the deal:
- FSR 3 works on almost any GPU, not just Nvidias.
- You’ll need to disable some Nvidia checks (don’t worry, it’s easy).
- Boom! You can now select FSR 3’s frame generation in your games.
In the past, I needed a 40-series card (like the elusive 3080ti) to enjoy this magic. But now, thanks to a free mod, everyone’s invited to the party!
How To Join The Fun?
- Download the mod (you’ll find it on Nexus Mods).
- Disable Nvidia checks (it’s like saying “Nvidia, step aside!”).
- Select FSR 3 in your game settings.
- Get ready for boosted frames – even if you’re not rocking an AMD card.
And hey, if you’re an AMD fan, this mod’s got your back too. So go ahead, game on!
Minecraft: How to Install & Use Distant Horizon + Shaders
How To Choose GPU?
Graphics cards (GPUs) are like the superheroes of your gaming setup. They handle all the heavy lifting when it comes to rendering those stunning game visuals. Now, here’s the deal:
- You Don’t Always Need One: Most folks can get it by using the built-in graphics (iGPU) that come with their computer’s CPU. But a dedicated GPU is a must-have if you’re serious about gaming or doing cool stuff like video editing and graphic design.
- Match Your Monitor: If you’re gaming at 1080p (that’s regular HD), a mainstream GPU will do just fine. But you’ll need a beefier card if you’re rocking a 4K monitor or want to play on ultra settings.
- Refresh Rate Matters: Do you have a fancy monitor with a high refresh rate? Well, you’ll need a powerful GPU and a speedy processor to make the most of it. On the flip side, if your monitor is chillin’ at 60Hz, don’t splurge on a super-fast card—it’s like putting a Ferrari engine in a golf cart.
- Space and Power: Make sure your PC case has room for the GPU you’re eyeing. Also, check if your power supply can handle it (look for those 8-pin connectors).
- AMD, Nvidia, and Intel: The latest and greatest GPUs come from Nvidia’s RTX 40-series and AMD’s RX 7000-series. But guess what? You can even tweak things to work on non-Nvidia cards. Just disable those pesky Nvidia checks and boom—you’re in the FSR frame generation club!
How To Enable FSR Frame Generation On Any GPU?
Change settings in-game

Let’s dive into those game settings.
- DLSS: First off, fire up the game. Once you’re in, find the DLSS setting. It’s like the turbo boost for your graphics. Set it to anything except “off.” Go for “Auto” or “quality” if you want the best visuals without breaking a sweat.
- NV Video Reflex: Next stop, NV Video Reflex. Enable it. This little gem reduces lag and makes your gameplay smoother than a buttered-up slide.
- Frame Rate: Now, let’s talk speed. Set your frame rate to “variable.” It’s like giving your GPU a permission slip to go wild when needed.
- V-Sync: Turn on V-Sync. It’s like a traffic cop for your frames, keeping them in check and preventing screen tearing.
- FSR: Make sure FSR (frame generation magic) is off. We’re about to unleash some DLSS goodness, and FSR might get jealous.
- Video Reflex Low Latency: Set this bad boy to “on.” It’s like a ninja reflex—quick and snappy.
- Apply and Quit: Now that you’ve made these tweaks, back out of the game settings and quit. Your GPU will thank you later.
Open Game Folder
- Game Folder: First, find your game folder. It’s like the secret hideout where all the game files hang out.
- Install the Mod: Right-click on “Dragon’s Dogma 2” in Steam. Imagine you’re giving it a little digital high-five. Then, choose “Manage.” It’s like telling your game, “Hey, I’m the boss here!” Finally, hit “Browse Local Files.” You’re peeking behind the game’s curtain.
- Drop Those Files: In this new window, you will drop the files you downloaded from Nexus. Think of it as adding sprinkles to your gaming cupcake.
How To Install Frame Generation Mod in Dragon’s Dogma 2?
Download Frame-Gen Mod
- Download the Frame-Gen Mod: So, you wanna soup up your game graphics, huh? Grab the Frame-Gen mod. It’s like giving your game a turbo boost. You’ll find the download link in the description below.
- Nexus Mods Account: Now, here’s the catch. To snag this mod, you’ll need a Nexus Mods account. It’s like the VIP pass to the modding party. But hey, if you find an alternate link, I’ve got your back—I’ll drop it down below.
- Unzip and Explore: Once that mod’s done downloading, unzip it. Imagine you’re unwrapping a digital gift. Inside, you’ll find two files: DLSS-G (that’s the old frame generation wizard) and FSR3 (the shiny new one).
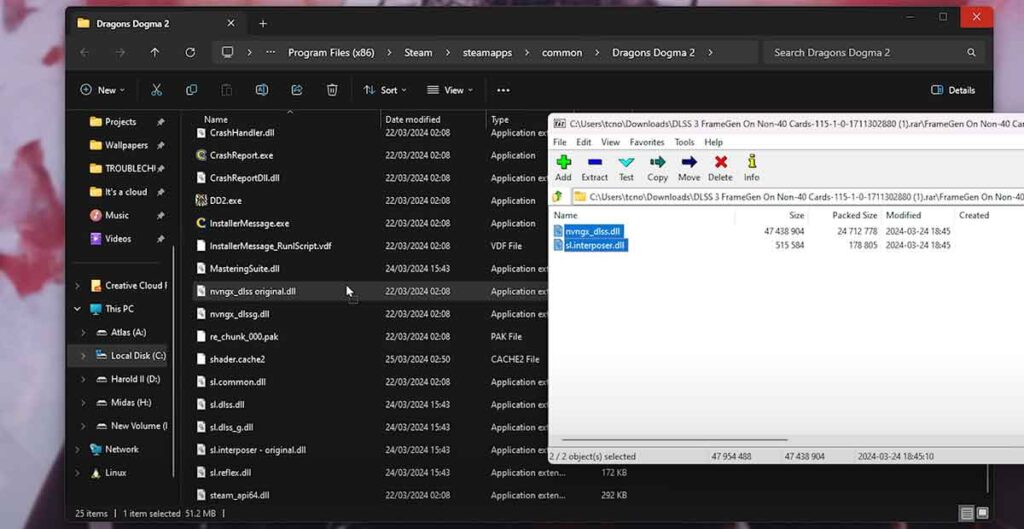
- Game Directory Detective: Now, sneak into your game’s installation folder. It’s where all the magic happens. Look for the game—let’s say it’s “Dragon’s Dogma 2.” Click anywhere and type in “SL.” Boom! You’re teleported straight to the SL interpos folder. It’s like finding the secret treasure chest.
- Rename or Relocate: You’ve got options here. Either rename the existing files (so you can switch back later) or move ’em to a different folder. I’m all about that backup life. So, let’s add “original” to the end of those filenames. DLSS-G becomes DLSS-G-original, and so on.
- Shader Cache Cleanup: Last stop—Shader docash Toom (or just “Shader” if you’ve got file extensions off). Delete it. Think of it as sweeping away the digital dust bunnies. This clears the way for the new frame generation magic.
Install DLSS To FSR mod
- DLSS to FSR Mod: Alright, buckle up! We’re about to soup up your game graphics. First, grab the DLSS to FSR mod. It’s like giving your game a magical makeover. You’ll find it in the link below.
- Nim’s DLSS G2 FSR 3.90 Universal Mod: Next stop, Nim’s workshop. Download the DLSS G2 FSR 3.90 Universal mod. It’s like adding rocket boosters to your game engine. Click that “manual download” button and let the bits fly.
- Unzip the Magic: Once that zip file lands on your computer, unzip it. Imagine you’re unwrapping a digital present. Inside, you’ll find a bunch of folders. But don’t panic—we’re after the treasure hidden in the “Dore version” folder.
- Extract and Deploy: Grab those files from the “Dore version” folder and drop ’em into your game folder. It’s like inviting new characters to your gaming party. Boom! You’ve just replaced DLSS frame generation with FSR 3 frame generation. Your game’s gonna thank you.
- Close the Zip: Now, close that zip file. Imagine you’re zipping up a superhero suit. We’re all set!
(Non-Nvidia GPU) Disable Nvidia check
- Non-Nvidia GPU: So, you’re rocking a non-Nvidia graphics card. No worries! We’ve got a workaround.
- Disable Nvidia Signature Checks: First, delete that Shader cache (if you haven’t already). It’s like tidying up your digital room. Now, here’s the secret sauce: we’re gonna disable Nvidia’s signature checks. It’s like slipping past the bouncer at a VIP party.
- Grab Those Files: Click that link (you know, the magical one) to revisit where you downloaded stuff earlier. Head to the files tab. Now, pick the first file—dssg to FSR 3.90 manual download. Slow and steady wins the race, right?
- Extract and Drop: Unzip that folder. Imagine you’re unpacking a treasure chest. Inside, you’ll find two registry files: disable and restore. These are like secret keys to the mod kingdom. Drag ’em into your game folder. It’s like inviting ’em over for a gaming party.
- Run the Magic: Double-click that disable the Nvidia signature checks file. Confirm with a couple of “yes” clicks. Boom! You’ve just bypassed the velvet rope. Now, you can select DLSS even without an Nvidia card. Your game’s gonna high-five you.
How to Clear Shader Cache for Better Gaming Performance?
Hardware Accelerated GPU Scheduling
If you’re having issues with Hardware Accelerated GPU Scheduling, turn it on. Most people should do this.
- Hit the start button, type “graphics,” and open the graphics settings.
- Look for “change default” inside the graphics settings.
- Toggle on Hardware Accelerated GPU Scheduling.
- Personally, I’ll keep this off because I don’t think it’s necessary, but if you want to try, go for it.
- If you need to re-enable it later, just restart your system and check again.
- Note that it might not work well with certain mods like the re framework mod.
- Now, open your game to see if everything’s working.
- Expect better performance after enabling it.
- If your frames are still low, go to system options, graphics, and adjust settings like frame rate and quality.
- If you see lag, you might need to enable Hardware Accelerated GPU Scheduling. Go back to graphics settings and turn it on.
- After enabling it, restart your system again.
- That’s it! You should see improvements in your game performance.
How To Fix Crashes?
- Overlay Overload: So, here’s the deal: overlays can be like that extra scoop of ice cream—it seems like a good idea, but sometimes it messes things up. If you’re using the Nvidia overlay, MSI Afterburner, or any other fancy overlays (like Discord), they might throw a party in your game files. And guess what? Sometimes, they crash the party.
- Keep It Light: Try turning off those overlays. Imagine you’re flicking the switch on a neon sign. Less is more, my friend. Your game might thank you with fewer crashes.
- Note to Self: Remember, even digital games need a breather. So, keep a mental sticky note: “Overlays = Potential Crash Zone.” Stick it on your virtual fridge.
Clearing shader cache & Starting Game
Before you start the game, let’s do one thing: clear the shader cache. Sometimes, if your game is acting up or crashing, deleting this file might fix it. It’s like giving the game a fresh start.
My game was crashing too, but after I cleared the shader cache, it worked fine. So, just delete that file and then start playing again. It might just solve your problem!
FSR Frame Generation WORKING – Double FPS
- Main Menu Check: Upon entering the main menu, observe if the frames are higher. They might show as 255 initially.
- In-Game Verification: Enter a game to confirm if the FPS has indeed increased. You should ideally see around 120 FPS, which indicates a doubling in frame rate.
- Success Confirmation: If you notice the FPS has doubled from around 60 to 120, it means the frame generation is successfully working. This significant boost in performance is remarkable.
- Compatibility: Unlike the previous frame generation mod, this method works not only for Nvidia RTX 40 series graphics cards but also for Nvidia 30 and 20 series, and potentially for AMD graphics cards as well.
- Performance Boost: With this enhanced performance, you can consider enabling features like Ray tracing and increasing other graphics options while still enjoying smooth gameplay with excellent FPS.
Fix Weird UI issues
If you’re seeing weird UI issues, like the UI acting funky when you’re moving quickly, it’s likely because of FSR running on the wrong layer. Here’s why:
- Game Layer vs. UI: FSR (like DLSS) is added to the game layer, while the UI sits on top of it. The problem arises because the UI isn’t designed to adjust with the frame generation process.
- Blurry UI: Since the frame smoothing affects the game layer but not the UI, when you move around quickly, the UI may seem blurry or glitchy.
To fix this, developers need to ensure that the UI adjusts correctly with frame generation processes like FSR or DLSS. This will prevent the UI from getting funky when you’re playing.
Future support for FG (no mods)
Here’s a simplified version:
- Future Fixes for FG (No Mods): There’s this glitch happening in the game, but hopefully, it’ll get better in the future.
- DLSS and FSR Support: Capcom might officially add DLSS and FSR to improve graphics for everyone, but until then, modders are doing their best.
- UI Glitches for Now: Until the official fix, you might notice some weird UI stuff. It’s annoying, but that’s the only downside.
- Improved FPS: If you’ve been stuck at 15 FPS, expect a boost to 30 FPS, which is a big difference. It should make the game smoother, especially on weaker computers.
- Shoutout to Mod Devs: Big thanks to the modders for keeping us updated. If there are more fixes or mods, let me know, and I’ll help everyone out.