
Rufus “Extended” Feature. Create Bootable USB Windows 11 for Unsupported Hardware: With Rufus, you can easily create a bootable USB flash drive to upgrade or clean install Windows 11. The tool works similarly to the Media Creation Tool, and there’s an option for downloading ISO files directly from Microsoft servers if needed!
Rufus is a very unique and easy-to-use program. Unlike the Microsoft solution, it can create both installer media for installing Windows 10 or 8 from scratch with an ISO file in just two steps:
- 1) Download
- 2) Burn onto a USB/DVD Drive!
What is Rufus’ “Extended” Feature For Create Bootable USB Windows 11?
Rufus is the most well-known third-party media creation tool that helps users create bootable USB drives. With version 3.16 beta 2, it has an “extended mode”, which allows you to bypass Microsoft’s primary security requirements and RAM limits. As well as make raw installation media to install Windows 11 for almost any new or old system.
Or if your computer lacks a UEFI BIOS-compatible bios chip set up from before 2006-2007 era computers when Intel first introduced their x86 instruction sets into computing devices regarding operating system compatibility standards. I hope this post finds its way across without too much difficulty!
Create Bootable USB Windows 11 For Unsupported Hardware Using Rufus
So you have been warned. So here’s how to use Rufus’s extended Windows 11 feature to create a bootable Windows 11 USB flash drive to install the OS on unsupported hardware.
Follow these steps to create a bootable Windows installer from scratch. You can use Rufus, an application that allows you to download and burn ISO images onto USB and CD/DVD media to install Windows 11 on your computer’s optical drive- no installing software needed!
Step 1, Download Rufus
1. First, you need to open the Official Rufus download page, then scroll down to the download section. Just make sure that you’re downloading Rufus 3.6 or later. Click on the link and Save it to your computer.
2. After the download is finished. Go to the download folder and Run the file. Wait for the installation to be completed.
3. In the Rufus. You have two options. 1) Either Download The ISO Using Rufus 2) or Select Existing Windows 11 ISO.
Install Windows 11 On Unsupported Hardware (Without TMP 2.0 or Secure Boot)
Method 1, Create a Bootable USB Drive Using the RUFUS Download Feature
For example, if you want to download the ISO file.
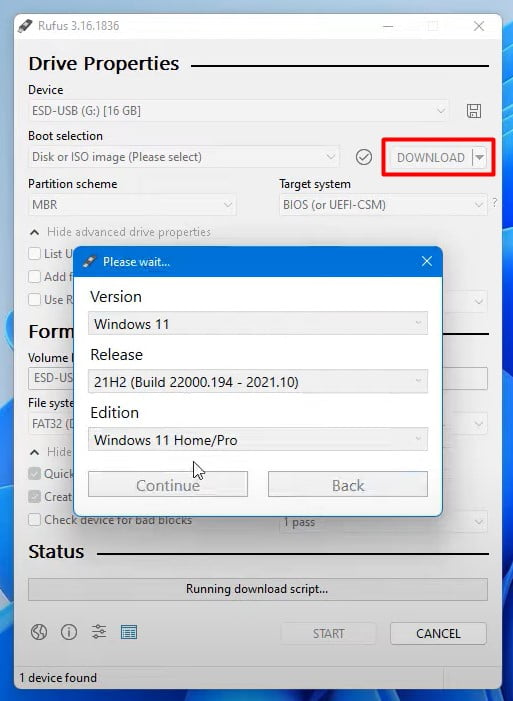
Step 1, Click on the Select button and Select the Download option. It will open a small pop-up.
Step 2, Click on the download button and Select Windows 11 from the list > Then select the latest release of the addition > Next, Select your language, and click the download button. Once the download is complete, you can continue with the bootable media creation steps.
If you can’t see the Download option
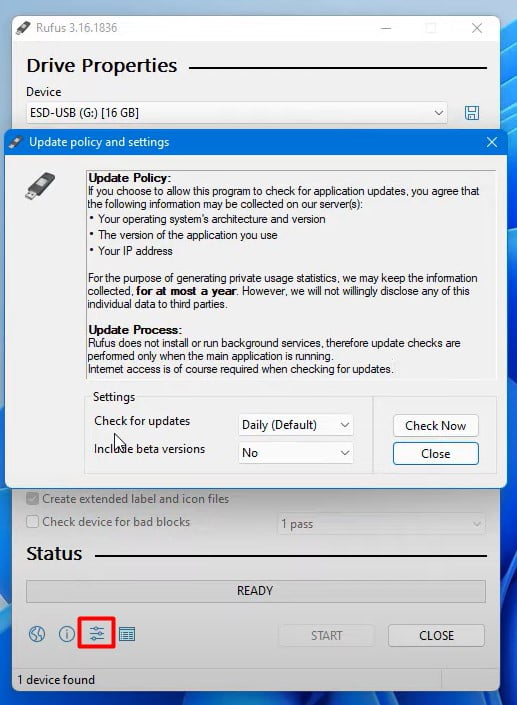
You need to open the Settings. And make sure that you have the option Check for updates selected to Daily default. Now close it and need to restart the application.
Method 2, Create Bootable USB Windows 11 For Unsupported Hardware (Rufus Extended Feature)
If you already have a downloaded iso file. Then, you can Create a Bootable USB For Unsupported Hardware without any delay.

1. So you need to choose the Select option. And then click on the Select button. I’m going to select the Windows 11 ISO image.
2. Then, at the top, make sure to select the USB drive that you want to use to create the bootable media for Windows 11 for unsupported hardware.

NOTE: Make sure if you have any data that is important to you on the USB drive to back it up because this process will erase everything.
3. Important Part!! Then on then in the image option, select the Extended Windows 11 (TPM 2.0, Secure Boot, 8GB + RAM) installation option.
This option helps create a bootable flash drive that bypasses all the Windows 11 system requirements or at least the TPM 2.0, secure boot and the limit of memory.
4. Next, you can use all the default settings. For the Partition Scheme as GPT and for the Target system, use UEFI. You can change the label if you want. This is for the USB drive. Make sure to check the Quick format option, and then you need to click on the Start button.
5. Once the process has been completed. You need to close all the messages and then click the close button. You are done. You have created a bootable Windows 11 USB flash drive for unsupported hardware using the Extended Windows 11 (TPM 2.0, Secure Boot, 8GB + RAM) option.
6. Now, You can start the installation process (After Creating a Bootable USB For Unsupported Hardware) using two methods.
Method 1, From file Explorer. Go to File Explorer. Open the USB drive and run the Setup.exe file.
Method 2: You can boot your computer to do a clean installation of Windows 11 without the restrictions, OR you can install windows 11 on unsupported hardware.