
Troubleshoot PS5 Error Code CE-10005-6: I will show you how to fix the (PlayStation 5 ) PS5 error code CE-10005-6 or the problem reading disk error. So this weird error pops up when you try to put your PlayStation 5 disk into your place to survive or replace the A4 disk.
If, for some reason, this error (PS5 error code CE-10005-6) pops up. It just doesn’t install or turn on. It just gives it an error because it cannot read the disk.
Are you experiencing this PS5 error code on your monitor?
So before resolving the PS5 Error code CE-10005-6, we should address a few inquiries at the forefront of your thoughts.
What does PS5 error code CE-10005-6 mean?
PS5 Error Code CE-10005-6 implies that you can’t install or download any game. Furthermore, it usually happens when downloading or installing the game through a CD.
Before Inserting the disk, make sure you clean the disk appropriately with delicate cotton fabric; for the rest, you will get the solution on NO 3.
What are the reasons for the PS5 Error CE-10005-6?
PS5 Error Code CE-10005-6 can happen due to the following:
Trouble Internet Connection.
Damaged/scratched/old disk. It occurs when you install a game or download it, and if your internet connection is not good, it leads to the PS5 Error CE-10005-6.
How To Fix PS5 Error Code CE-10005-6
Solution #1: Unplug and Plug-in
Try to take out the disc and clean it. Unplug your PlayStation 5 from the power cord itself. Replug it back in. and try again. A lot of times, it’s because of that.
For some reason, some system software error is causing it not to read the disk and essentially causing this issue. Put it back in and see if that helps alleviate this issue.
If you have another disk, hopefully a PlayStation 4 or 5, put it in and see if it reads that. There’s a slight chance that maybe that disc is the issue, not the console.
It could be that it’s scratched up or has problems, or all that other good stuff is possibly happening to that disc instead of the console itself.
Solution #2: Delete the Download and Redownload the Game
Now, if all else fails, what you can do is, You want to make sure that the disk is kind of here and that there’s an update downloading. Delete the disk or the copying of the download.
You’ll see it over here, like when you press PlayStation in the download bar, and there’s a possibility that the file or download is corrupted.
Just delete it if it’s on the main console. Just press options and delete. Let it redownload, recopy, or reinstall to remove the possibility of that error happening. Because you want to make sure it’s a fresh, clean slate and start.
Solution #3: Insert Disk Correct In PS5 Correctly
How do you insert a CD into your PlayStation 5 correctly? I know this may sound silly and something like common sense. But even I had this issue. So, usually, you would think logically.

SEE IMAGE LEFT – This way, This is incorrect (SEE THE PICTURE), even though this makes logical sense. This is exactly how the PS4 was.
SEE IMAGE RIGHT – But with PlayStation 5. you’re putting it in this way (SEE THE PICTURE). So, this is how you insert the game into the drive. If this is the cause of the error, then this step will fix the PS5 error code CE-10005-6.
Read More: Fix PS5 Error WS-116330-4 | Account Suspended/Banned
Fix PS5 Error Code WV-109156-2
Solution #4: Restart PlayStation 5
How to restart PS5 using the controller and the button on the console.
1. First, press the PlayStation logo button on your DualSense controller. It will open the PS5 control center menu.
2. you just want to go down to the power icon. Go right there and tap on that. It will open a small context menu.

- A) Rest mode puts it in a rest mode. It’ll still charge your controllers. You can continue to download updates. It’ll suspend your games.
- B) you can turn off the PS5, which will turn it off completely.
- C) Or You can go ahead and Restart PS5.
Solution #5: Check Up on the PlayStation 5 Network Status
1. Go into Settings. In settings, we will go into the Network where the issues are happening.

2. Next, select “View Connection status.” Here, you must ensure you are connected to the PlayStation network. And everything is up to date.
You need to be connected to the internet for this. If you aren’t. You might want to test it out on your phone itself.
Solution #6: Change WiFi-Band from Automatic to 5 GHz
1. You need to go into your Settings > You want to go into the Network, and you want to scroll down to Settings and hit on it.

2. Next, click on the Setup internet connection. Now, this should bring up any available network connections, and you’ll see it kind of search here.
3. Now, if you go, when you hit the options icon on your controller. And if you go to wifi frequency bands, you’ll see a set automatic by default, but you can choose 5 Gigahertz or 2.4 Gigahertz.
5 Gigahertz is pretty good if you’re looking for theoretically faster speed. Still, it’s got a much shorter range than 2.4, but if you’re trying to connect to that, try that and hit search, and you should see it populate up with specifically 5g networks A5 gigahertz networks.
Solution #7: Reset PS5 In Safe Mode
1. So now you need to make sure that the console has to be completely off. To do this, press the power button and turn off the PlayStation 5. Wait until the PlayStation 5 completely powers down.

2. If your PlayStation is in the vertical position. It’s the very bottom button. The one on top of it is the eject button. All you want to do is keep your finger on it until you hear two beeps.
3. Next, it will ask you to connect your controller to your PlayStation with a USB C-type cable. You need to put it in the USB slot, put it in the type USB on the controller, and then hit the PlayStation button.
4. When you hit the PlayStation button, you can restart your PS5 with a black screen. Press the first option, “Restart PS5”. You are done. It will shut down and back up to the main PlayStation home page.
Solution #8: Change DNS Settings
1. The first thing you will do is hover over to Settings. And you need to click on Network. You will hover over to Settings again in the Network section and click On Setup Internet Connection.
2. Now, if you are already connected to the internet. Then, you can click into the connected wifi section and click Advanced settings. You don’t need to reconnect to the internet to do this.
3. Now, here, you will see certain settings are set automatically already. But you can easily change. Now, we’re going to be changing the DNS Settings specifically. Click on it. Two new options will open: a) Primary DNS and b) Secondary DNS
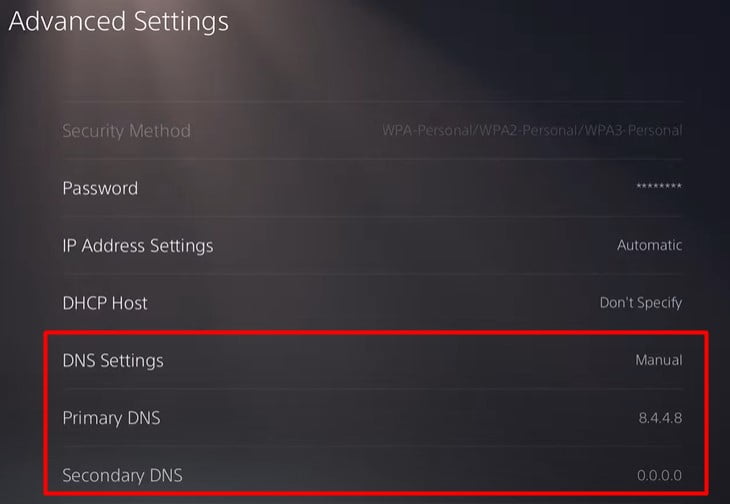
4. Click on the Primary DNS. We’re going to change this from automatic to manual. We will change this to 8.4.4.8 and Then Click on Done.
5. We will change the secondary to 8.8.8.8, and we will press OK.
6. We’ll let it connect to the access point, which is the DNS setup. I will give it some time to let it connect and reconnect to the internet. Voila, we are connected to the internet with the latest and greatest DNS settings. It will fix your PS5 error code CE-10005-6 issue.