
Fix KMODE EXCEPTION NOT HANDLED issue on Windows 11/10: I completed building my new computer yesterday. However, I have been having some BSOD problems. I discovered that they were identified with my RAM as I have been doing some overclocking and returned the RAM esteems to default.
After that, I didn’t get a blue screen for around 13 hours of utilization under medium to weighty burden (playing The Witcher 3 and different games) and 8 hours of inactivity. However, similarly, as I suspected, everything was working. But suddenly, I got another BSOD – Kmode exception not handled.
We’re going to write on a kind of BSOD. Furthermore, that is a system service special case. This is a BSOD that is rigorously related to Windows 10 drivers. And to significant Windows 10 files. So in case you’re getting this BSOD as often as frequently. Perhaps once per day, and you lose all the work that you were dealing with.
That isn’t very reassuring. However, in this post, I’m going to attempt to help you fix that, and by this means, I’m going to show you in this post. I’m trusting that you will fix this KMODE EXCEPTION NOT HANDLED, issue after reading this post.
What exactly is a KMode Exception Not Handled error on Windows 11 or Windows 10?
KMode Exception Not Handled is a Blue Screen of Death (BSOD) error that occasionally occurs in Windows 11/Windows 10. A broken driver probably sets it off and can make your PC restart. While restarting, the issue can show up once more, bringing about a restart loop.
By default, it saves a bit of memory dump to c:\windows\memory.dmp. It is not extremely valuable to find support from the web. It’s a large file and may contain privacy-sensitive information.
If you get the exception again and there’s no small-scale dump, you should take a gander at your System storage device (SSD or HDD). A damaged storage device can bring about this issue. An imperfect storage device will most likely be unable to save the small-scale dump when it malfunctions.
Understand The Various KMode Exception Not Handled Error On Windows 11
It’s conceivable, Yes. Many KMODE_EXCEPTION_NOT_HANDLED issues we get here are from bombing storage devices. It’s very simple to distinguish them if you know the parameters; however, once in a while, a faltering drive can’t save the issue for diagnosis.
The primary parameter of the KMODE_EXCEPTION_NOT_HANDLED blue screen is the status code.
For example:
0xC0000005 is STATUS_ACCESS_VIOLATION, which implies a system driver attempted to get to invalid memory.
It could be programming issues or inadequate RAM, and so on, 0xC00000E9, 0xC000000E, and 0xC0000185 are ordinary I/O device errors. You are able to learn the status codes in ntstatus.h
Best Method TO Solve The KMode Exception Not Handled Error
I settled the ETD.sys blue screen of death error on Windows 10. This occurred on a Lenovo 100’s PC. In any case, I’ve read online that numerous models have this issue. It’s really brought about by the ELAN Touch device software that controls the touchpad.
Something else that can assist with fixing the blue screen of death is removing superfluous additional hardware. USB drives extra typically based on mice or new Bluetooth gadgets you have recently installed. Take them out and check the condition after that.
Solution #1, Restart the Computer in Safe Mode
1st, So, from the blue screen, the only option you have is to Power down and then Power back On. Tap the F8 or F11 key on your keyboard.
NOTE: You need to do a hard Power off all three times in succession. This means turning on your PC until the point it gets to the Windows boot screen with a little loading circle. Press the power button on your PC or laptop. And afterward, Shut that off. and later repeat that process on two more occasions. So, an aggregate of multiple times (Three times).
Typically, this would give you the Windows Repair options screen. But I’d been fighting with my computer for a while. So, it decided to run startup repair instead. If your computer does run startup repair, it might go for a few minutes. And then it’ll give you the Windows startup screen.
![Windows 10 Repair option and select Advanced Option [fix kmode exception not handled error]](https://newscutzy.com/wp-content/uploads/2021/04/Windows-10-Repair-option.jpg)
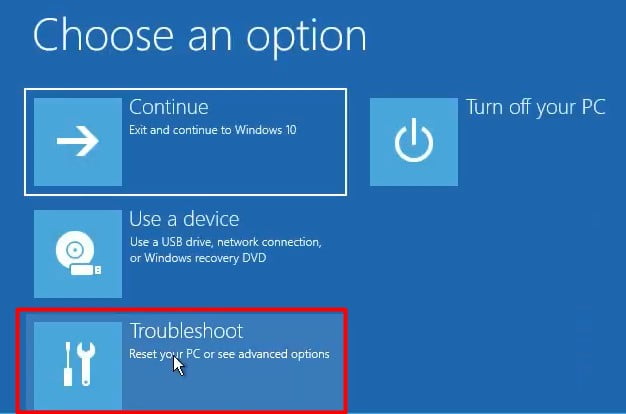
2nd, Where you can select Advanced Options and then select Troubleshoot.
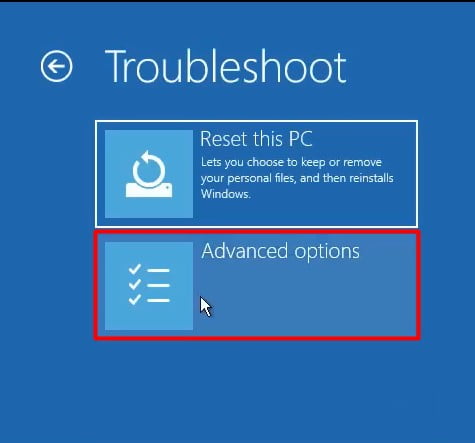
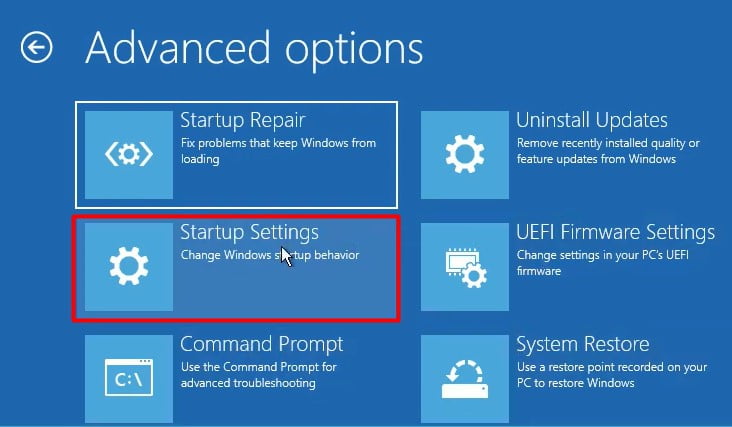
3rd, And next, Select Advanced Options again. Select the Startup settings option.
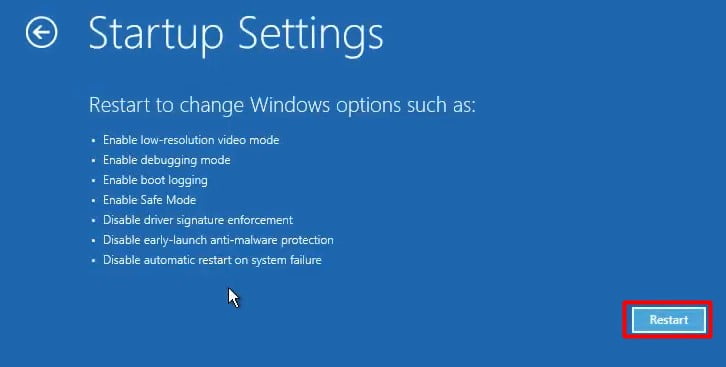
4th, On the startup window. Select the Restart button.
NOTE: Windows will automatically boot to safe mode, and this is great because you have to diagnose something that requires you to restart the computer many times.
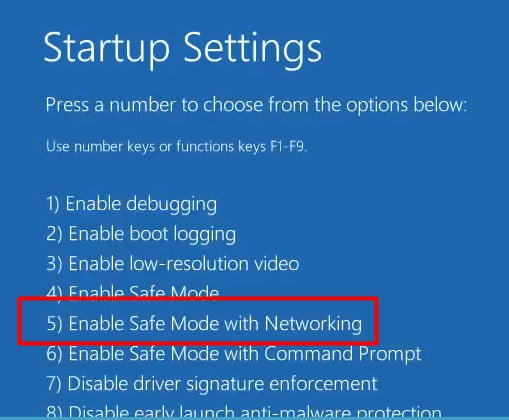
On the next screen. You should be presented with the boot options screen. I’m just going to go into Safe mode with networking. So Press number Five on the keyboard. It will start to Reboot. Please go to the next point.
Solution #2, Disable ELAN Service
You can tell that you’re in safe mode now because it’s in all four corners of the screen.
1st, So on your keyboard, Press Windows + R. It will open the run box.
2nd, Type in “MSConfig”. And then Press OK. Wait for a while.
3rd, It will open System Configuration. Got to the Services Tab.
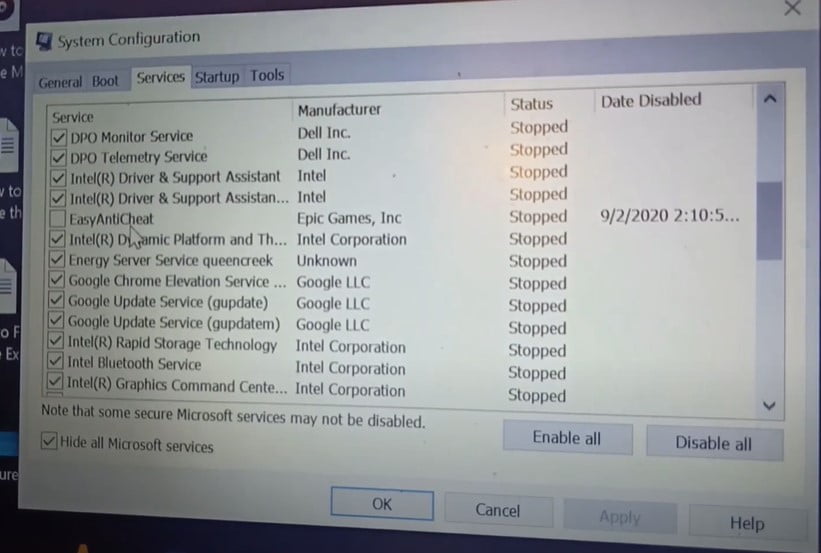
4th, Check the box for “Hide all Microsoft services”: that will shorten the list a little bit. We’re looking for the ELAN service from ELAN microelectronics corporation. So just Uncheck that and then hit Apply. Say OK.
Let’s say Restart, and then your computer should reboot out of Safe mode. And into normal windows. And when it comes back up. You should be able to use your touchpad without getting that Kmode exception not handled blue screen error.
Read More: Fix Ethernet Doesn’t Have a Valid IP Configuration Issue
Solution #3, Update Windows and Driver
Windows update
First of all, make sure your operating system is up to date. So, if your operating system is up to date, that means that all you were Windows 10 drivers will be up to date.
So what you have to do:
1st, Click on the Start menu, then click on the Settings (Look like Gear) icon.
2nd, Then go down a bit where it says Update and Security. Click to open it.
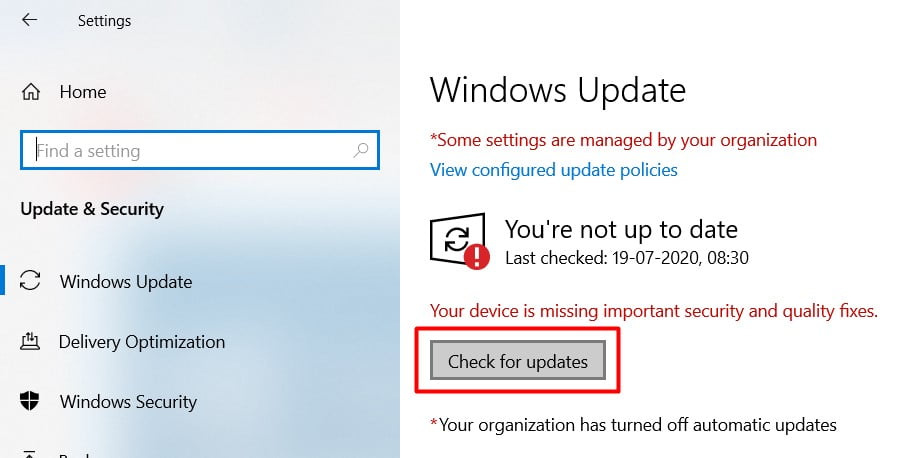
3rd, And then go to the Windows update on the next page. You’re going to have to click on Check for Updates. Or maybe windows will automatically check for updates and install all the updates you have here and what Windows recommends.
Update Drivers
To fix the Kmode Exception Not Handled issue on Windows 10.
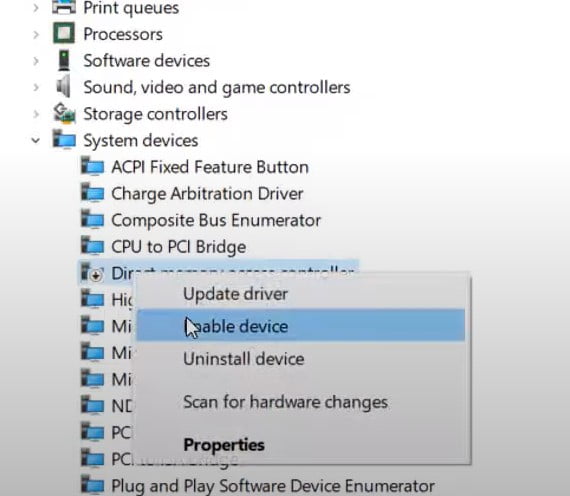
1st, Go to Start and type Device Manager. Click here to open it. Now expand the Network adapter. And right-click on the network connection. Now go to Properties. Then select the Drivers tab. Click on Update Driver.
NOTE: This may not do anything as MS is far behind certifying drivers.
2nd, Then you need to Right-Click on the driver and select Uninstall. After you need to REBOOT the system, this will refresh the driver stack.
Repeat the process for Network – Wi-Fi, Network Card (NIC), Keyboard, Mouse, and Sound. If third-party with their own program and drivers and some other significant device drivers you installed.
Presently, go to System Manufacturer’s site (as examples: Toshiba, Dell, HP) (as rollback) and afterward Device Manufacturer’s site (As an example: ATI, Intel, Nvidia, Realtek) and get their most recent versions. (Search for Chipset, BIOS, and programming updates at System Maker’s site while there.)
Okay, so now you have to ensure that you have your graphics card drivers up to date here. It depends on what graphics card you have. If you have an AMD graphics card or an Nvidia graphics card, go to the official website or use the official driver that is installed on your system and check for updates.
1) Download them and SAVE the installation file.
2) Go to where you download them. Right-click on the file and RUN AS ADMINISTRATOR.
3) Now, you need to REBOOT the system after each installation.
Continuously check in the Device Manager – Check the Drivers tab to be sure the version you are installing really appears. This is on the grounds that a few drivers roll back before the most recent is installed (sound drivers especially do this). So, Install a driver – Reboot the system – check to be sure it is installed, and repeat the process depending on the situation.
Some Third-Party Programs
Run DriverView – Set the VIEW to Hide Microsoft drivers. Update those files without Dump in their names (and update Chipset and BIOS drivers).
DriverView – Free – utility shows the rundown of all device drivers right now loaded on your computer. For every driver in the rundown, extra valuable data is displayed: description, the load address of the driver, product name, version, Manufacturer that made the driver, and more.
Read More: Reboot and Select Proper Boot Device Error | How to Troubleshoot?
Solution #4, Disable TabletInputService
To do that,
1st, Click the ‘Start button and then type ‘Advanced startup options’ in the search field, and then choose “Change advanced startup options” in the search results. This will take you directly to these options from the settings.
2nd, So now, go all the way to the bottom under where it says ‘Advanced startup’ and then click ‘Restart now.‘
3rd, After restarting your PC, you will notice this blue ‘Choose an option’ screen. From there, select ‘Troubleshoot’ and then select ‘Advanced options’ and then select the ‘Startup settings.’ then you will notice all that will happen once you restart your computer again, so to confirm, click ‘Restart’ once more.
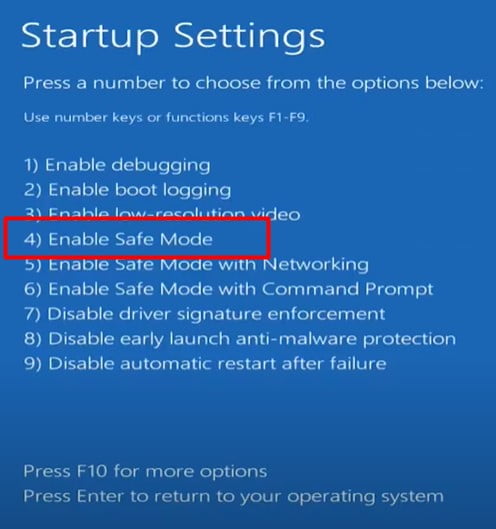
4th, After restarting your PC, this time now you will notice this ‘Startup Settings’ screen. From there, Choose option 4 to boot to Safe Mode.
5th, NOW, Go to the Cortana search box, type REGEDIT, and hit Enter.
6th, Select Yes to continue the User Account Control confirmation box.
7th, Once you are in the Registry Editor window, Find and expend to Select the following folder:
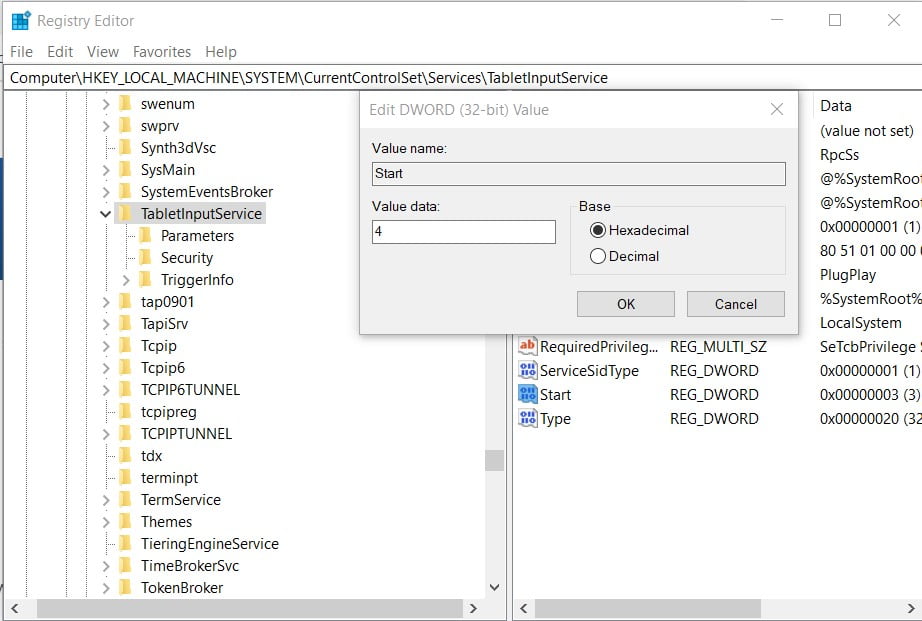
HKEY_LOCAL_MACHINE\SYSTEM\CurrentControlSet\services\TabletInputService.
8th, On the Right-panel, double-click the Start REG_DWORD. A small pop-up will open.
9th, In the Value data input field, Just replace the current value with 4.
10th. Next, Click on OK to save the changes and Then Restart the PC.
Check that the “Kmode Exception Not Handled” issue should be resolved.
Solution #5, Delete ETD.sys driver
Again, Restart your PC with an Advanced startup blue screen in Windows 10. and Once you are in the Advanced option.
1st, Click on the ‘Troubleshoot’.
2nd, Select “Advanced options“.
3rd, Click on the “Command Prompt”.(Make sure it is Run as Administrator).
4th, Locate the C directory drive by typing:
C:5th, Next go to the directory:
cd C:\Windows\System32\Drivers6th, Next Run the Comments:
ren ETD.sys ETD.sys.oldSolution #6, Disable Windows 10 Fast Startup
The fast startup was first introduced in Windows 8. and, in a simple summary, is basically a mix of traditional cold startup and hibernation. This allows you to turn on your computer faster. Having Windows startup using a saved hibernation file. Fast startup is enabled by default on Windows 10.
But in some cases, you may want to disable the feature. One issue you may find is because your machine doesn’t perform a regular shutdown, updates may not be fully installed. Others could be not being able to get into bios. Or allowing you to dual boot; luckily, it’s pretty easy to disable.
To do this:
1st, Right-click on the Start icon. Select the Power options. If you don’t see your startup options here. Go to Additional Power Settings on the right side.
2nd, Next on the left menu. Select Choose what the power buttons do.
3rd, In order to change these settings, select “Change settings that are currently unavailable.”
4th, Now you can uncheck the box close to “Turn on fast startup” under shutdown settings. Next, click on Save Changes. And you’re good to go.
Read More: Fix “This Site Can’t Be Reached or err_connection_reset” Error?
Solution #7, Run the Check Disk
If the Kmode Exception Not Handled problem is not fixed.
1st, Just go in the search box. Type in here cmd. right-click on cmd and click on Run as administrator, on user account control-click on Yes.
2nd, So here is the command prompt. We’re gonna run two commands. The first command we’ll check our disk or our hard drive and that is:
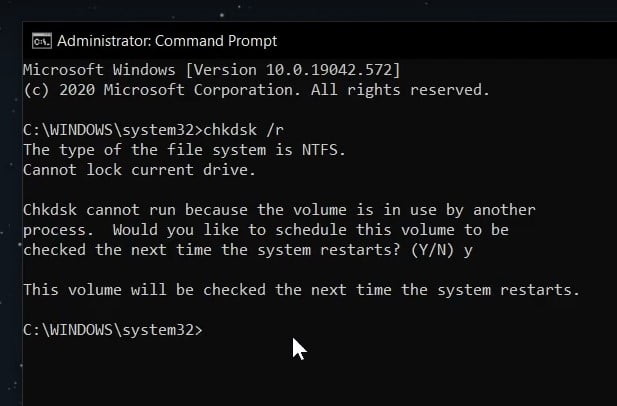
chkdsk /rThen Press Enter.
And now you can see here if you receive this message:- “The type of the file system is ntfs cannot lock current drive check disk cannot run because the volume is in use by another process would you like to schedule this volume to be checked the next time the system restarts.”
Here, type Y and then press Enter – this means that when you restart your system, windows will do that system check for you.
3rd, After the Restart, what do we have to do now? The second command:
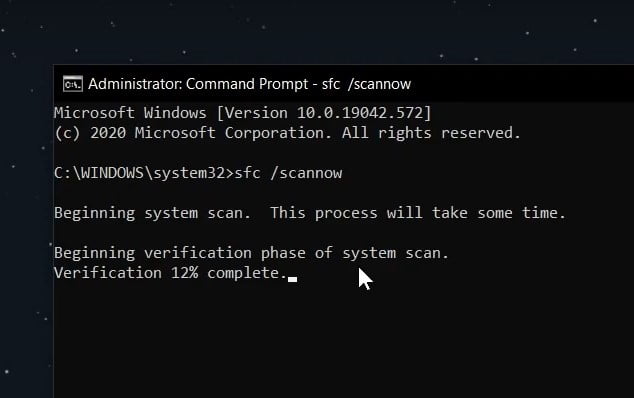
sfc /scannowPress Enter.
This is a system file checker. This will scan for important system files that are corrupted, missing, or anything like that. and it will try to replace them or fix them by pressing Enter; the scan will begin, and the system will be scanned. It will resolve your error “Kmode Exception Not Handled While Streaming.”
Conclusion
if you enjoy these posts, guys, then hit the share button. It really does help me out, and I also hit the Subscribe button if you want to keep up to [date] when I upload new posts.
Also, if you’ve got any problems like the “Kmode exception not handled” error (On Windows 11/Windows 10) for your computers, You can always head over to my comment and post there. And we can help you out over there, or if you’ve got any questions, or you want to contact me [okay]. Anyway, Have a great day,
2 Comments
The problem still persists,please help.
Try this method: Turn off fast startup for normal boot