How to build better windows in Enshrouded? Also, add texture and detail to the outside of your build! Enshrouded is a sandbox game that lets you build your own world with blocks and tools.
You can create anything from castles and villages to dungeons and temples. But how do you make your builds more interesting and appealing?
One way is to add some texture and flare to the outside of your windows. In this article, I will show you some simple window designs that you can use to enhance your buildings in Enshrouded. Let’s jump into it!
How To Build Better Windows in Enshrouded?
Adding Interest to Your Building
- Rectangles No More: Since we’re stuck with 90° turns, let’s inject some personality into our buildings.
- Bay Windows: We’ll learn how to craft charming bay windows that break the monotony.
- Two for One: Not only will we master window crafting, but I’ll also reveal tips for vines and a special detail for added flair.
Crafting Bay Windows
- Materials: Grab your preferred building material.
- Sizing: Start with a 3-high structure for a bay window.
- Width and Depth: Make it 6 tiles wide and 3 deep for a two-bay window.
- Mind the Gap: Despite the window being 2 tiles wide, we need the extra space for perfection.
Enhancing Details
- Roof Overhang: Add a subtle overhang for a polished look.
- Ceiling Pendant: Consider a ceiling light to complement your new window.
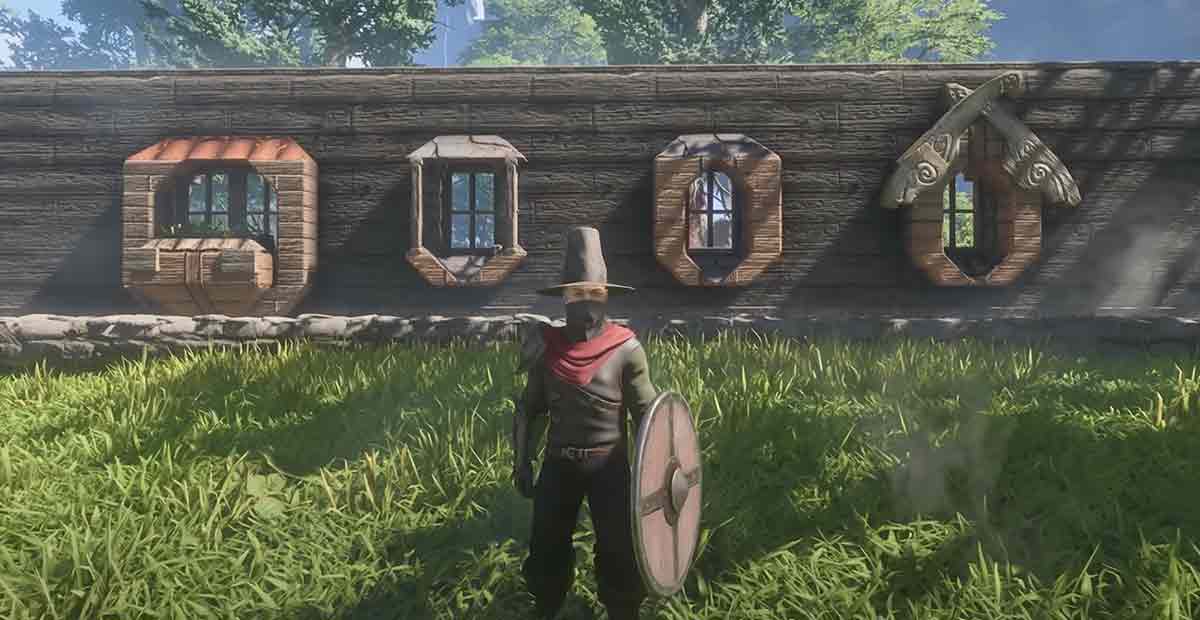
Window Design #1: The Carved Window
This window design is very easy to make and only requires one type of block: the shingle roof block. You can find this block in the building menu under the roof category.
To create this window design, follow these steps:
- Start by adding two shingle roof blocks to the bottom and two to the top of the window. Make sure they are aligned with the window frame.
- Next, add three shingle roof blocks on each side of the window, but leave the corners empty. This will create a gap between the blocks and the window frame.
- Finally, work from the bottom up and fill in the gaps with shingle roof blocks. Aim at the block behind the window frame and snap the shingle roof block in place. Do this for all four gaps.
And that’s it! You have created a carved window that looks like this:
This window design adds a nice rounded effect over the window and gives it some depth and dimension.
Window Design #2: The Trimmed Window
This window design is a variation of the first one but with extra trim on the sides. You can use any roof block for this design, but I will use the stone shingle roof block for this example. To create this window design, follow these steps:
- Start by adding two stone shingle roof blocks on the top of the window, or however wide your window is. Then, add one stone shingle roof block on each side of the window, overlapping the top blocks by one block.
- Next, take the wooden window frame and rotate it sideways. Snap one window frame on each side of the window, inside the stone shingle roof blocks.
- Then, add two stone shingle roof blocks on the bottom of the window, aligned with the window frame.
- Finally, skip the corners and add one stone shingle roof block on each side of the window, one block up from the bottom. Aim at the block behind the window frame and snap the stone shingle roof block in place.
Window Design #3: The Planter Box Window
You can use any type of roof block for this design, but I will use the roof tiles block and the shingle roof block for this example. To create this window design, follow these steps:
- Start by adding roof tiles blocks along the top of the window, filling in the entire width. You can leave the corners without roof tiles blocks if you want a more arched effect or fill them in if you wish for a more sharp and clean-cut look.
- Next, go to your hammer and enter the building mode. Select the single terrain block option and choose either dirt or farm soil. Place a single terrain block on top of each roof tiles block, creating a row of soil above the window.
- Then, go back to your roof tiles blocks and add one roof tiles block on each side of the window, overlapping the top blocks by one block. This will create a border for the soil row.
- Next, take the shingle roof block and add two shingle roof blocks on the bottom of the window, aligned with the window frame.
- Finally, skip the corners and add one shingle roof block on each side of the window, one block up from the bottom. Aim at the block behind the window frame and snap the shingle roof block in place.
- Enshrouded Unlock All Hidden Building Blocks Quist
- Enshrouded: How To Infinite Stone & Dirt Farm?
- Find Enshrouded Oswald Anders Chest Quest Guide
- Best Enshrouded Archer Build S-Tier, Stats, Skill and Gear
- Enshrouded – How To Build A Medieval Mansion?
- Enshrouded Dirt Road Block – Full Guide
Final Touches and Tips
- Finishing Touches: Adjust corners and add shutters for extra charm.
- Architectural Detail: Use the same method for shutters or other architectural features.
Now, with these tricks up your sleeve, your buildings will never be boring rectangles again! Happy building, and thanks for tuning in!