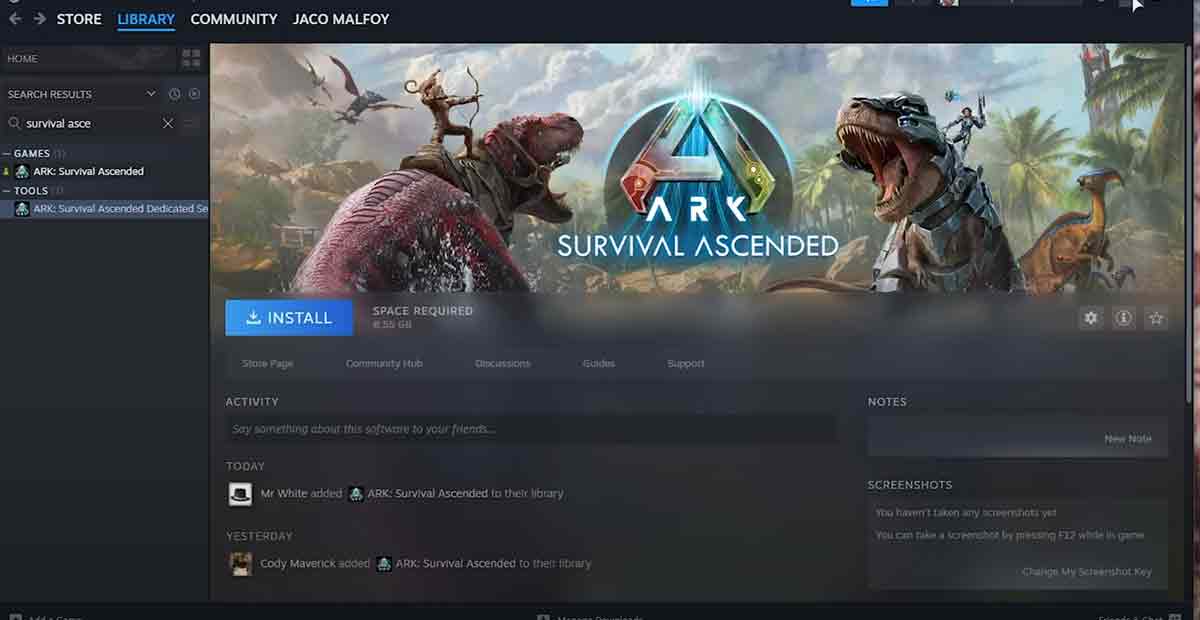
Set Up ARK: Survival Ascended Dedicated Server: We’ll walk you through setting up your own ARK Survival Ascended dedicated server. Recent updates have resolved the controversy surrounding dedicated servers, allowing users to download and host their servers without additional strings attached.
This means you can now truly host your own ARK Survival Ascended dedicated server for free. Let’s dive into the requirements and the step-by-step process to get your server up and running.
ARK: Survival Ascended Dedicated Server Requirements
| Specification | Minimum | Recommended |
|---|---|---|
| CPU | Intel Core i5-2500 or AMD FX-6300 (or comparable) | Intel Core i7-8700K or AMD Ryzen 7 3700X (or comparable) |
| RAM | 16GB DDR4 | 32GB DDR4 |
| Storage | 200GB SSD (with additional space for mods and DLC if needed) | 500GB SSD (with additional space for mods and DLC if needed) |
| Operating System | 64-bit Windows 10 (or Windows Server 2019) | 64-bit Windows 10 (or Windows Server 2019) |
| Internet Connection | 50Mbps upload/download (consider higher bandwidth for more players and mods) | 100Mbps upload/download (consider even higher bandwidth for large player counts and heavy modding) |
Download ARK Survival Ascended Dedicated Server (Steam):
There are two options for downloading the ARK Survival Ascended dedicated server. If you have Steam installed, open it, find ARK Survival Ascended Dedicated Server, and install it.
Alternatively, you can download and host dedicated servers using SteamCMD, Steam’s official software. Detailed instructions for downloading SteamCMD and the commands are provided to set up the dedicated server.
Setting up ARK Survival Ascended Dedicated Server with SteamCMD
For a more streamlined and resource-efficient process in setting up your ARK Survival Ascended Dedicated Server, SteamCMD offers a professional alternative to the Steam client. Follow these steps for a seamless installation:
- Download SteamCMD for Windows:
- Access the SteamCMD download for Windows here.
- Folder Setup:
- Extract the downloaded SteamCMD into a dedicated folder separate from the game files for organizational cleanliness, such as <server dir>\steamcmd.
- Open a Command Prompt in the steamcmd folder. You can do this by clicking the path at the top of Windows Explorer and typing
cmd. Alternatively, use the command prompt/terminal and navigate to <server dir>\steamcmd\ withcd <server dir>\steamcmd\.
- Download Dedicated Server Files:
- Create a folder named “server” at <server dir>\server.
- Execute the following command in the command prompt/terminal:bashCopy code.
steamcmd.exe +force_install_dir ../server/ +login anonymous +app_update 2430930 validate +quit
- Verification:
- After completion, you should find ArkAscendedServer.exe in <server dir>\server\ShooterGame\Binaries\Win64\ArkAscendedServer.exe.
These steps ensure a professional and efficient setup using SteamCMD, minimizing resource usage and eliminating the need for a Steam account.
Setting Up Server Configuration and Launch Files
To create the server configuration and launch files, follow these steps:
- Create a server.bat file by generating a new Text Document, renaming it to server.bat, and removing the .txt extension. Ensure that File Extensions are enabled in Windows Explorer under the View tab if .txt is not visible.
- If you used SteamCMD for the download, place the server.bat file in \server.bat.
- Enter the following content and save the bat file:
@echo off
echo ------------------
echo Updating server
echo ------------------
start SteamCMD\steamcmd.exe +force_install_dir ..\server\ +login anonymous +app_update 2430930 validate +quit

echo ------------------
echo Starting server
echo ------------------
start server\ShooterGame\Binaries\Win64\ArkAscendedServer.exe TheIsland_WP?listen?SessionName=<SERVER_NAME>?ServerAdminPassword=<ADMIN_PASS>?Port=7777?QueryPort=27015?MaxPlayers=32 -NoBattlEye- Remember to replace <SERVER_NAME>, <ADMIN_PASS>, and the MaxPlayers option with your desired values. This customized configuration defines your server.
- If you want to set a password for server access, append ?ServerPassword= to the long text string just before ?ServerAdminPassword. The updated last line should resemble the following:
start server\ShooterGame\Binaries\Win64\ArkAscendedServer.exe TheIsland_WP?listen?SessionName=<SERVER_NAME>?ServerPassword=<password>?ServerAdminPassword=<ADMIN_PASS>?Port=7777?QueryPort=27015?MaxPlayers=32 -NoBattlEyeNote on SteamCMD:
Executing the server.bat file for SteamCMD ensures the server is updated, guaranteeing seamless online functionality with the latest client versions.
Connecting to Your New ASA Server:
To join your freshly set up ASA server, open the in-game console and enter the command:
open 127.0.0.1:7777.Enabling Others to Join Your ASA Server:
Facilitating friends’ access to the internet involves two essential steps. Both sections must be completed to allow external players to participate.
