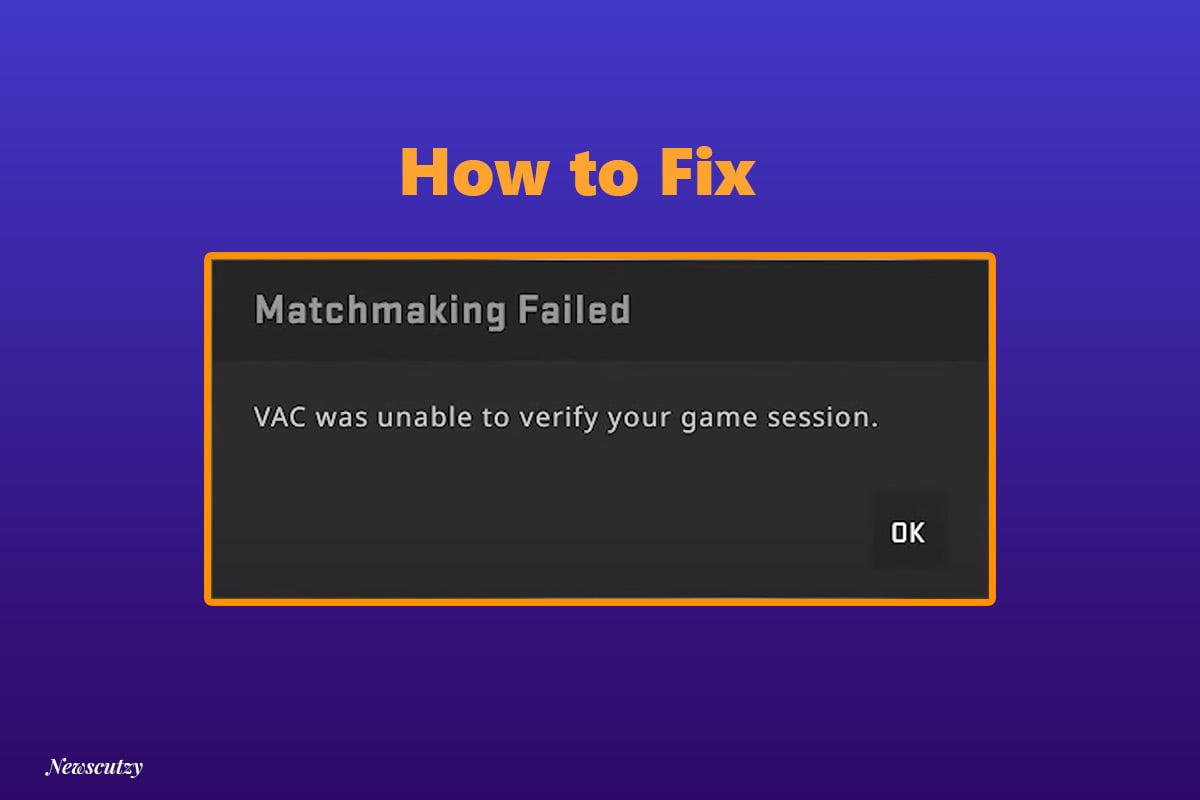
VAC WAS UNABLE TO VERIFY YOUR GAME SESSION CSGO ISSUE TROUBLESHOOT: As of late, a lot of people experienced the error “vac was unable to verify your game session CSGO” while at the same time attempting to open a favorite game, Counter-Strike: Global Offensive. At the point when VAC runs this check, it searches for any files uploaded by the game that do not have a digital signature and blocks them.
In healthy and normal accounts, this error may show up because of the wrong system settings. Doubtlessly, the application either can’t get to the necessary libraries and files, or the Internet connection was reset or hindered by the system. Presently let us break down the potential reasons for this error, and how it very well may be fixed.
Presently, this is quite possibly the most irritating thing that could end up with people. what’s more, it’s truly baffling that this comes up.
So today I’m going to try to help some of you all out. I’m going to give you folks a few ideas and some investigating tips that may assist you with fixing this “Vac Was Unable to verify Your Game Session CSGO” issue.
What is the meaning of this (vac was unable to verify your game session) error?
This issue is brought about by third-party software interfering meddling with your Steam or Game. To determine the issue, you’ll need to stop or disable the problem program from your System.
Cause behind the Valve Anti-Cheat System (VAC) authentication error
There can be various reasons, one of which is system file corruption. damaged system file appearance can be a genuine danger to the prosperity of our PC. System file issues can happen from various perspectives. Deficient uninstall or installation, hardware, or inappropriate removal of programs.
- Buggy configuration files.
- VAC neglects to confirm the gaming meeting.
- Recognized as errors in installation documents.
- Bogus positive because of which you may experience Unable to verify the game meeting.
It can likewise be caused if your PC is recuperated from a spyware /adware or virus attack or by an inappropriate shutdown of the PC. All the above exercises may bring about the corruption or deletion of the appearance in the Windows system files. This damaged system file will prompt the missing and improperly linked data and files needed for the appropriate working of the application.
Prevent conflicting background apps/services?
There are various normal program conflicts that can cause this “Vac was unable to verify your game session” error. In the event that you are running any of the software below, if it’s not too much trouble, disable it. Go to your task manager and stop all the files that you think might hinder with the steam services app while playing:
- Powershell
- CCleaner
- IObit Start Menu 8
- Sandboxie
- Cheat Engine
- Steam Idlers
- Process Hacker
- Hypervisors
- DLL Injectors
To determine VAC is unable to verify the game session if you have taken a stab at uninstalling and reinstalling the game however it didn’t work. It is important to comprehend that doing so stacks the old game files hence, the issue won’t be fixed. Along these lines, to resolve the issue we recommend you to try the accompanying best fixes as this will remove VAC’s inability to verify the game session error. also,check this information in details from Steam Support page.
NOTE: If you’re using scripts or cheats then I believe that this will not solve your problem.
[20 Method] How To FIX Vac Was Unable to Verify Your Game Session
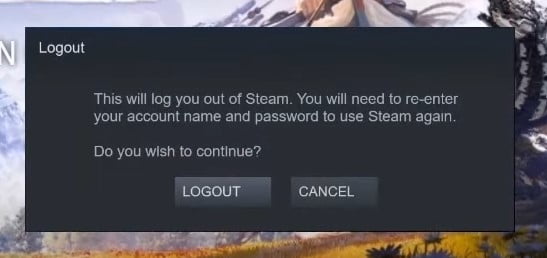
Solution 1, Logout and Relogin on Steam
Most chances it will fix your problem.Because it is the most popular method for the problem as per users feedback.
1st, You need to Click on Steam at the top-left corner of the window.
2nd, Next click on Change User option. Another window will appear asking you if you wish to continue.
3rd, Click on LOGOUT option. You will be signed out of your Steam account.
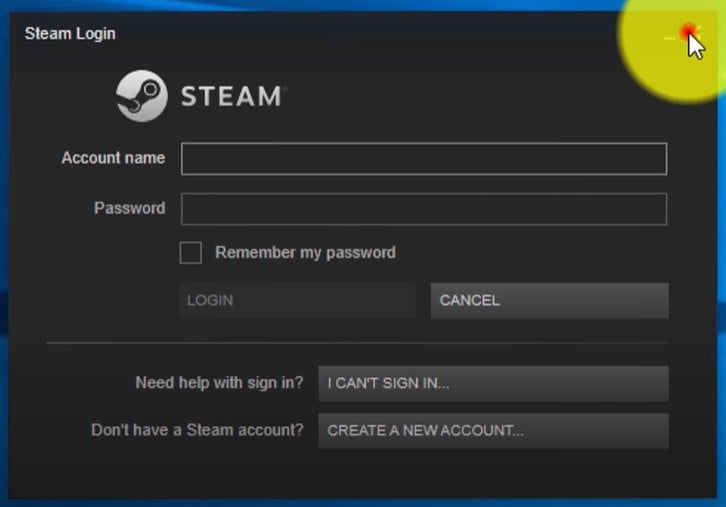
4th, Next a menu should pop up right in the middle of the screen and if not just reopen steam and this will pop up requesting for you to login.To log back into your account. you will need to enter your account name and password again.
Solution 2, Verify the integrity Game files
1st, You have to quit CSGO.
2nd, Then open the Steam.
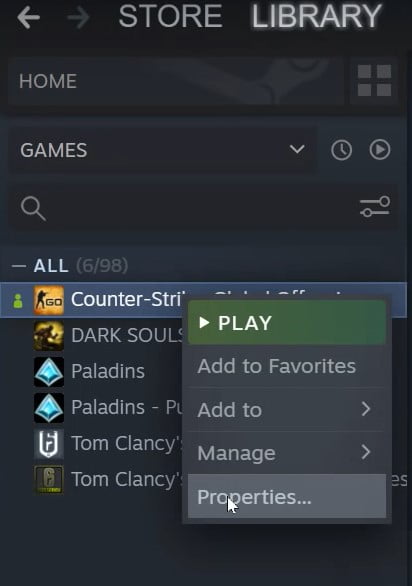
3rd, Right-click on CSGO.
4th, Next select the Properties option.
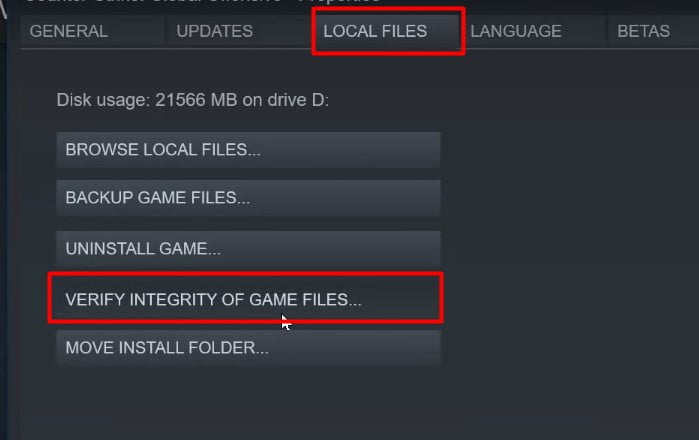
5th, After you go to properties, go to the Local files tab.
6th, And then Select “Verify integrity of Game files” option.It will open a dialogue-box.
Now this will take some time. but what will happen is, once it completes. you may find that there are some files missing or corrupted. then when you click the OK option.
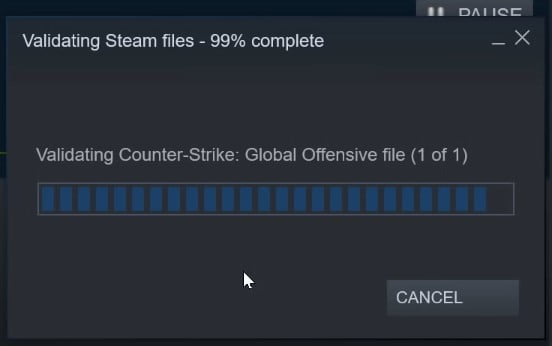
It will automatically start downloading those files. As you can see in my download area (See the Picture). there have been some new files that have been downloaded. now just quit Steam and then try to relaunch the game. Now if this doesn’t work for you, then you can try the next step.
Solution 3, Run SFC Scan
It will fix the hard drive issues that happen on operating systems. A hard drive is a vital piece of the computing system. You may have extremely important information in it. Furthermore, I can’t stand to lose it.
So we will perceive how to scan and fix the disk errors. Also, consistently do the disk health check to stay away from any hard drive failure. Fundamentally, these issues (Such as Vac Was Unable to verify Your Game Session) we are discussing are like the hard drive isn’t reacting as expected. Or then again, giving a few or more problems when you are trying to get to it.
1st, So open the elevated command prompt. you can do that by going into the Start menu and type CMD.
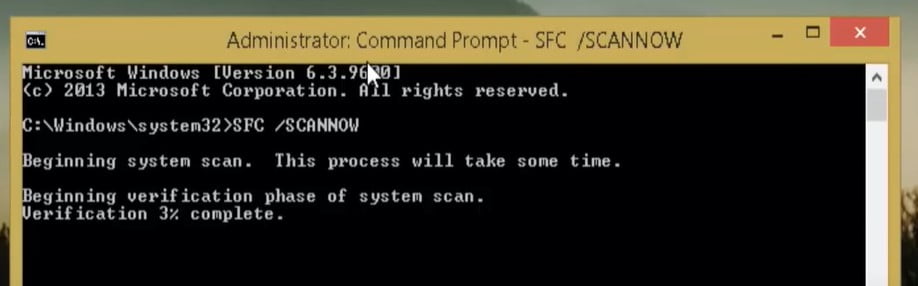
2nd, Right click on it and click on a Run as administrator. now type this simple command:
SFC /ScannowAnd Press Enter.
It will require some time, perhaps an hour to finish the scan depending upon the size of the hard drive and the quantity of files accessible on it. Try not to close the window before it finishes 100%.
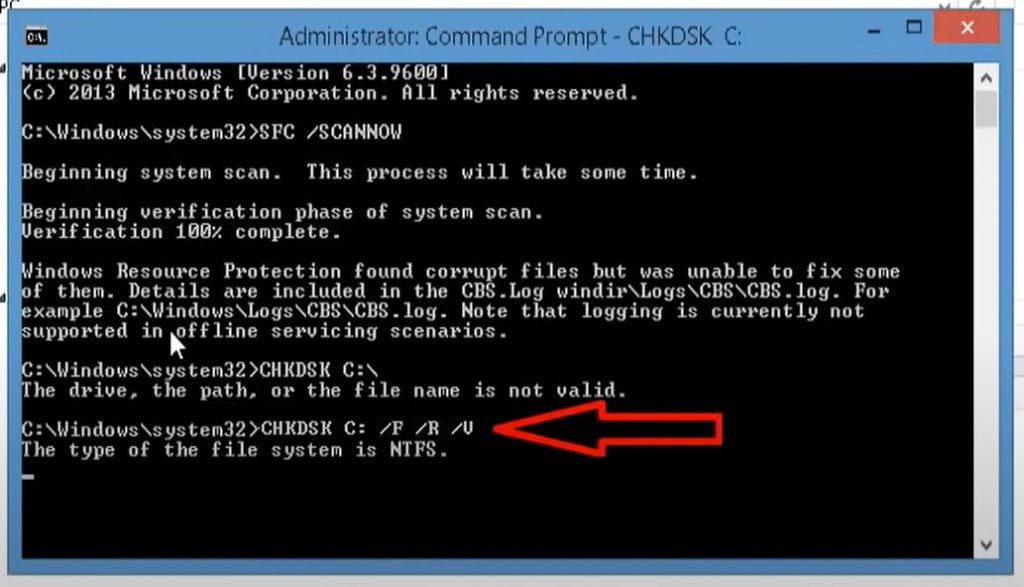
3rd, Let’s first check it out for C Drive:
Type the simple command chkdsk space C colon[:] space for /f space for /r space four slash V.
CHKDSK C: /F /R /VAnd Press Enter.
NOTE: C: – for selected drive.
4th, After its completed.You need to Reboot your system.
SFC scan now is used to scan and check if you have any missing corrupted or modified Windows system files and if it finds anything like that it attempts to repair them by replacing with a clean copy from backup component store. I hope it will fix your vac was unable to verify your game session CSGO issue.
Read More: KMODE EXCEPTION NOT HANDLED Windows 10 / 8.1 / 8 | How to Fix?
Solution 4,Completely Close and Relaunch Steam
1st, Now click on Steam.and select the Exit option.
2nd, Now open your windows Start menu and type task manager. open your Task manager from the search result.
3rd, If it’s not open in detail. click on More details.
4th, Find the Steam client bootstrapper service or any running steam related program. Now right-click on it and select the End task.
5th, Now close your Task Manager. now reopen your Steam.
6th, Next Go to your library and launch your game.Click on Yes to continue.
Sometimes this will refresh everything and make the alert go away itself.Now your vac was unable to verify your game session problem should be fixed.
Solution 5, Change The Steam Account Name
If the above method doesn’t work for you. what you can do secondly is that you need to change your steam account name.
1st, So for that you just go to Steam.
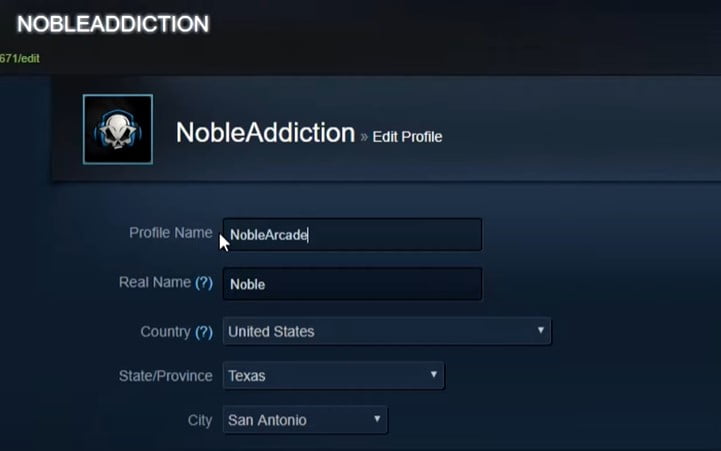
2nd, And then click on the Profile option. and then go to the Edit profile option. and there you just change your profile name to whatever you want.
3rd, After that,You need to scroll down to bottom.You can see the button called “Save Changes”. Next close CS:GO and Steam program.
4th, Then relaunch Steam. and then open up csgo again.
See if that fixes the vac was unable to verify your game session problem. if it does you can change your profile name back to what it was before. and if it doesn’t then do not change your profile name back.
Read More: “This Site Can’t Be Reached or err_connection_reset” Error? [100% Fix]
Solution 6, Run Steam App as an administrator
If the alert still keeps popping up. Return into steam and recheck your game files. You need to try reopening csgo again, and if that still doesn’t work. The following method I can give you folks is to:
1st, Again go back to Steam. Right-click on CSGO.
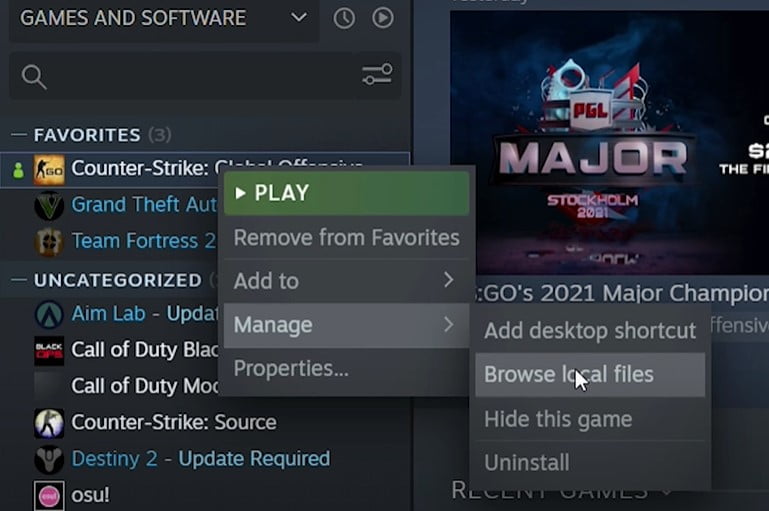
2nd, Hover your mouse pointer over the Manage option. and then Select to where it says Browse local files.
Now what this is going to do is, it’s going to open up the System window where CSGO is actually located on your computer.
As you guys can see the above picture csgo application. this is the application for it right here.
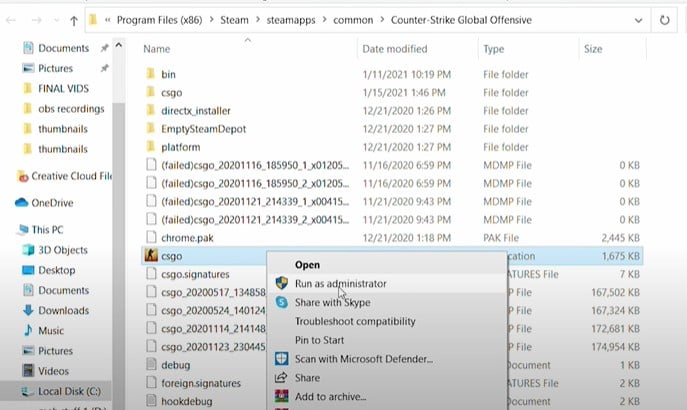
3rd, What you need to do is, go ahead and right-click on it and Select Run as administrator. once you click Run as administrator. it’s going to pop up an alert on your screen asking you to verify that you want to do this go ahead and select Yes.
Then it’s going to boot up CS:GO as an administrator.I don’t know why but for whatever reason this has personally fixed my game in the past.
Read More: Best Way to Transfer Hard Drive to a New Computer Without Reinstalling Windows 10
Solution 7, Replace the Steamservice.dll file
You need to open two steam directories.Make sure your steam program is closed completely from background.
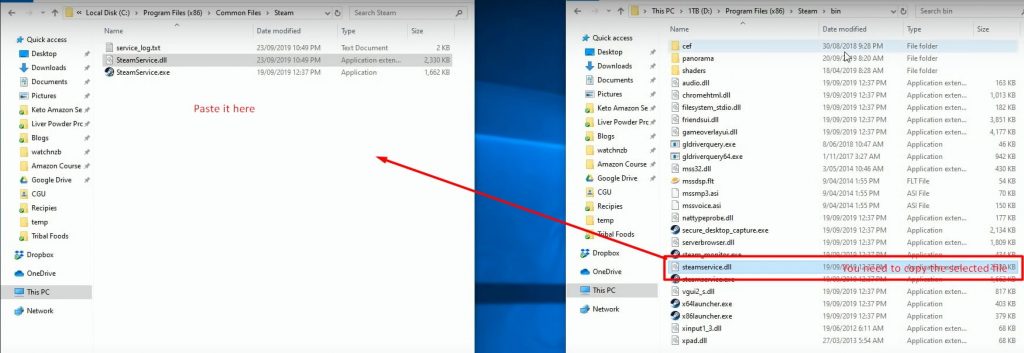
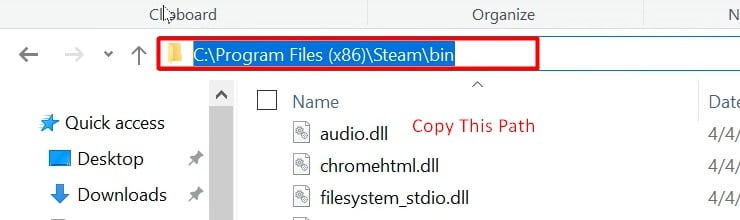
1st, Go to your Steam directory. We’ve got steam installed. go to bin and here you need to find the steamservice.dll file.
The Path: C:\Program Files (x86)\Steam\bin.
2nd, Here you need to copy the steamservice.dll.
3rd, Next You need to find and open the other folder.
The Path: C:\Program Files (x86)\Common Files\Steam.
4th, Then you need to replace the copied file here.Click on Continue to successfully replace.
5th, Next open the Steam program.Check if the vac was unable to verify your game session error pop-up is gone or not.
Read More: “Cannot verify server identity” | How to Stop iPhone Saying?
Solution 8, Repair the Steam client
1st, You need to go to the Steam Folder directory. Go to the bin folder.
2nd, Now copy the file path of your steam’s directory and paste it on the notepad. as you can see here.
3rd, Go to the windows search box.Type run and open the Run app.

4th, Most Important: Copy the file path from notepad and paste it in the Run box.And Now add more things: Slash[/] steamservice.exe file [space] backslash[/] [Repair].
The Path Should looks like this:
C:\Program Files (x86)\Steam\bin\steamservice.exe /Repair
5th, And Press Enter.
Solution 9, Remove and Allow Steam from Firewall And Antivirus
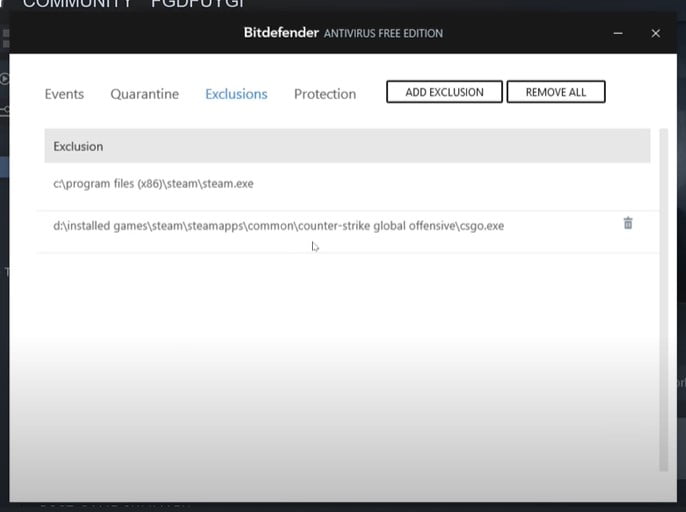
1st, So first I would recommend that you turn off your antivirus system or you put steam and csgo on its exception list.
2nd, As well as go to Windows settings.

3rd, Then search and open Firewall and network protection.
4th, and then click on “Allow an app through firewall”.
Note: Make Sure you have CSGO and Steam checked in this list.

5th, Next, click on Change settings. and then Click on allow another app.
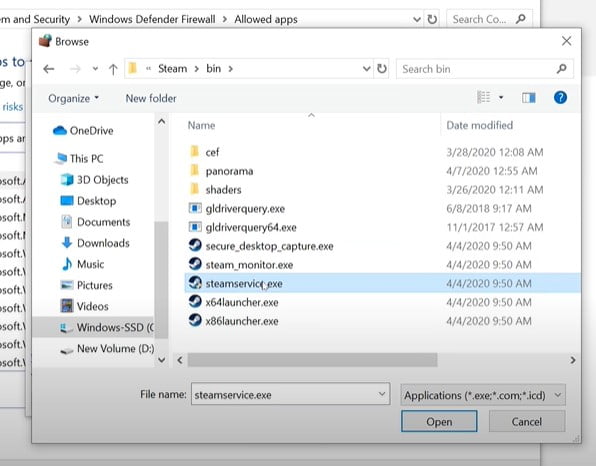
6th, Then Browse to your steams installation folder. then go to the Bin folder and then select steamservice.exe and then click Add.
Solution 10, Clear Steam Download Cache
1st, You go to Steam. click on Settings. and then go to Downloads. and then clear the download cache. now try relaunching steam back and see if it fixes the problem.
ALso try with this,
Go to program files (x86) -> Steam -> Delete Folder appcache And play CSGO Again.
Solution 11, Check Steam Client Service Is Running
If these simple methods don’t work, and you still see the same error, let’s move on to more complicated things.
1st, Close Counter-Strike, but leave the Steam window open (minimize the steam program).
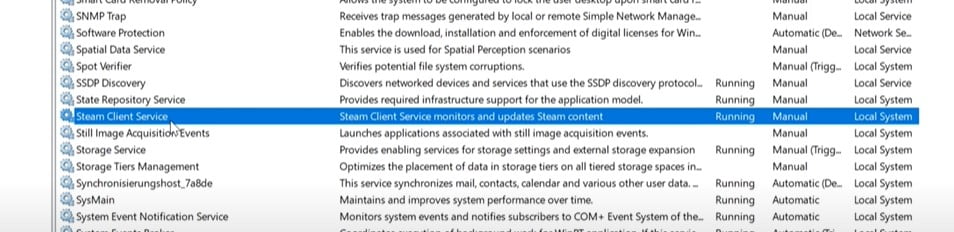
2nd, Go to windows search box. Type and search Services.
2nd, Open the Services window to check if Steam Client Service is running. If it isn’t, start it, or reboot the computer. In fact, it should start automatically when you launch the client.
3rd, Restart the computer, launch Steam as Administrator and check if the game runs properly without poping-up the vac was unable to verify your game session CSGO issue.
Solution 11, Update the Game and Network Driver
If you don’t update the graphics with the latest version, your applications or games may not run efficiently. Also, additionally, you may experience a blue screen error! So in this segment, you will discover how to update any driver and graphics card on Windows 10 effortlessly.
Presently there are three different ways of doing this (Mentioned Two):
- Windows Update.
- Auto-detection.
- Downloading the drivers yourself.
1) Alright, Now let us begin via Windows Update:
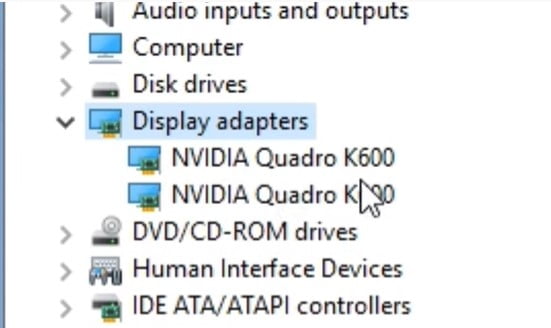
1st, You need to click on the “Start” button and next type the word ‘device manager’ in the search box. Next, you have to select ‘Device Manager’ from the search results.
2nd, Once you open the device manager, you need to find where it says ‘Display adapters.’ double-click on it. A dialogue box will open. now you should notice the name of your graphics card. Furthermore, as a side note, presently you know which graphics card you have. So this also permits you to know which graphics card you have on your System.
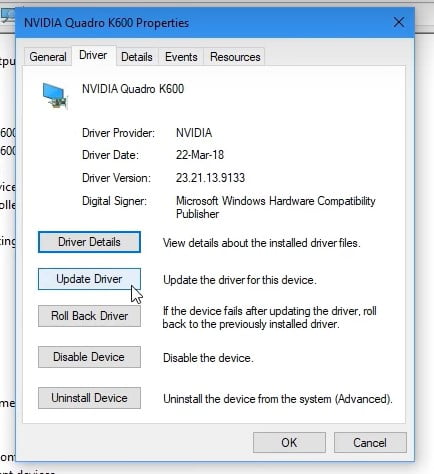
3rd, Next, now double-click on your graphics card and now you need to click on the ‘Driver’ tab and now just click on the “Update driver” option.
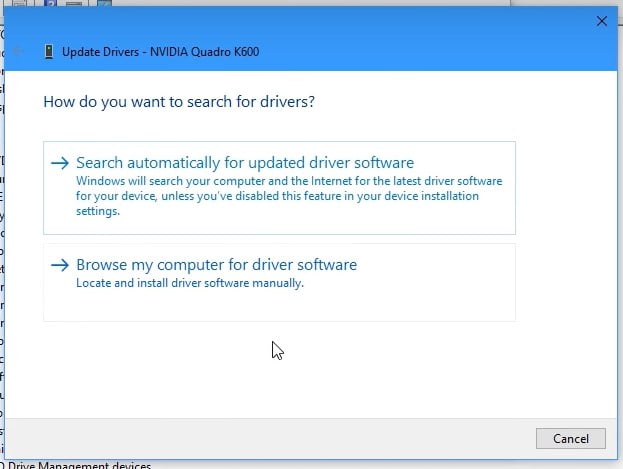
Presently you should see two choices:
- You can search automatically for updated driver software
- You can browse your computer for driver software.
I will select the first option. Presently Windows will search and download graphics card drivers for your PC if it discovers them and Most probably it will fix the Vac Was Unable to verify Your Game Session alert issue.
Currently, if it couldn’t find anything, you may see this message, where it shows you, “The best drivers for your device are already installed.”
However, in some cases that is not the case. The most recent version of drivers is available on the web. But it’s only that there are a few issues, and Windows couldn’t find them.
2) Auto-detection
The following method is auto-detect. It bodes well! Why not let the manufacturing company that makes your graphics card verify whether you have the most recent version of the drivers or not? Also, joyfully the significant manufacturers do this very well.
I have included some official links to these checking graphics card tools. These scanning tools will examine your System and afterward download the most recent version of the drivers for you.
Update Graphics Card via Geforce experience
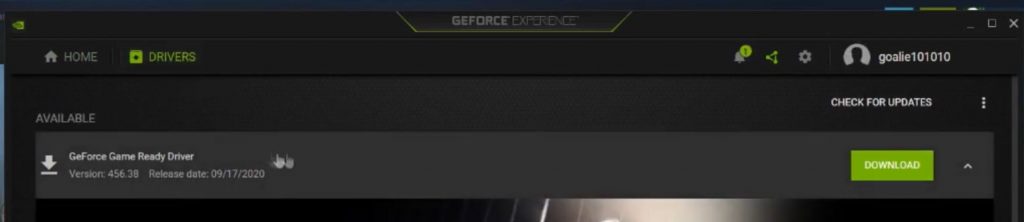
Another option is going to GeForce experience. if you have that for your computer. if not then obviously this step doesn’t apply. but to update your game drivers, so just go to the Drivers option and you see there’s a GeForce game-ready driver. The release date is the 17th one’s available. and they update it all the time. so you always want to make sure you have the latest one.
Solution 12, Try With a New Account
Another thing I can suggest is more of a test to see possibly if something in your account is causing your game to bug. Sometimes people will have multiple steam accounts. especially because each steam account that you create is free to make.
I would go ahead and make a brand new steam account. and try booting up and playing CSGO with that account. as you guys know csgo is a free-to-play game. so you guys will have no problem creating a new steam account.
Booting up CS:GO with it. try booting up CSGO with that new steam account. and see if the alert still pops up. if it doesn’t pop up. then that means there’s a problem within your account.
Solution 13, Uninstall Steam and Reinstall
Next best thing I can suggest is to go ahead and uninstall csgo.
1st, You can do this by simply going back up to CS:GO. right-clicking on it. hovering over manage. and then clicking uninstall right here. this will completely remove CSGO from your hard drive.
2nd, Once the process is done I would go ahead and restart your computer again. and then go ahead and reinstall it. I know this has fixed people’s problems before. so hopefully by this point, your “Vac Was Unable to verify Your Game Session” problem will be solved.
Also, I can suggest that what I know has worked for people too is completely uninstalling CSGO and then uninstalling Steam. Now, this can be a bit annoying of a process. and it can take some time but uninstall both programs. Restart your computer. and then go back online, reinstall steam and then once Steam is installed, reinstall CSGO.
Solution 14, GO Offline and Back to Online
This one only works on VAC was unable to verify game sessions but I don’t know if it works on the other ones. So this trick will fix this Vac Was Unable to verify Your Game Session error,
1st, While your steam is online and logged in already. You exit it once.
2nd, Open Steam again.
3rd, On the top left corner of the steam you see the “Steam” option. if you see it already, click on it and click the word that says “Go Offline…”.
4th, After that it opens your steam offline.And click Steam again on the top-left corner and click “Go Online ”
5th, When you’re done clicking on it. Sign in your account back and play your CSGO or Any game and you’re done.
Solution 15, Delete Temporary files
In this section I’ll show how to completely delete all temporary files in Windows. For this segment I’ll utilize Windows 10 obviously you can likewise follow a similar strategy for different versions of Windows be it windows 7 8 or 8.1. Presently deleting temporary files not just gives you more disk space to work with but also helps with speed up your windows. also, make your applications run faster.
So first I am going to run simple commands to review temporary files in different locations on our windows. To do that:
1st, You need to go to your search and type Run. then click on the run up from the search results.
2nd,On the Run search box type [%] sign [temp] [%] sign as shown on the picture.and hit enter.
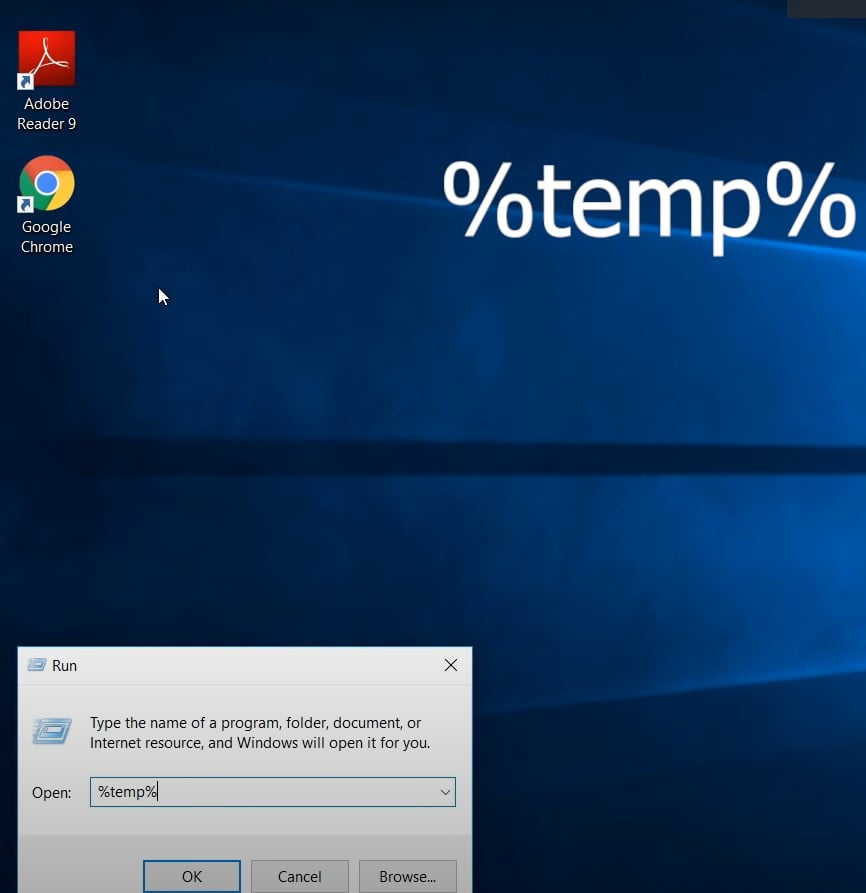
This will show the temporary files from your applications.
3rd, So here select all files in this folder and then right-click and select Delete to remove these files.
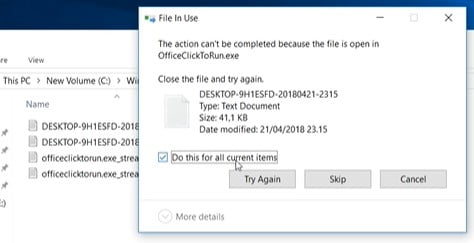
Now if you get some notification saying that certain files cannot be deleted. or do you want to try again. just skip them and continue with the process.
Solution 17, Wrong PC time
Here and there the accident happens because the time on the PC isn’t shown accurately. For this situation, you need to change the clock in Windows, or stunningly better – empower auto-synchronization of time on one of the servers. From that point forward, you need to restart Steam and attempt to sign into CS:GO once more.It can fix your “Vac Was Unable to verify Your Game Session” issue.
Solution 18, Update Windows
This whenever you complain about it being slow or a key not working or at being glitchy. The first thing they say is make sure your updates are through.
1st, your search bar type in updates. make sense huh. Okay it the person that pops up checks for update system settings. and that’s what we want. Hit Enter.
2nd, So it will show your Windows Update screen. that’s showing you all the available updates.
Sometimes it won’t show this. sometimes it’ll try to trick you. it’ll say no updates are available or you’re all updated. or something to the effect of you don’t need to update this.
3rd, But there’ll be a button saying check for updates. always click that button because that will manually check for updates.
Solution 19, Manually Install DirectX and Visual Studio c++
Now one more thing that you can do is, manually download directX, microsoft.net framework 4.5 and microsoft visuals the c++ ones from the internet. this might be a DirectX problem. so see if after manually downloading all of this. and then relaunching steam will work out this problem or not.
Solution 20, Contact To the Steam Support Team
I hope that these solutions helped you guys. but if it didn’t then what I suggest is checking out that steams official guide to solving this problem. and then contacting the steam support regarding this problem that you’re facing.
So at first they might redirect you to their official support page. actually now that I think about it. I am sure that they will redirect you to their official support page. but after that they will ask you to send them your msinfo32 report.
And once they receive that report. they will tell you all the programs that you have which are interfering with steam and this “Vac Was Unable to verify Your Game Session” issue.
Conclusion
All in all, you may get concerned about this error if you see it unexpectedly, yet you shouldn’t stress. Following this guide ought to and ideally has settled your “Vac Was Unable to verify Your Game Session” issues, but in case you’re actually encountering this (Vac Was Unable to verify Your Game Session) issue, don’t hesitate to try to get into contact with me through the comment section underneath. What’s more, I’ll try to help you all out however much I can so. Much thanks to you all for such a huge amount for perusing this post. ensure you all share this post.