Fix Modern Setup Host High Disk issue On Windows 11 or Windows 10: In case you’re like a huge number of other people, you’ve presumably upgraded to Windows 10 recently. Furthermore, if so, you’re most likely experiencing a Modern Setup Host High Disk Usage error.
I’m going to give you the best tips that I use consistently to attempt to determine this issue. I don’t know why Microsoft will not resolve it themselves, but hopefully, a portion of these tips will help you solve it on your system.
The most conceivable reason why your PC is slowing or lagging down can be because the Modern Setup Host is generating 100% Disk Usage problems on your Windows 11/Windows 10.
In any case, don’t stress. We have sorted out certain methods to fix the issue. Read on to expertise.
Since it is a significant cycle to upgrade Windows 10, you need to run it for quite a while. As you know already, it might take up to hours, contingent upon your system performance. The cycle ought not to be running frequently. It possibly does when there is a significant update available. Also, that happens in a regular few months.
Effect of SetupHost.exe
So, once you are tackling a job and the Modern Setup Host is working in Windows 10 background, it sources high CPU utilization, which can be pretty much as high as 100%. At this time, it is hindering your PC, and you are stuck with a high disk utilization issue.
Much of the time, the update cycle will be gone naturally after finishing its work. However, for a significant Upgrade on your PC, it might require 20-30 minutes to finish the installation cycle. Once in a while, it requires around a few hours.
If I Delete The Modern Setup Host?
Nonetheless, you can’t stop the cycle as it is quite possibly the most vital Windows elements to install significant Windows10 updates. But, If you figure out some way to stop it, we would prescribe not to do it since it might totally break the Windows 10 update cycle.
Why is the Modern Setup Host important?
The Modern Setup Host is a hardware resources app that is a self-extracting installer and archive. You will possibly locate modern setup hosts in Windows 10 PC.
The issue shows up to Modern Setup Host, which is keeping the hard drive and CPU occupied when you do not perform any action on the system.
At the point when your operating system installs a Windows 10 update, the modern setup host runs naturally. Modern Setup Host is a Windows application that encourages the PC to recognize and update the Windows. This setup app gives the PC trouble to run as it makes two kinds of issues while running.
The first one is Modern Setup Host creating the 100% Disk Usage, and the second one is Modern Setup Host crashing or not responding.
In the two cases, the PC will slow down as well as produce a ton of heat. There are a few different ways you can resolve the issue identified with the Modern Setup Host. In this post, We explained a few of them.
How To Fix Modern Setup Host High Disk Error On Windows 11 Or Windows 10
If you update your system from Windows 10 to Windows 11, I recommend you check how to fix 100% Disk Usage in Windows 11 | RAM/Memory issue. It will really help you fix the Modern Setup Host issue on Windows 11 or Windows 10.
Solution #1: RUN the Disk. Check
Run the check disk from command prompt:
1st, You have to type “command prompt” on the search bar.
2nd, Next right-click on the command prompt app and then click on the “Run as administrator”. If a client access control pop-up shows up asking whether you’re certain you need to dispatch the command prompt, select yes.
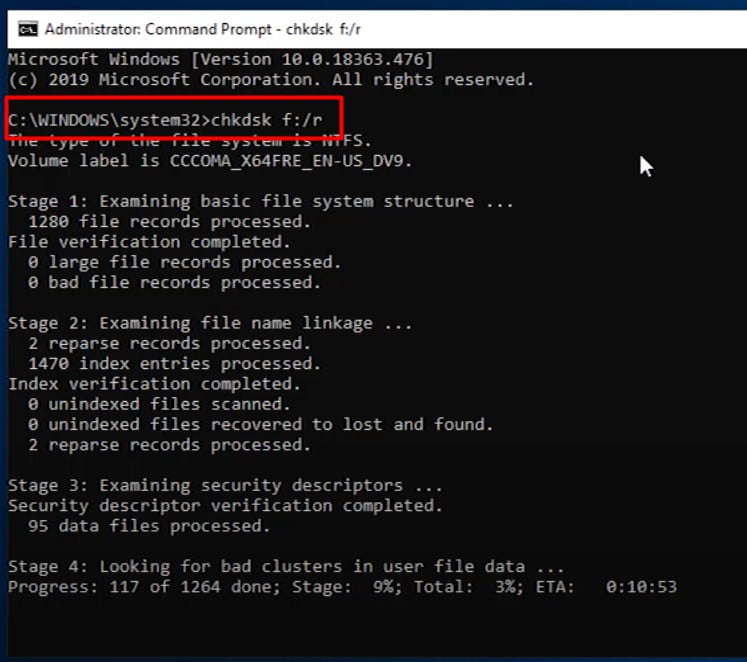
3rd, Type “chkdsk X” where X is the drive letter you want to scan. Followed by the parameters you want a check disk to perform the scan with. and then press Enter.
For Example:
chkdsk C:/r
Type of parameters you are able to add:
/r – this means that the check disk finds terrible sectors on the drive and attempts to recover all readable data from them.
/f – this means that the check disk can resolve any errors that it finds.
/x -this means that the check disk powerfully dismounts the chosen drive before scanning it.
Solution #2, Clear Windows Update Cache
I’m demonstrating how to clear the Windows update cache in Windows 10. windows consequently will cache all Windows update installation elements when you download and install them onto your PC in Windows 10. as I’m certain a large number of you know.
It’s an automated cycle with very restricted user control. One sure angle about caches is that Windows can reapply updates without downloading files again from their own servers and taking additional time bandwidth and simply generally dissatisfaction.
it will be much simpler to update files. If there is a cache previously stored on the PC. However, over a long time passes again the cache gets bigger and bigger. it’ll simply take out more hard drive space. so in this post, I will tell you the best way to clear the updated cache. while this should be possible utilizing the disk cleanup utility.
it’s not as intensive as certain people might want. what’s more, it doesn’t do a total 100% cleaning position. so we will do the most ideal technique to clean off as much of it as possible.
So what we’re going to do is:
1st, Head over to the Start button.
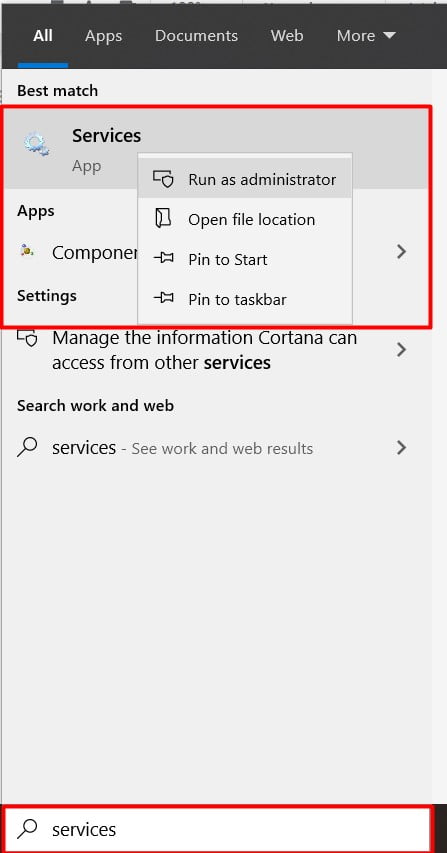
2nd, and afterwards, we will type the word services. we will right-click on the services app. and afterwards, we will left-click on “Run as administrator”.
Once the Service window opens. we need to go down to the Windows Update option. so we will simply look down. Right, so once you arrive at Windows Update.
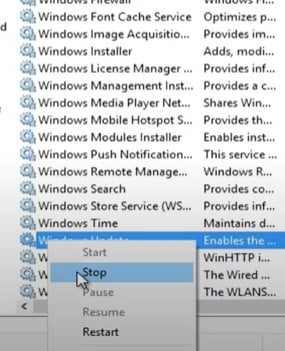
3rd, you need to right-tap on it. also, select stop. Alright, so we can see the Windows Update servers have stopped. well, that is finished.
4th, we need to head back over to our Start button. on a right-click on it. At that point, we need to left-tap on the Run.
5th, Presently we need to type in the Run box:
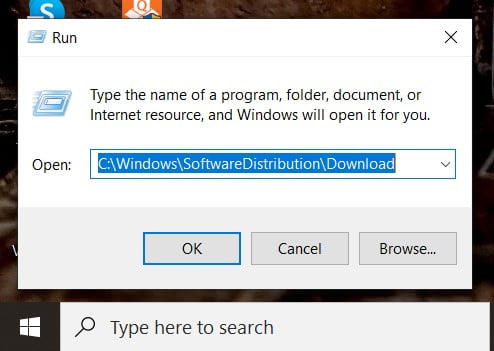
C:\Windows\SoftwareDistribution\Download
and afterwards, you need to click on Enter. once you appear in the software distribution folder. Double-tap on the download folder.
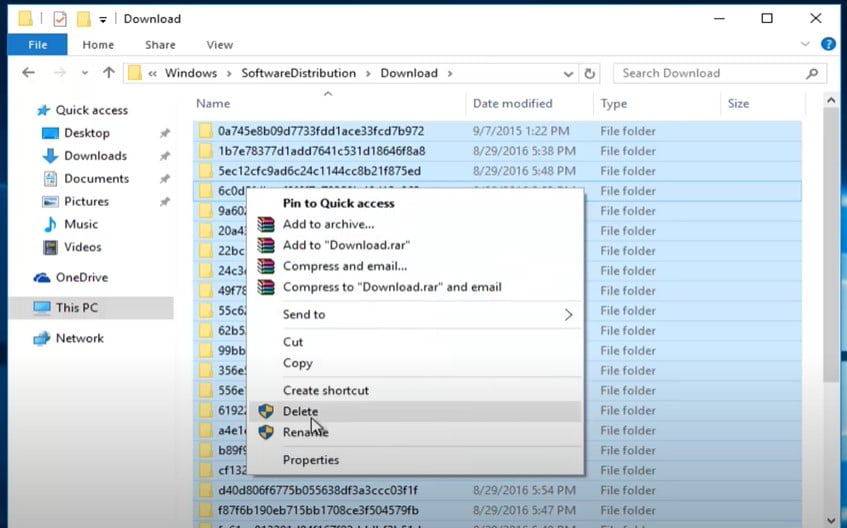
6th, presently how you need to manage the keyboard is to hold down the ctrl + A key to mark the entirety of the file in this list.
7th, and then you need to right-click and select the Delete option.
What’s more, you can see how much space is being cleared as we erase the cache. At the present time, it’s already almost 400 megabytes.
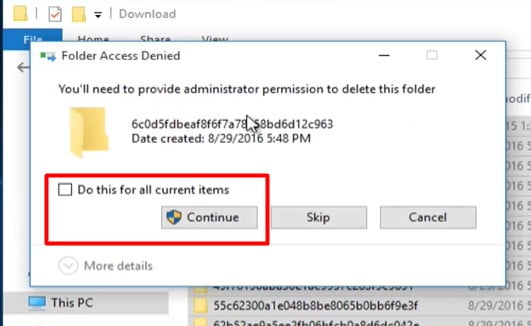
You probably won’t get some folder access. Simply check the mark in this bond saying “Do this for all current items”. And afterwards left-click on the Continued button.
you must have administrative privileges to do this.
if it says you could not find the item. simply click on this little checkbox “Do this for all current items” and afterwards left-click on “Skip”.
Presently we see that our folder is unfilled. So this basically clears most with the exception of. For Undeletable documents in there, it’s most likely still being actively utilized on the PC. Simply don’t stress over it.
Generally, the cache has been cleared. Check whether the modern setup host high disk usage problem is fixed or not. Also, you can how to clean up the disk.
Solution #3, Performing a Clean Boot
It is very easy to do:
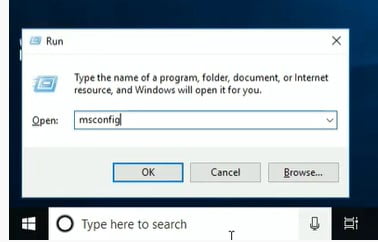
1st, So look for the Run option. Press Enter. what’s more, here type the word:
2nd, MSConfig and press Enter. A pop-up window will open.
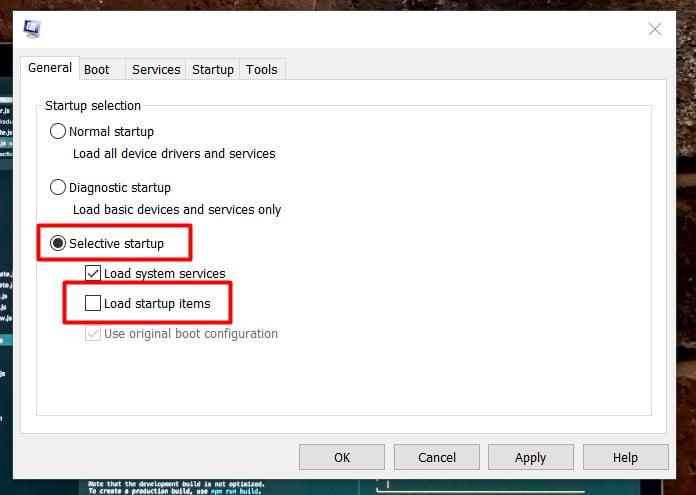
3rd, And here by default, “Normal startup” is selected. But you need to select the “Selective startup” here.
4th, And the option says “Load startup items”. You have to Uncheck this box.
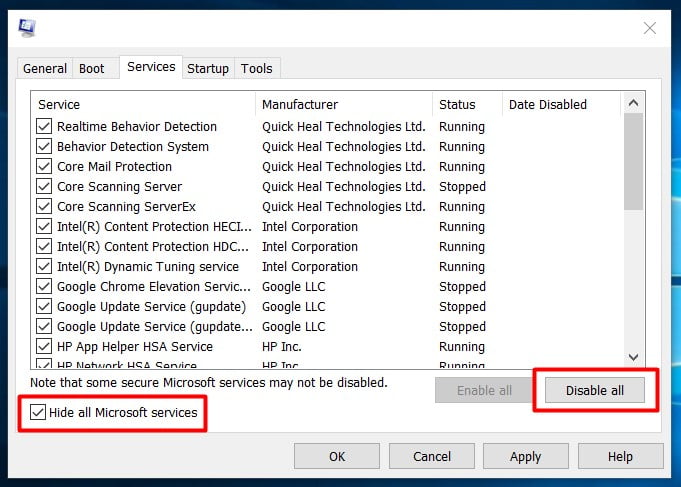
5th, Now click on the “Services” tab and here you can see the “Hide all Microsoft services” option. Just select the box. once you have hidden all the Microsoft services. Click on the “Disable all” button.
6th, You have successfully disabled all the additional services.
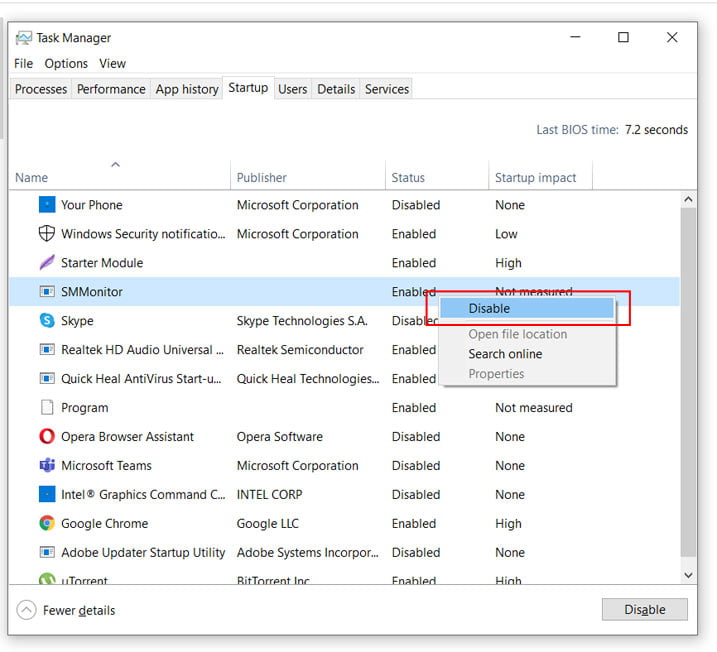
7th, Now just go to the Startup tab. and here you have to click on the Open Task Manager link. Well, here the status of my application is disabled. You do the same and disable all the things here by right-clicking on them. Click on Disable.
So what you have to do is, close it. apply these settings. and click on OK. so it will request you to restart to apply the settings. you need to restart your system. also, your system will be clean-booted.
Yet, one thing you need to remember is, whenever you have cleaned the boot in your Computer. also, you are fulfilled and getting palatable outcomes, then you again need to undo all these. Now try again if the modern setup host high disk usage problem is gone.
- Fix “Connection Registration Did Not Arrive In Time” Error In New World
- The 7 Best PC Games for 2022
- Phone Is Slowing Down? How To Solve? 💎
- Best 5g Architecture Explanation for The Future in 2022
- [Fixed] Vac Was Unable to verify Your Game Session CS:GO
Solution #4, Perform a DISM Scan
In this Windows 10 adviser, I’ll walk you through the guide to utilize the command-line DISM to assist you with getting your operating system back to a good state and resolving the Modern Setup Host error.
Instructions to RUN DISM COMMANDS TO FIX Modern Setup Host
There are three fundamental options you can use with DISM to fix the Windows image on your PC, including CheckHealth, ScanHealth, and RestoreHealth – and you need to utilize them in a specific order.
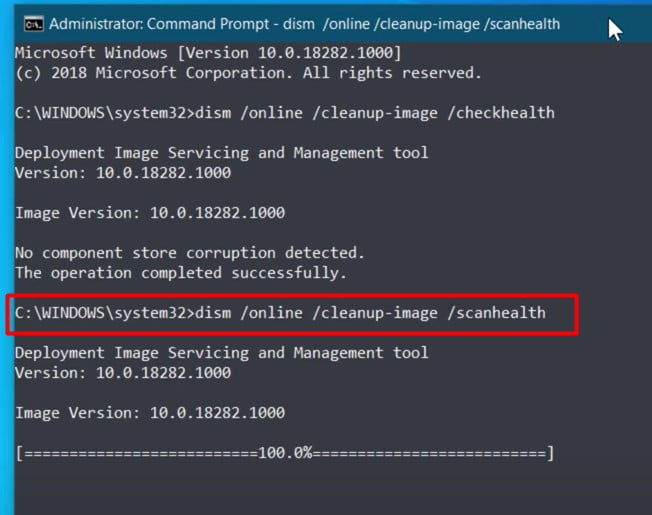
1) Using DISM with the CheckHealth Command
Utilize the DISM command with the/CheckHealth change to confirm whether any defilement has been recognized. This order must be utilized to check whether any bug exists, however, it doesn’t play out any repairs.
To check, Run the following command:
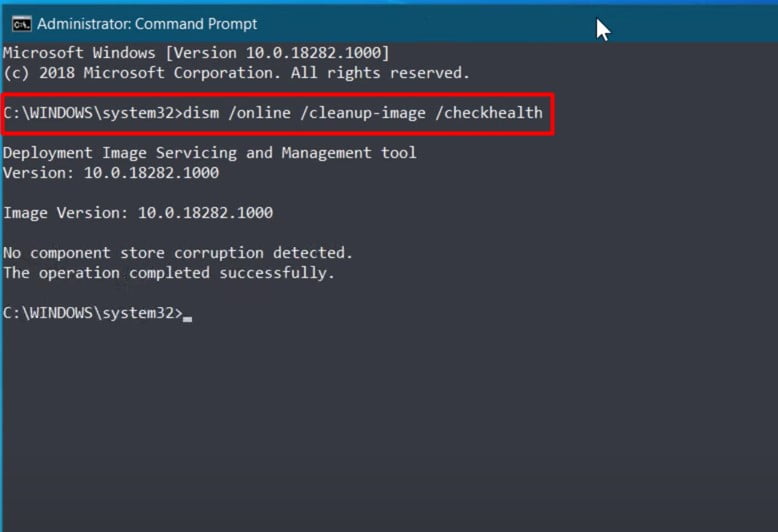
1st, Run the Command Prompt as an Administrator.
2nd, Type or copy the following command:
DISM /Online /Cleanup-Image /checkHealth
2) Using DISM with the ScanHealth Command
Utilize the DISM command with the/ScanHealth change to scan the Windows image for any bug. In contrast to the/CheckHealth, the/ScanHealth switch can require as long as 10 minutes to finish the cycle.
To check, Run the following command:
1st, Run the Command Prompt as an Administrator
2nd, Type or copy the following command:
DISM /Online /Cleanup-Image /scanHealth
3) Using DISM with the RestoreHealth Command
Utilize the DISM command with the/restorehealth change to check the Windows image for any bug and to play out a repair consequently. In contrast to the/ScanHealth switch, the/restorehealth switch can require as long as 20 minutes to finish the interaction.
To check, Run the following command:
1st, Run The Command Prompt as an Administrator
2nd, Type or copy the following command:
DISM /Online /Cleanup-Image /restoreHealth
REMEMBER: While running DISM utilizing the/ScanHealth or/RestoreHealth, you will see the interaction will appear to be stuck at 20% or 40%, however, it’s regular conduct. After a couple of moments, the activity will complete as expected.
At the point when you run the command referenced above, DISM will attempt to utilize Windows Update to replace the buggy files.
OTHER POSSIBLE or Additional DISM COMMANDS:
Dism.exe /online /Cleanup-Image /StartComponentCleanup
Dism.exe /Online /Cleanup-Image /AnalyzeComponentStore
Dism.exe /online /Cleanup-Image /StartComponentCleanup /ResetBase
Ideally, a portion of these strategies will fix your Windows 10 high disk usage modern setup host errors:)
Solution #5, Reset Virtual Memory
High disk usage in Windows 10 is the Windows swap file. We can reset that to solve this problem.
To do that:
1st, we need to tap on the Start menu. type control panel in the search box. open your Control panel.
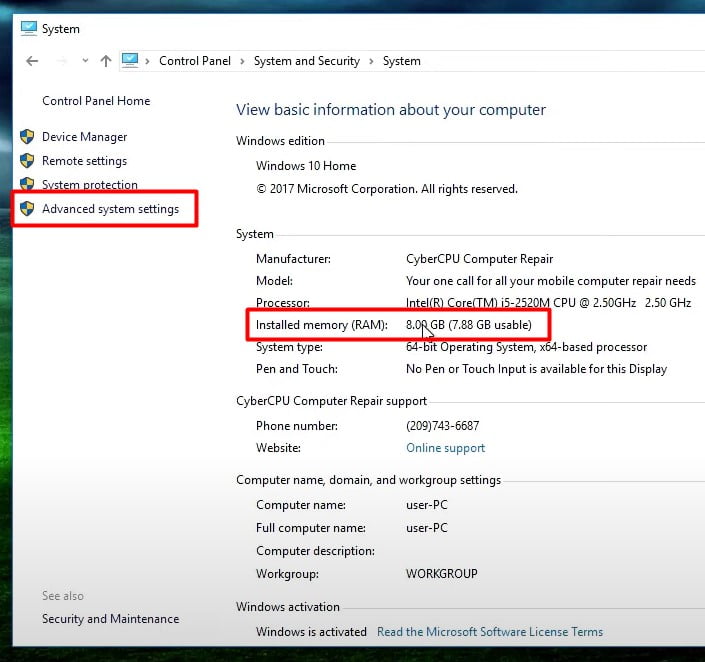
2nd, and click on System and Security option. from the system and security window, you need to hit the system option.
And afterwards, we’re going to observe here how much memory we have. Also, this PC has 8 Gigs RAM. So we’re going to tap on the Advanced system settings link here on the right side.
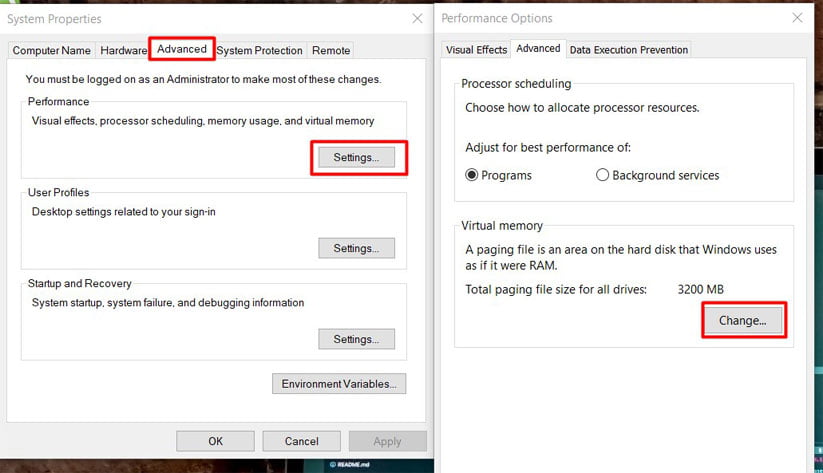
3rd, Click on the Advanced tab, then under the Performance section. We’re going to hit the Settings button.
4th, In the settings window, we click on the Advanced tab. and then go down here to Virtual memory, and we need to hit the Change button.
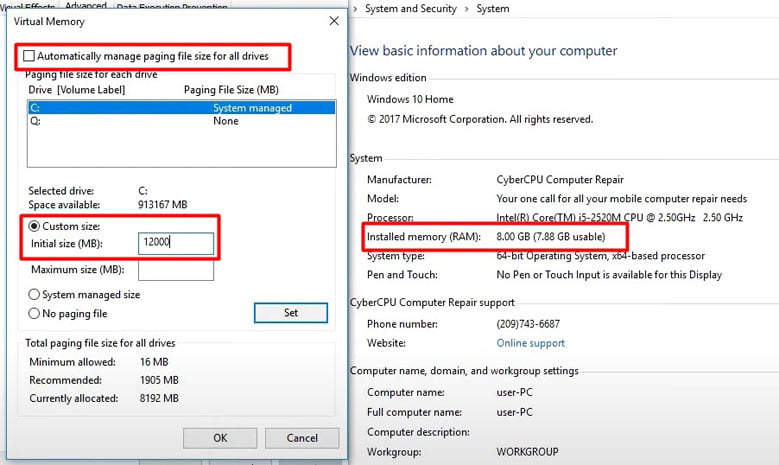
5th, From here, we need to uncheck the “Automatically manage paging file size for all drivers” option, and we want to make the page file 1.5 times the amount of memory we have. So since we have 8 gigs of RAM in the system. our swap file should be 12 gigs.
6th, So we’re gonna click on Custom size. we’re gonna put 12 gigs. and then we’re gonna hit set. and then we’re gonna hit the OK button. and you’re gonna have to restart your computer for these changes to take effect. so we’re gonna hit OK. hit OK again. OK again.
Solution #6, Disable Windows Update
OK, in this section. We’re going to demonstrate to you how you can disable the automatic Windows 10 updating feature. OK, alright, I’m gonna show you ordinarily where it should be, but where it is not now, alright.
1st, so we’re just gonna go down to Start and then Settings. And then we’re gonna go down to Update and security. Now ordinarily, this is where the option to disable the automatic updates would actually be OK.
2nd, Click on Windows Update option > Click on Advanced option > Select the Date how long you need to pause.
Method 2,
We’re gonna simply go down to search and type in control. And then click on the Control panel desktop app at the top of the results.
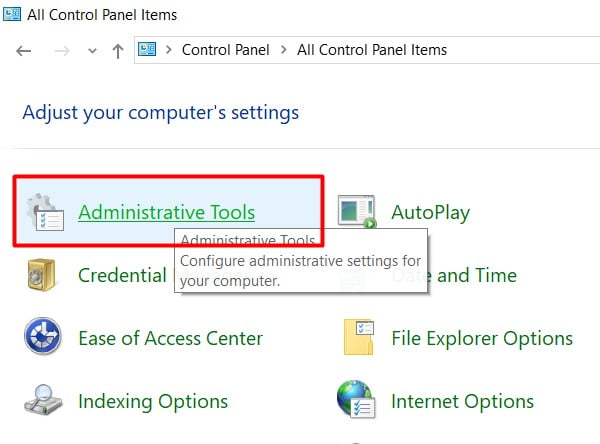
1st, Once the control panel opens, you’re gonna go up to the upper right where it says view by and you’re gonna change that to large icons. so we need to go ahead and click on Administrative Tools right here.
2nd, Alright next after that, you’re going to locate Services down the list. Double-click on that. once the services window opens. well, the services snap in scroll all the way down to the bottom and locate the Windows Update service.
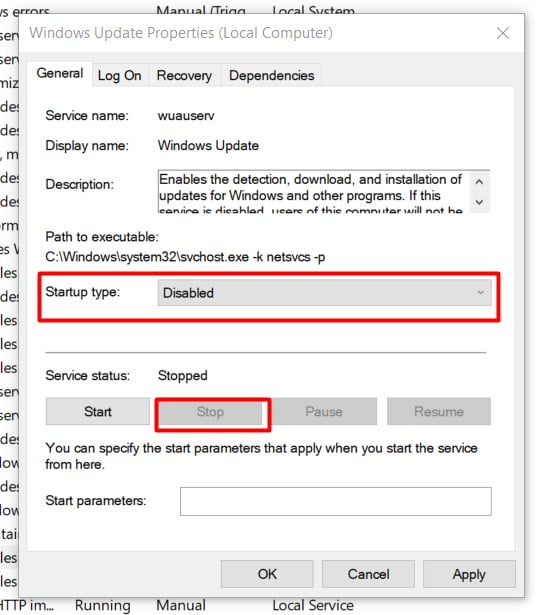
3rd, So we’re gonna double-click on it . Alright, now, this is the exit control of the Windows updates. alright so to stop it from doing the automatic updates just simply click on the Stop button. Now if you just do it this way. It only applies to the local session.
4th, OK, but if you want to disable the automatic updating permanently.
Go up to Startup type and select Disable. OK, and then just OK out of this, all right. You can see down here now where it says it’s actually disabled. OK, and this will apply immediately after you do it.
- How to Make Windows 10 Look Like Windows 7
- Boost Horizon Forbidden West Performance: FSR Frame Gen Mod for RTX 20/30 Series
- MW3: How to CLAIM SECRET FREE Daily Login Rewards?
- Dragon Dogma 2: Where to Find the Sphinx Early in & Solve All Riddles Fast!
- How to Get Bellanoir Raid Boss in Palworld to Spawn?
- Helldivers 2: How to Look Like A Clone Trooper?
- How To Enable FSR Frame Generation For All Graphics Cards?
Solution #7, Check The Default System Language
One of the numerous reasons behind Modern Setup Host error is when the operating system language of your Computer isn’t the default UI language. This is the language framework that is pre-installed on your Computer. You may then have to set the default system as the installed language system.
Windows 10
1st, Open a raised command prompt as Administrator.
2nd, Copy and paste or type the command underneath into the command prompt:
dism /online /get-intl
and press Enter.
Check on Windows 7
1st, Click on the ‘Windows’ button to open the Windows Start Menu and Click on the “Control Panel” option.
2nd, and then click on the “Clock, Language, and Region” category option.
3rd, Afterward click on the “Region and Language” option.
In the “Region and Language” window, guarantee that the language type is set to “English (United States)” and snap on the “Additional Settings” button.
How to change the Language
1st, We will start by heading once again to our Start button. Furthermore, we will left-tap on that. At that point, we will left-tap on the settings option on the left side here.
2nd, left-click on the time and language tile bottom left.
3rd, Presently, left-click on Region and language.
Now, you are able to really choose another country if you need to add additional language.
So we should simply say I don’t know here. How about we simply say where you are in Spain? Furthermore, we should add a language. So we should add Spanish here.
Solution #8, Use of speed boosters
The most disappointing thing, other than popcorn parts stalling out in your teeth, is a slow PC. These are a few tips to help you speed it up. The principal tip is to run a cleanup and security program. It can help you to get rid of the modern setup host 1005 high disk usage problem.
Most of the slow PCs are caused by you knowing viruses or junk files, all that stuff. Also, there are a lot of software out there that are scams when it comes to cleaning up software. Yet, the software that I referenced today in this section is genuine, and all these software programs have free versions accessible.
So you can utilize them free of charge. In any case, they additionally have Pro premium versions available that you can pay for in the event that you certainly need to accelerate your PC to the quickest point possible.
So, there are five pieces of software that I suggest for cleaning up and accelerating your PC. They are Ccleaner, Auslogics Disk Defrag, Revo Uninstaller, Malwarebytes and BitDefender. So Ccleaner, Revo Uninstaller and Auslogics Disk Defrag are three extraordinary system utilities to help clean up your System and get rid of all the brief garbage files.
Disable the things that run in the background. Disable the software programs on startup. uninstall programs that you needn’t bother with. Furthermore, defrag your hard disk. I can’t suggest these sufficiently. I utilize these all when I’m working on another person’s PC so surely try it.
The two most loved security software are BitDefender and Malwarebytes. So BitDefender is the antivirus. Malwarebytes is anti-malware. If you pair both of those together. You will undoubtedly not need to manage any spyware viruses or malware. They work effectively to ensure your system. so ensure you run those and you’re doing scans on your PC with those.
Also Check: How to Make Your Windows 10 PC Run Faster
Solution #9, Running The Windows Update Troubleshooter
Here is a little trick and tip for those who have issues with Windows Update. there is in Windows 7, 8.1 and 10 troubleshooter for Windows Update. Presently, this is something that you can do if Windows updates give you issues. I clarified in this post about ways to really get out of trouble when Windows updates aren’t functioning admirably.
So the initial step is simply going to the control panel in your Windows 10. and Windows 8.1, too. right-click the start button and just go into the control panel. If you are on Windows 7. you can simply tap the Start button. furthermore, go into the control panel. and it’s there on the list.
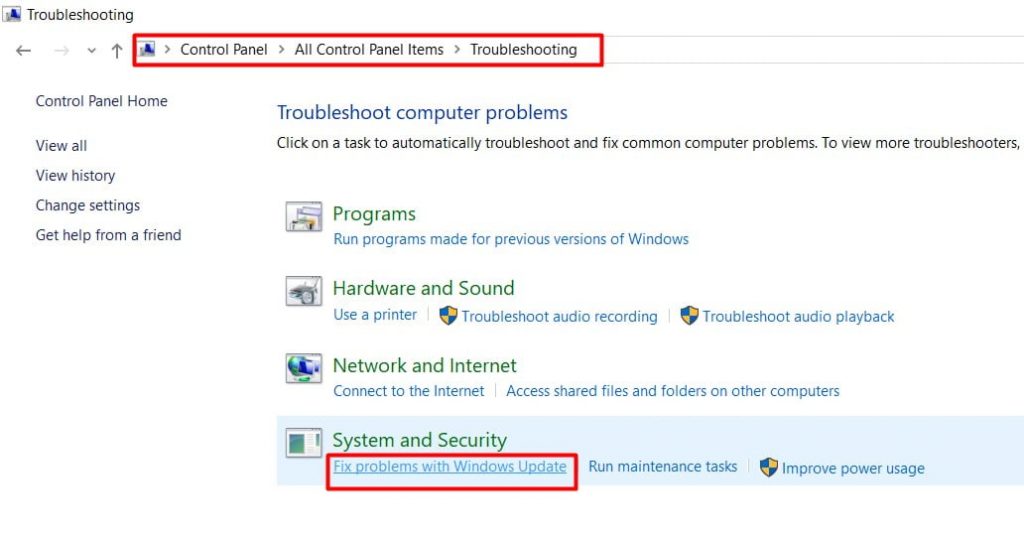
In the control panel. You can see a feature called troubleshooting. Click here. And, in troubleshooting, you can see that something that you have the “Fix problems with Windows Update”. Simply click there and click Next. This is the Windows Update troubleshooter. It checks for stuck updates. It checks for buggy files. And it attempts to fix things.
Presently If you don’t perceive any issues with the standard check, click on try troubleshooting as an administrator. It will obviously check even more deeply because it presently has the privilege to do significantly more in your Windows operating system.
If there are issues, what it’s going to say is alright. I recognized this and this or this, and it’s going to really resemble a somewhat green checkmark. say alright. it’s fixed. we fixed the problems.
Solution #10, Optimize the Startup programs
This is a legitimate process within Windows here. but if you know, this is taking up a little bit too much usage of your systems hardware. I’m going to show you guys how to limit that a little bit hopefully.
Notification
Opening up the start menu. go and start on at one time. type in settings. the best thing should come back with settings directly above the app. to go ahead and lock up on what you want.
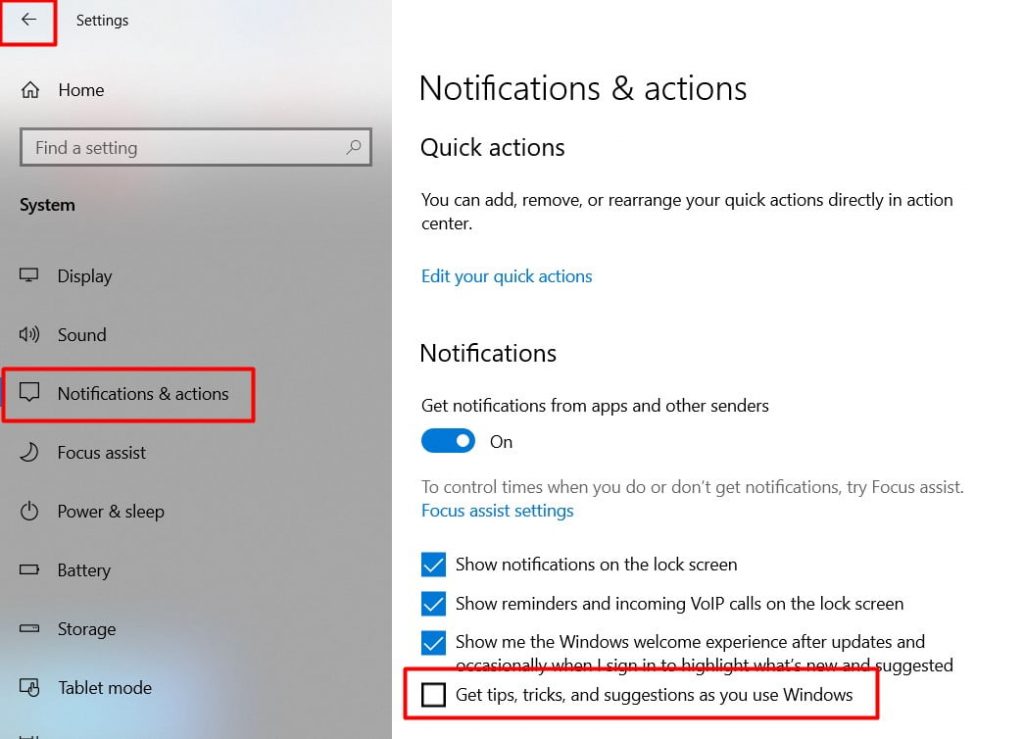
Click on the system tile one time. Now you need to click on Notifications and Actions on the left side.
Underneath the notifications section. you have to uncheck the option where it says, “Get tips trips and suggestions as you use Windows”. so uncheck that box if it’s currently a checkmark.
Start
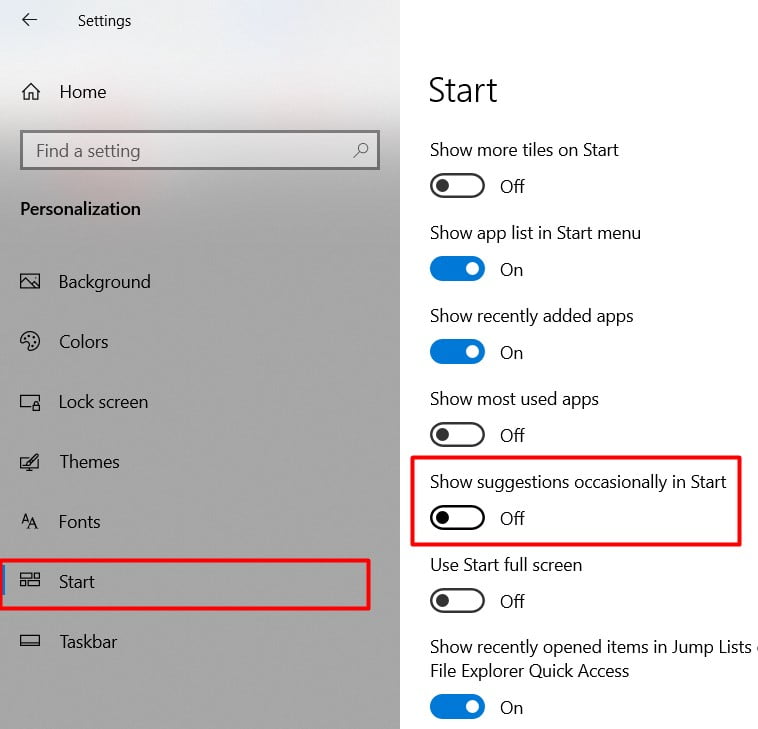
Go to the top bar of this window. So go ahead and click the back arrow to go to the Settings Window. and now you need to go ahead and select the Personalization tile. So let’s start on the left side. And now, it says Show suggestions occasionally at the start.
You need to unselect that, so switch it to the off position by clicking on the button on time. I should turn it off.
Background
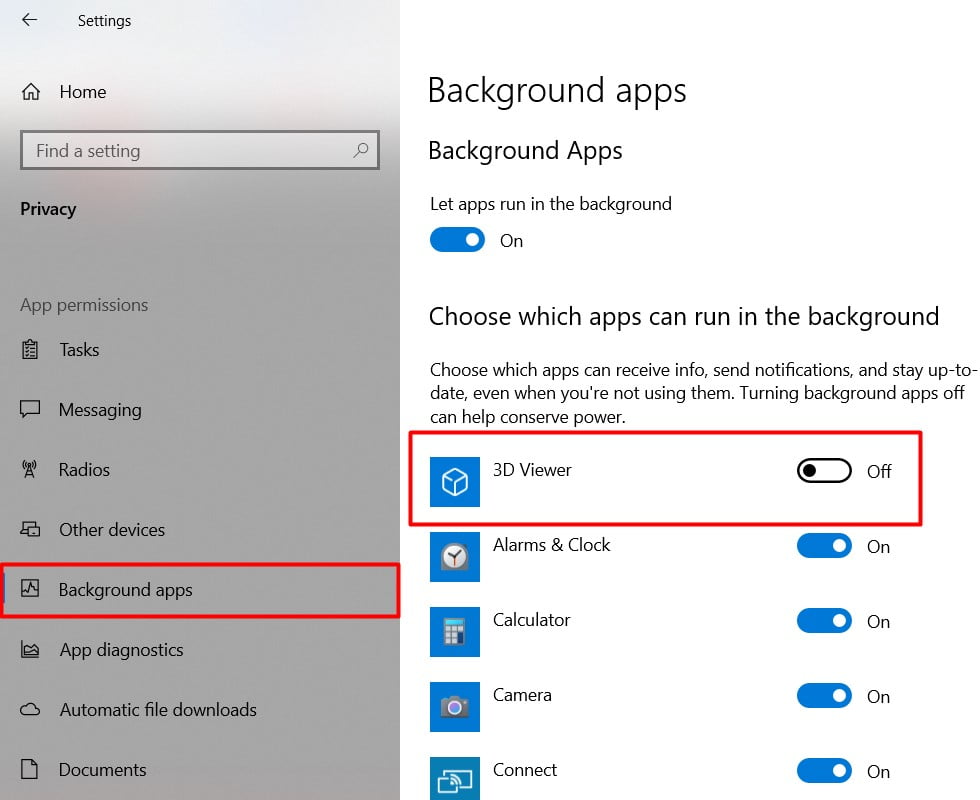
Now go ahead and click the back arrow up at the top once more. And now that you’re back here, you want to go set the privacy tile.
Scroll down on the left side until you find the area that says Background apps. Go ahead, lock hold on that.
And now I personally go through all the apps that are currently given permission to run in the background. And anything you don’t actually really use. You can go ahead and just turn it off.
So it’s just going down the lesson, just toggling the ones you don’t use into the off position. So a pretty straightforward process here, guys. So just go through that shouldn’t be too big of a deal.
Solution #11, Run Windows 10 Media Creation Tool
Install Windows 10 with the utilization of Microsoft’s media creation tool. Now click on this link (Windows 10 Media Creation Tool), where you can proceed to get the tool. This is a guide and simply kind of showing you the way toward installing it. This method helps you to update your system without the modern setup host 100% high disk usage problem.
It’s not continually going to be the same on each PC, so utilize this as a manual to give you somewhat of a thought of what will occur. Furthermore, consistently make sure to back up any significant data before you start doing anything like this.
So we should get into this now and perceive how we’ll experience the process. OK, then, from the desktop, we open our program on the Microsoft media creation tool page.
At that point, we will pick between 32-bit and 64-cycle most PCs presently run 64-digit; mine is running 32. it will not allow you to run some wrong one.
So whenever we have downloaded that, we run it. That will bring up user account control, and click yes to that. And afterwards, we can shut the browser down at this point.
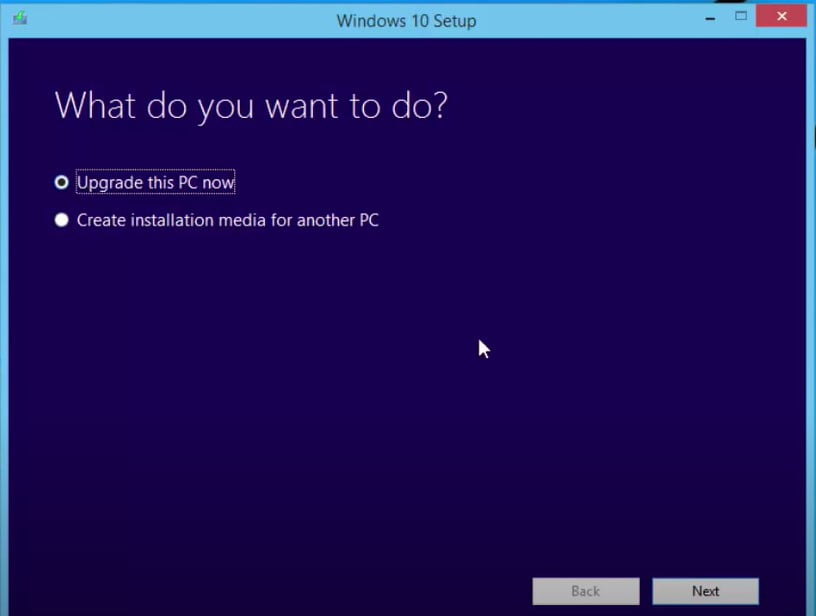
The Windows 10 setup pop-up box will open. Also, we need to choose to upgrade this PC now. And afterwards, click Next. Now Windows 10 will be downloaded, and relying upon the connection will rely upon what amount of time it will require.
Once your download is done, it will, at that point, be verified .then you’ll get a pop-up saying that it’s creating the Windows 10 media.
Then Windows will set up the files and prepare for the installation process. When it’s hit 100%, windows will check for any updates. So you can apply during the installation. And then, it’ll check your system and make sure you’re prepared to install Windows 10.
It will take longer on your PC. At that point, it will check to ensure you have sufficient space on your PC to install. Afterwards, you’ll be given some different options presently because we’re doing an update on this install. We are going to install Windows 10 Pro.
So that is a guide and a look at how to determine the modern setup host error. Or if you notice it is taking up a high amount of disk or 100% CPU usage on your Windows PC. Also, I’d prefer to thank you for reading. If you have any inquiries and ideas, drop them below the comment section and share this helpful post with your companions.